Learn how to implement user authentication to access a secure ArcGIS service with OAuth credentials.
You can use different types of authentication to access secured ArcGIS services. To implement OAuth credentials for user authentication, you can use your ArcGIS account to register an app with your portal and get a Client ID, and then configure your app to redirect users to login with their credentials when the service or content is accessed. This is known as user authentication. If the app uses premium ArcGIS Online services that consume credits, for example, the app user's account will be charged.
In this tutorial, you will build an app that implements user authentication using OAuth credentials so users can sign in and be authenticated through ArcGIS Online to access the ArcGIS World Traffic service.
Prerequisites
Before starting this tutorial:
-
You need an ArcGIS Location Platform or ArcGIS Online account.
-
Confirm that your system meets the system requirements.
-
An IDE for Android development in Kotlin.
Steps
Create OAuth credentials for user authentication
OAuth credentials are required to implement user authentication. These credentials are created as an Application item in your organization's portal.
-
Go to the Create OAuth credentials for user authentication tutorial and create OAuth credentials using your ArcGIS Location Platform or ArcGIS Online account.
-
Copy the
Client IDandRedirect URLas you will use them to implement user authentication in the next step. TheClient IDis found on the Application item's Overview page, while theRedirect URLis found on the Settings page.
Client ID and Redirect URL when implementing OAuth in your app's code. The Client ID is found on the Application item's Overview page, while the Redirect URL is found on the Settings page.The Client ID uniquely identifies your app on the authenticating server. If the server cannot find an app with the provided Client ID, it will not proceed with authentication.
The Redirect URL is used to identify a response from the authenticating server when the system returns control back to your app after an OAuth sign in. You can configure several redirect URLs in your application definition and can remove or edit them. It's important to make sure the redirect URL used in your app's code matches a redirect URL configured for the application.
Open an Android Studio project with Gradle
-
To start this tutorial, complete the Display a map tutorial. Or download and unzip the Display a map solution in a new folder.
-
Modify the old project for use in this new tutorial. Expand More info for instructions.
-
On your file system, delete the .idea folder, if present, at the top level of your project.
-
In the Android tool window, open app > res > values > strings.xml.
In the
<string name="appelement, change the text content to Access services with OAuth 2.0._name" > strings.xmlUse dark colors for code blocks 1 2 4 5Change line <resources> <string name="app_name">Access services with OAuth 2.0</string> </resources> -
In the Android tool window, open Gradle Scripts > settings.gradle.
Change the value of
rootto "Access services with OAuth 2.0".Project.name settings.gradleUse dark colors for code blocks 23 24Change line rootProject.name = "Access services with OAuth 2.0" include ':app' -
Click File > Sync Project with Gradle files. Android Studio will recognize your changes and create a new .idea folder.
-
-
Delete the code that sets your API Key. Since your app will be using OAuth, you will not need to set an API Key.
MainActivity.ktUse dark colors for code blocks 40 41 42 43 44 46 47 48 49Remove line override fun onCreate(savedInstanceState: Bundle?) { super.onCreate(savedInstanceState) setContentView(activityMainBinding.root) setApiKeyForApp() setupMap() }MainActivity.ktUse dark colors for code blocks 61 62 63 64 65Remove line Remove line Remove line Remove line Remove line override fun onDestroy() { mapView.dispose() super.onDestroy() } private fun setApiKeyForApp(){ ArcGISRuntimeEnvironment.setApiKey("YOUR_ACCESS_TOKEN") }
Prepare files before coding the app
Modify the files from the Display a map tutorial so they can be used in this tutorial: you will add imports, modify the view point's scale, define strings for OAuth Client ID and Redirect URL, and add an Android activity for the default OAuth intent receiver.
-
In the Project tool window, make sure that the Android view is displayed. Open app/java/com.example.app, and click MainActivity.kt. Add the following imports, replacing those from the Display a map tutorial.
MainActivity.ktUse dark colors for code blocks package com.example.app import android.os.Bundle import android.util.Log import android.widget.Toast import androidx.appcompat.app.AppCompatActivity import com.esri.arcgisruntime.layers.ArcGISMapImageLayer import com.esri.arcgisruntime.mapping.ArcGISMap import com.esri.arcgisruntime.mapping.BasemapStyle import com.esri.arcgisruntime.mapping.Viewpoint import com.esri.arcgisruntime.mapping.view.MapView import com.esri.arcgisruntime.security.AuthenticationManager import com.esri.arcgisruntime.security.DefaultAuthenticationChallengeHandler import com.esri.arcgisruntime.security.OAuthConfiguration import com.example.app.databinding.ActivityMainBinding import java.net.MalformedURLException class MainActivity : AppCompatActivity() { -
Change the scale of the map's initial viewpoint to 72000.0. This scale will make the secured layer visible without zooming in.
MainActivity.ktUse dark colors for code blocks val map = ArcGISMap(BasemapStyle.ARCGIS_TOPOGRAPHIC) mapView.map = map mapView.setViewpoint(Viewpoint(34.02700, -118.80543, 72000.0)) -
Open app/res/values and click strings.xml. Enter certain values that you specified while creating your OAuth credentials in Create OAuth credentials above.
In string.xml define strings for the OAuth
Client ID, redirect host and uri. Replace the placeholder strings with values from your actual OAuth credentials. The replacement values are not quoted.-
"YOUR_CLIENT_ID": Replace with the
Client IDfor your app. -
"YOUR_REDIRECT_HOST": Replace with the host name portion of your Redirect URL that follows
://. Above, we suggested usingauth. -
"YOUR_REDIRECT_URI": Replace with the protocol identifier of your Redirect URL that precedes
://. This must bemy-app.
strings.xmlUse dark colors for code blocks <resources> <string name="app_name">Access services with OAuth 2.0</string> <string name="oauth_client_id">YOUR_CLIENT_ID</string> <string name="oauth_redirect_host">YOUR_REDIRECT_HOST</string> <string name="oauth_redirect_uri">YOUR_REDIRECT_URI</string> </resources> -
-
Open app/manifests and click AndroidManifest.xml. Add an activity for the default OAuth intent receiver.
AndroidManifest.xmlUse dark colors for code blocks <!-- You must declare this activity, an intent receiver, to display the OAuth sign in --> <activity android:exported="true" android:name="com.esri.arcgisruntime.security.DefaultOAuthIntentReceiver" android:launchMode="singleTask"> <intent-filter> <action android:name="android.intent.action.VIEW" /> <category android:name="android.intent.category.DEFAULT" /> <category android:name="android.intent.category.BROWSABLE" /> <data android:host="@string/oauth_redirect_host" android:scheme="authenticate-with-oauth" /> </intent-filter> </activity> </application>
Implement user authentication using OAuth credentials
ArcGIS Runtime provides an API that abstracts some of the details for user authentication using OAuth 2.0 in your app. You can use classes like
AuthenticationManager
to request, store, and manage credentials for secure resources.
Add code to set up the
AuthenticationManager
. This launches a browser window that challenges the user for sign in credentials.
-
In the
setupfunction, after the line that callsMap() map, create anView.set Viewpoint() OAuthConfiguration.MainActivity.ktUse dark colors for code blocks mapView.setViewpoint(Viewpoint(34.02700, -118.80543, 72000.0)) // set up an OAuth config with URL to portal, a Client ID and a Redirect URL val oAuthConfiguration = OAuthConfiguration( null, getString(R.string.oauth_client_id), getString(R.string.oauth_redirect_uri) + "://" + getString(R.string.oauth_redirect_host) )The
Oconstructor takes three parameters:Auth Configuration -
R.string.oauth: the URL for your organization's portal associated with the ArcGIS Location Platform account or ArcGIS Online account you signed in with during Create OAuth credentials above._client _id -
": theR.string.oauth _client _id" Client IDfrom your Application item's Overview page in your portal. -
": the protocol identifier and host name of theR.string.oauth _redirect _uri" + " R.string.oauth _redirect _host" Redirect URLfrom your Application item's Settings tab in your portal.
-
-
Create a
DefaultAuthenticationChallengeHandlerand set it on theAuthenticationManager. Then add theoto theAuth Configuration Authentication.Manager MainActivity.ktUse dark colors for code blocks mapView.setViewpoint(Viewpoint(34.02700, -118.80543, 72000.0)) // set up an OAuth config with URL to portal, a Client ID and a Redirect URL val oAuthConfiguration = OAuthConfiguration( null, getString(R.string.oauth_client_id), getString(R.string.oauth_redirect_uri) + "://" + getString(R.string.oauth_redirect_host) ) // setup AuthenticationManager to handle auth challenges val defaultAuthenticationChallengeHandler = DefaultAuthenticationChallengeHandler(this) // use the DefaultChallengeHandler to handle authentication challenges AuthenticationManager.setAuthenticationChallengeHandler( defaultAuthenticationChallengeHandler ) // add an OAuth configuration // NOTE: you must add the DefaultOAuthIntentReceiver Activity to the app's manifest to handle starting a browser AuthenticationManager.addOAuthConfiguration(oAuthConfiguration)
Add a traffic layer
You will add a layer to display the ArcGIS World Traffic service, a dynamic map service that presents historical and near real-time traffic information for different regions in the world. This service requires an ArcGIS Online organizational subscription.
ArcGIS World Traffic service data is updated every five minutes to provide traffic speed and traffic incident visualization and identification.
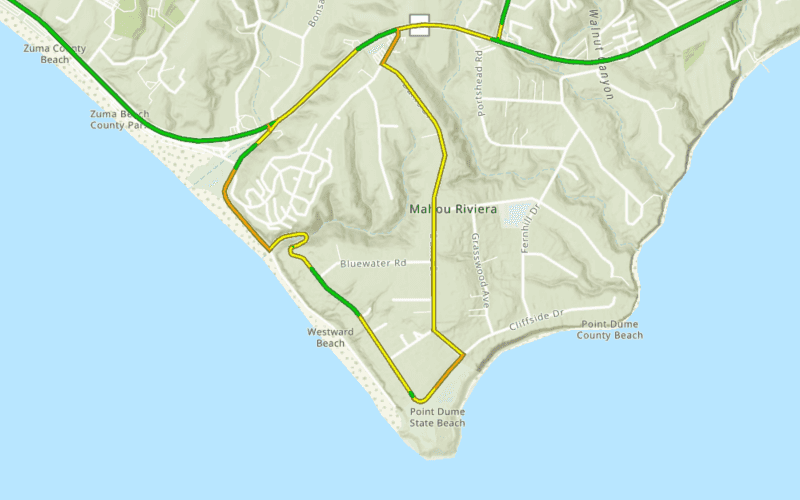
Traffic speeds are displayed as a percentage of free-flow speeds, which is frequently the speed limit or how fast cars tend to travel when unencumbered by other vehicles. The streets are color coded as follows:
- Green (fast): 85 - 100% of free flow speeds
- Yellow (moderate): 65 - 85%
- Orange (slow); 45 - 65%
- Red (stop and go): 0 - 45%
Finally, you will add error code that catches a malformed URL and displays a Toast with the error message.
-
Create an
ArcGISMapImageLayerto display the traffic service. Then add the layer to the map's collection of data layers (operational layers).MainActivity.ktUse dark colors for code blocks 98 99 100 101Add line. Add line. // add an OAuth configuration // NOTE: you must add the DefaultOAuthIntentReceiver Activity to the app's manifest to handle starting a browser AuthenticationManager.addOAuthConfiguration(oAuthConfiguration) val trafficLayer = ArcGISMapImageLayer("https://traffic.arcgis.com/arcgis/rest/services/World/Traffic/MapServer") map.operationalLayers.add(trafficLayer) -
Enclose the code of
setupusing aMap() tryclause. Follow thetrywith acatchclause that takes aMalformedand callsURL Exception log.Error() MainActivity.ktUse dark colors for code blocks 76 77 79 80 81 82 83 84 85 86 87 88 89 90 91 92 93 94 95 96 97 98 99 100 101 102 103 104 105 106 108 112 113Add line. Add line. Add line. Add line. Add line. private fun setupMap() { try { val map = ArcGISMap(BasemapStyle.ARCGIS_TOPOGRAPHIC) mapView.map = map mapView.setViewpoint(Viewpoint(34.02700, -118.80543, 72000.0)) // set up an OAuth config with URL to portal, a Client ID and a Redirect URL val oAuthConfiguration = OAuthConfiguration( null, getString(R.string.oauth_client_id), getString(R.string.oauth_redirect_uri) + "://" + getString(R.string.oauth_redirect_host) ) // setup AuthenticationManager to handle auth challenges val defaultAuthenticationChallengeHandler = DefaultAuthenticationChallengeHandler(this) // use the DefaultChallengeHandler to handle authentication challenges AuthenticationManager.setAuthenticationChallengeHandler( defaultAuthenticationChallengeHandler ) // add an OAuth configuration // NOTE: you must add the DefaultOAuthIntentReceiver Activity to the app's manifest to handle starting a browser AuthenticationManager.addOAuthConfiguration(oAuthConfiguration) val trafficLayer = ArcGISMapImageLayer("https://traffic.arcgis.com/arcgis/rest/services/World/Traffic/MapServer") map.operationalLayers.add(trafficLayer) } catch (e: MalformedURLException) { logError("Error in OAuthConfiguration URL: " + e.message) } } -
Within the
Mainclass, create theActivity logfunction that takes aError() Stringparameter and displays a Toast containing the message.MainActivity.ktUse dark colors for code blocks Add line. Add line. Add line. Add line. Add line. Add line. Add line. Add line. Add line. Add line. /** * Log an error to logcat and to the screen via Toast. * @param message the text to log. */ private fun logError(message: String?) { message?.let { Log.e(TAG, message) Toast.makeText(this, message, Toast.LENGTH_LONG).show() } } -
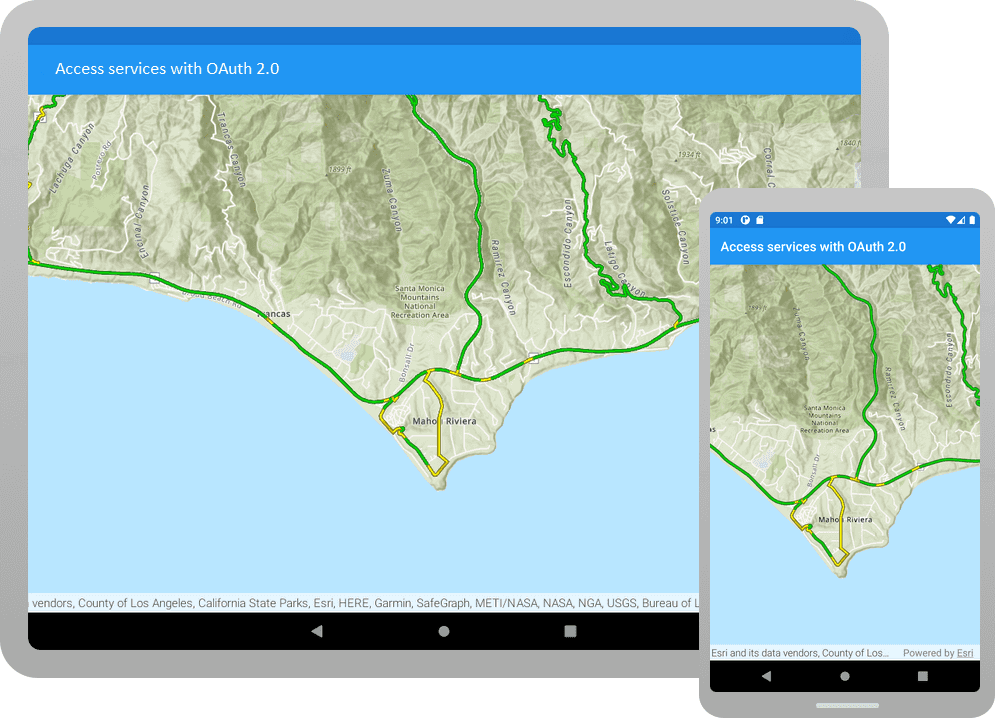
Click Run > Run > app to run the app.
You should see the map with the topographic basemap layer centered on the Santa Monica Mountains in California. You will also see the traffic layer, with its symbology of green, yellow, orange, and red roads to indicate current traffic flow. This is a secured layer, which is visible in your app because the user has entered valid ArcGIS Online username and password.