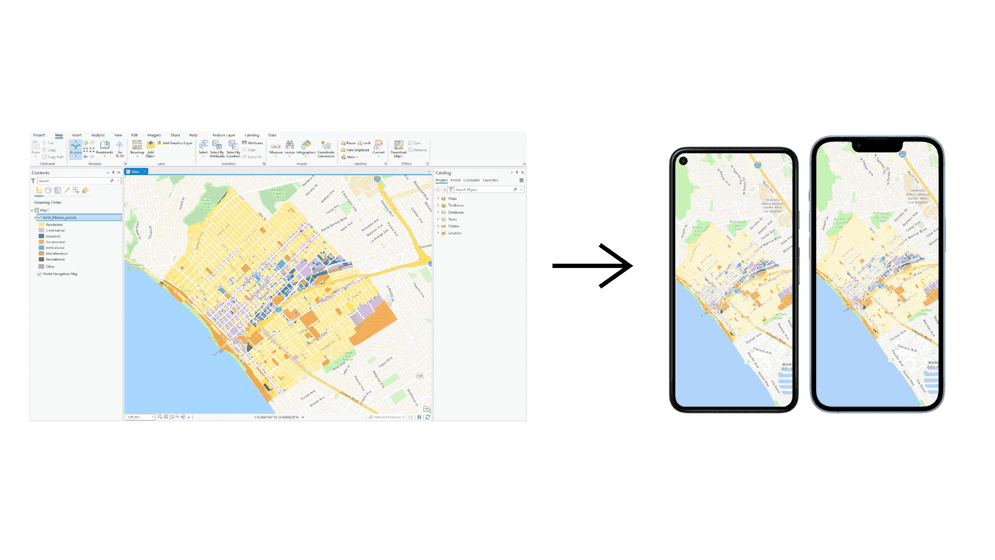
In this workflow, you will learn how to create a feature layer, create an ArcGIS Pro project that shows a map of Santa Monica, California, add the layer into the map, export it as a mobile map package (.mmpk) file, then sideload it into your device to create a fully offline app. You can also add 3D data into your ArcGIS Pro project and export it as a mobile scene package (.mspk) file. However, this workflow will only show how to add a 2D map and export a mobile map package.
Prerequisites
You need an ArcGIS Pro installed and licensed for this tutorial. If you do not have access to ArcGIS Pro, you can start a 21 day free trial.
Steps
1. Prepare the map and data
Download dataset
For this workflow, you will use the Santa Monica Parcels dataset to create a hosted feature layer for your mobile map package.
-
In your web browser, go to the Santa Monica Parcels item.
-
Click the Download button to download the zip file locally.
Import dataset to create a feature layer
You can use ArcGIS Pro to import shapefile data.
- Unzip the Santa Monica parcels zip file.
- The zip file contains the Parcels_Public.shp file.
- Launch ArcGIS Pro.
- Create a new map project.
- A map with
World Topographic MapandWorld Hillshadebasemap layers will be created.
- In the Map ribbon, click on Add Data > Data and select Parcels_Public.shp file.
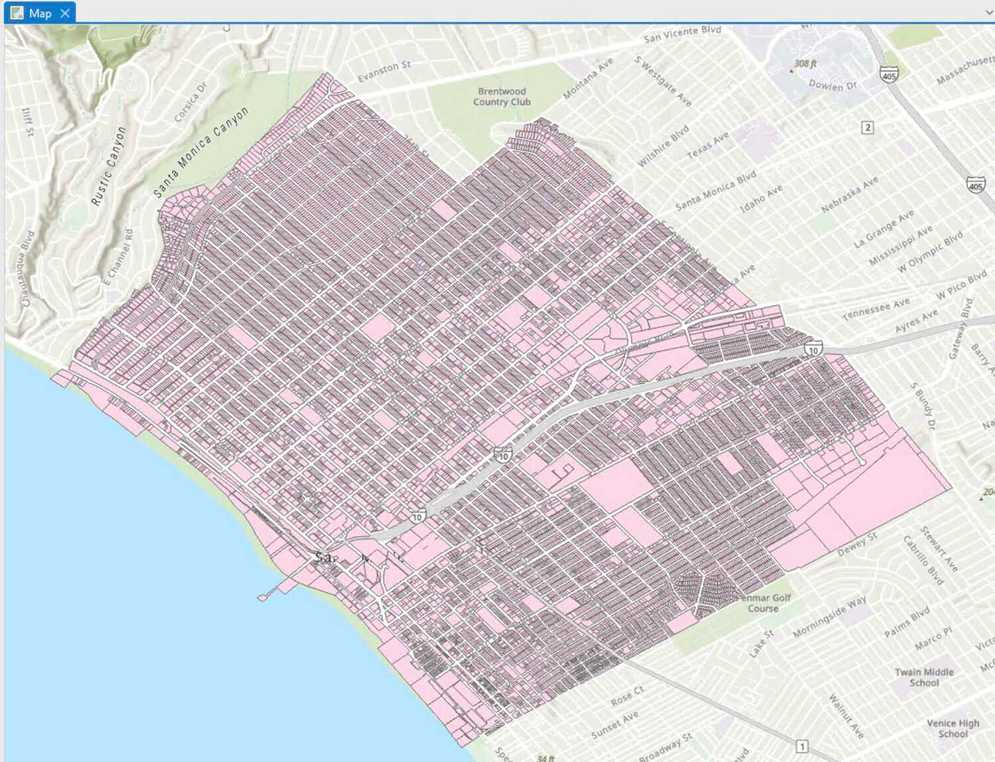
The Parcels_Public.shp file is added as a feature layer to the map.
The feature layer will look something like this:

Set the feature styles
You can use ArcGIS Pro to change the visualization of the Santa Monica parcels layer.
-
In the Content pane, right-click on the feature service and click Symbology.
-
In the Symbology pane, set the following properties:
- Primary symbology:
Unique values - Field 1:
useType
- Primary symbology:
-
In the Classes tab, click on the symbol for Commercial > Properties.
-
Set the fill colors for each
use:Type -
In the Appearance section, click the color button > Color Properties... to display the color palette. Set the following property:
- HEX#:
#c29ed7 - Transparency:
30%
- HEX#:
-
Repeat the above step for the following
use:Types - Fill Color:
- Residential:
#ffde3e - Industrial:
#004c73 - Government:
#fc921f - Institutional:
#149ece - Recreational:
#267300 - Miscellaneous:
#b7814a
- Residential:
- Fill Color:
-
-
Set the outline colors for each
use:Type - In the Appearance section, click the outline color button > Color Properties... to display the color palette. Set the following property for
Commercial:- HEX#:
#ffffff - Transparency:
65%
- HEX#:
- In the Appearance section, set the Outline width to
1.0 pt. - Repeat the above steps for each
use.Type
- In the Appearance section, click the outline color button > Color Properties... to display the color palette. Set the following property for
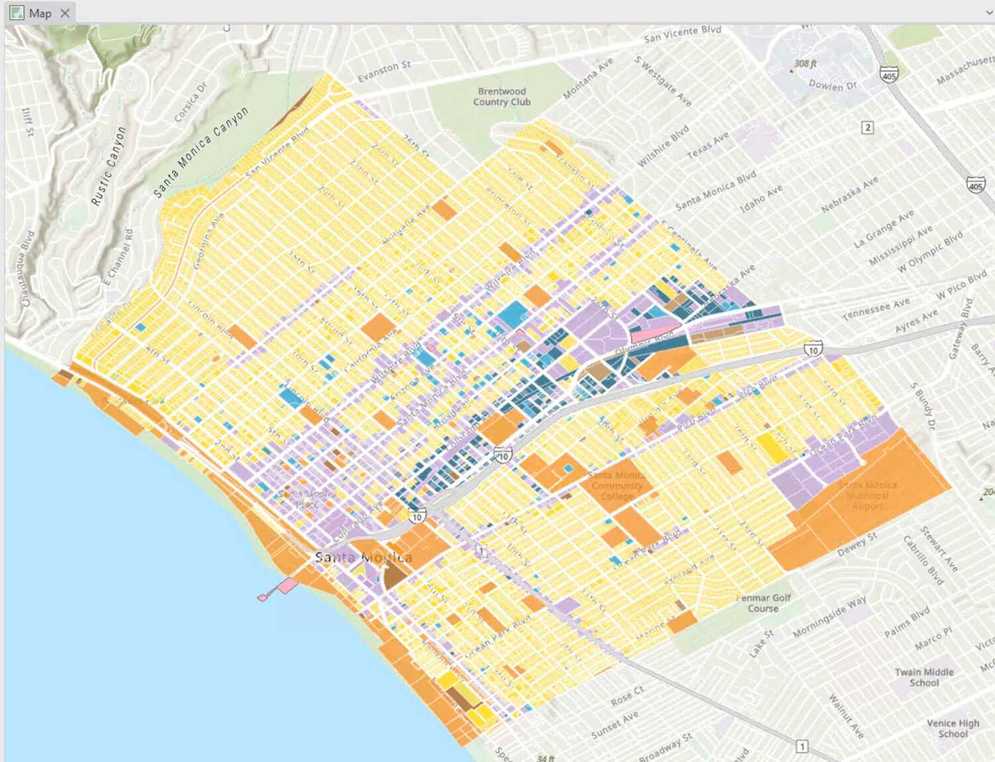
The styled layer will look something like this:

Set up the map in ArcGIS Pro
Now, you will combine the data layer in a map in ArcGIS Pro, ready to export as a mobile map package.
- In the Content pane, click on the Map layer.
- In the Map tab, click Basemap and choose Navigation.
- In the Map tab, click Locate and type
Santa Monicain the search box and then hit the enter key. This will focus the map to the city of Santa Monica, California. Zoom in and out to explore your desired region to take offline.
Create the mobile map package file
The final step is to use a sharing tool in ArcGIS Pro to export the mobile map package. In this case you will clip the layers out that fall within the current visible extent of the map.
- In the main ribbon, click the Share tab and then Mobile Map.
- On the left side of the application in the Package Mobile Map window, set the following properties:
- Select Save package to file to saves a mobile map package
.mmpkfile to local storage. - Name: Click the folder to select a save location for the mobile map package. Name it
Santa.Monica Parcels.mmpk - Summary: Parcels of the city of Santa Monica, California.
- Tags: Santa Monica, Parcels
- Check Current Display Extent. Ensure the map is zoomed to the area you want to package, e.g. Santa Monica.
- Select Save package to file to saves a mobile map package
- Click Package to create the mobile map package.
Your finished mobile map package should be saved as a file named Santa. The file should contain the Santa Monica map and parcels data.
2. Build the app
Setup offline app
-
Install and setup the ArcGIS Maps SDK for .NET on your development machine. Make sure you fulfill the SDK's system requirements.
-
Follow the Display a map tutorial or download the completed solution to get a starter code for this workflow.
-
Open the
.slnfile in Visual Studio.The Visual Studio solution, project, and the namespace for all classes currently use the name
Display. Follow the steps below if you prefer the name to reflect the current tutorial. These steps are not required, your code will still work if you keep the original name.A Map -
Update the name for the solution and the project.
- In Visual Studio, in the Solution Explorer, right-click the solution name and choose Rename. Provide the new name for your solution.
- In the Solution Explorer, right-click the project name and choose Rename. Provide the new name for your project.
-
Rename the namespace used by classes in the project.
- In the Solution Explorer, expand the project node.
- Double-click MapViewModel.cs in the Solution Explorer to open the file.
- In the
Mapclass, double-click the namespace name (View Model Display) to select it, and then right-click and choose Rename....A Map - Provide the new name for the namespace.
- Click Apply in the Rename: DisplayAMap window that appears in the upper-right of the code window. This will rename the namespace throughout your project.
-
Build the project.
- Choose Build > Build solution (or press F6).
Add a mobile map package to the project
You will add a mobile map package (MMPK) to your Visual Studio project. To get an .mmpk file, you can complete the Prepare the map and data step or download its solution.
-
From the Visual Studio Project menu, choose Add > Existing item ....
-
Navigate to the folder that contains your mobile map package. Change the file type in the dialog to
All files (*.*), chooseSanta, then click Add to add it to the project.Monica Parcels.mmpk -
In the Visual Studio Solution Explorer, select
Santa. In the Properties window, set the following properties of the file.Monica Parcels.mmpk - Build Action:
Content - Copy to Output Directory:
Copy always
- Build Action:
Display map from the mobile map package
-
In the Visual Studio > Solution Explorer, double-click MapViewModel.cs to open the file.
-
Add additional required
usingstatements at the top of the class.MapViewModel.csUse dark colors for code blocks 14 15 16 17 18 19 20 21 22Add line. Add line. using System; using System.Collections.Generic; using System.Text; using Esri.ArcGISRuntime.Geometry; using Esri.ArcGISRuntime.Mapping; using System.ComponentModel; using System.Runtime.CompilerServices; using System.Linq; using System.Threading.Tasks; -
In the MapViewModel class, remove all the existing code in the
Setupfunction.Map() -
Modify the signature of the
Setupfunction to include theMap() asynckeyword and to returnTaskrather thanvoid.MapViewModel.csUse dark colors for code blocks 60 61Change line Change line private async Task SetupMap() { }When calling methods asynchronously inside a function (using the
awaitkeyword), theasynckeyword is required in the signature.Although a
voidreturn type would continue to work, this is not considered best practice. Exceptions thrown by anasync voidmethod cannot be caught outside of that method, are difficult to test, and can cause serious side effects if the caller is not expecting them to be asynchronous. The only circumstance whereasync voidis acceptable is when using an event handler, such as a button click.See the Microsoft documentation for more information about Asynchronous programming with async and await.
-
(Optional) Modify the call to
Setup(in theMap() Mapconstructor) to avoid a compilation warning. After changingView Model Setupto an asynchronous method, the following warning appears in the Visual Studio Error List.Map() Use dark colors for code blocks Copy Because this call is not awaited, execution of the current method continues before the call is completed. Consider applying the 'await' operator to the result of the call.Because your code does not anticipate a return value from this call, the warning can be ignored. Your code will run despite the warning. But if you want to be more specific about your intentions with this call and to address the warning, add the following code to store the return value in a discard.
MapViewModel.csUse dark colors for code blocks 33 34 35 37 38Change line public MapViewModel() { _ = SetupMap(); }From the Microsoft documentation:
"[Discards] are placeholder variables that are intentionally unused in application code. Discards are equivalent to unassigned variables; they don't have a value. A discard communicates intent to the compiler and others that read your code: You intended to ignore the result of an expression."
-
Add the following code to the
Setupfunction. This code defines the path to the mobile map package relative to the app, creates the mobile map package using theMap() Mobileconstructor, loads the mobile map package asynchronously, and adds the first map in the mobile map package to theMap Package Map.View Use dark colors for code blocks Add line. Add line. Add line. Add line. Add line. Add line. Add line. Add line. Add line. Add line. Add line. // Define the path to the mobile map package. string pathToMobileMapPackage = System.IO.Path.Combine(Environment.CurrentDirectory, @"SantaMonicaParcels.mmpk"); // Instantiate a new mobile map package. MobileMapPackage santaMonicaParcels_MobileMapPackage = new MobileMapPackage(pathToMobileMapPackage); // Load the mobile map package. await santaMonicaParcels_MobileMapPackage.LoadAsync(); // Show the first map in the mobile map package. this.Map = santaMonicaParcels_MobileMapPackage.Maps.FirstOrDefault();A
Mobilecan contain many maps in aMap Package Mapsarray.Loading the mobile map package is an asynchronous process. The file is read on a thread that does not block the UI.
-
Click Debug > Start Debugging (or press F5 on the keyboard) to run the app.