![Simple offline mapping app](/documentation/static/18c91218a7a0e2d31e80283049597324/4cdf7/web-map-on-demand.png)
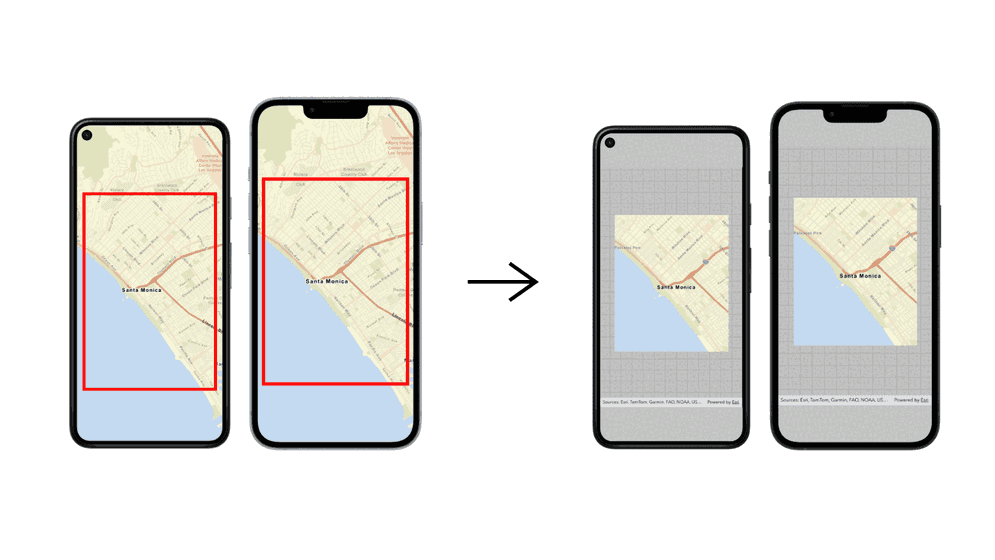
In this workflow, you will learn how to create a web map, enable it for offline use, then use it to create a partially offline app. Later on, your app will request for an area within the map to download. This is also known as the on-demand method because you are defining which areas in the map to take offline on demand.
Prerequisites
You need an account for ArcGIS Online or ArcGIS Enterprise to host data for offline use and get an access token. If you need an account, go to Get started.
Steps
1. Prepare the map and data
Create a web map
To create a web map with the Map Viewer, start by setting the basemap layer. Use the Streets vector tile basemap layer.
-
In your web browser, open the Map Viewer and sign into your ArcGIS account.
-
In the left panel, click Basemap > Current Basemap > Streets.
-
In the left panel, click Basemap to close the window.
Set focus to an area of interest
To specify the viewpoint of the map to an area of interest, use the magnifier icon and set the map properties to preserve map scale.
-
In the bottom right panel, click the magnifier icon.
-
Type in
Santa Monica
in the search field and hit enter. This will set your map focus to an area of interest, which, in this case, is the city of Santa Monica, California. -
In the left panel, click Map properties.
-
Under Map view, toggle on the Preserve map scale. This will ensure that the map focus stays on the city of Santa Monica, California, even after you close the web map.
Your web map should look something like this.
Save the web map
Now that you have a web map, you need to save it to your portal.
- In the left panel, click Save > Save as. At minimum, you need to provide a title and tags for your web map.
By default, your web map sharing level is set to Owner. Later, you will need an access token that is scoped to access the web map item for use in your offline app.
Enable web map for offline use
-
In your web browser, find the item ID at the end of the URL for the web map you just saved.
- For example:
8ab76e9c5352400d87ca3315db9ba08e
- For example:
-
In a new browser tab, copy and paste the following URL and insert your item ID. This will return the item page for your web map, where you can configure it for offline use.
https:
//www.arcgis.com/home/item.html?id=< ITEM_ ID> - For example: https://www.arcgis.com/home/item.html?id=8ab76e9c5352400d87ca3315db9ba08e
-
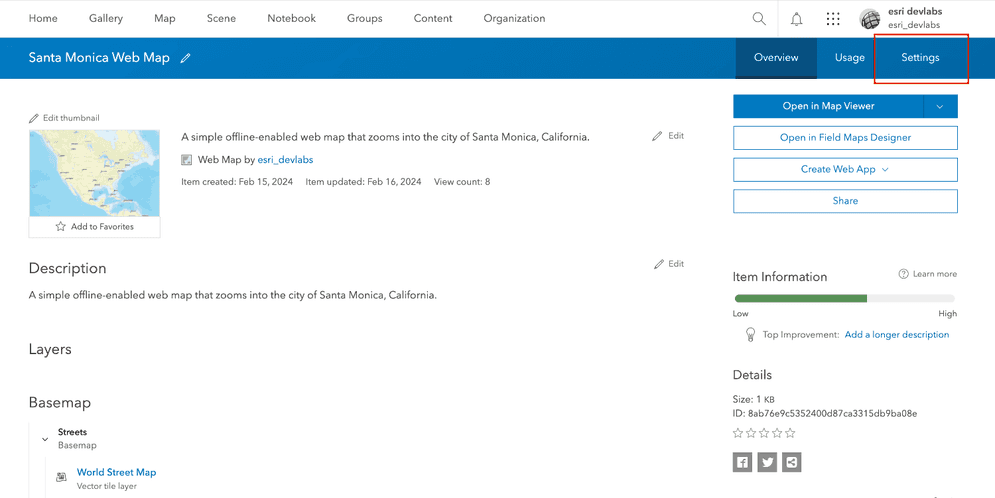
Click Settings on the top bar of the item page.
-
Scroll down to the Offline menu.
-
If you don't see the Offline enabled icon at the top right corner, click Check Compatibility and turn on Offline.
-
Optionally, you can also manage advanced offline settings for your web map by clicking Options. These settings allow you to choose what data or updates mobile devices get and use a tile package for your offline basemap.
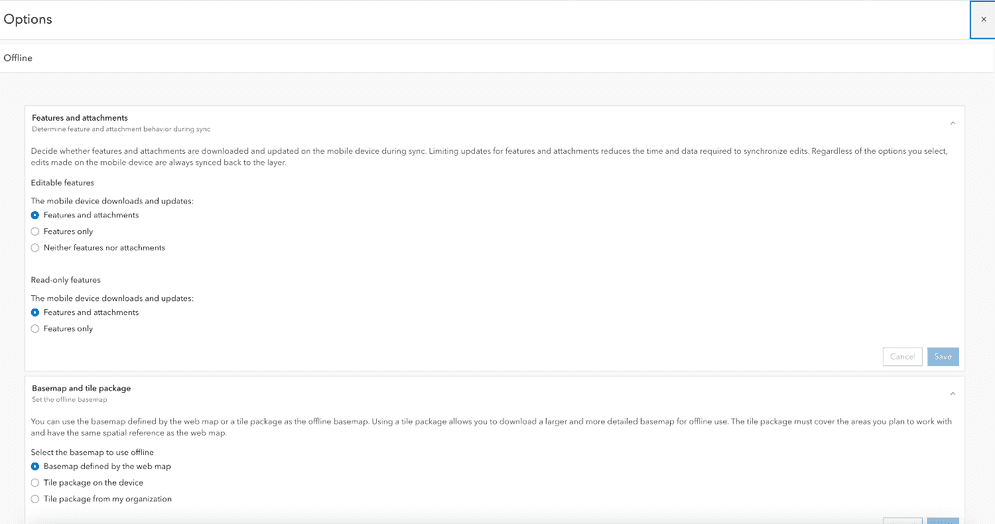
Under Features and attachments, you can configure download behaviors for both editable and read-only features. Adjusting how attachments and features are delivered can reduce the time it takes to synchronize edits, especially in areas of poor connectivity, as well as the amount of cellular data used.
Under Basemap and tile package, you can choose which basemap you want to use on your map. If you choose to use a local tile package, you will provide the filename of the package on your device. If you choose to use a tile package from your organization, you will browse a tile package from your ArcGIS organization.
-
Click Save. Your web map is enabled for offline use now.
2. Build the app
Setup offline app
-
Install and setup the ArcGIS Maps SDK for .NET on your development machine. Make sure you fulfill the SDK's system requirements.
-
Follow the Display a map tutorial or download the completed solution to get a starter code for this workflow.
-
Open the
.sln
file in Visual Studio.The Visual Studio solution, project, and the namespace for all classes currently use the name
Display
. Follow the steps below if you prefer the name to reflect the current tutorial. These steps are not required, your code will still work if you keep the original name.AMap -
Update the name for the solution and the project.
- In Visual Studio, in the Solution Explorer, right-click the solution name and choose Rename. Provide the new name for your solution.
- In the Solution Explorer, right-click the project name and choose Rename. Provide the new name for your project.
-
Rename the namespace used by classes in the project.
- In the Solution Explorer, expand the project node.
- Double-click MapViewModel.cs in the Solution Explorer to open the file.
- In the
Map
class, double-click the namespace name (View Model Display
) to select it, and then right-click and choose Rename....AMap - Provide the new name for the namespace.
- Click Apply in the Rename: DisplayAMap window that appears in the upper-right of the code window. This will rename the namespace throughout your project.
-
Build the project.
- Choose Build > Build solution (or press F6).
-
Install and setup the ArcGIS Maps SDK for Kotlin on your development machine. Make sure you fulfill the SDK's system requirements.
-
Complete the Display a map tutorial. Or download and unzip the Display a map solution in a new folder.
-
Modify the old project for use in this new tutorial. Expand More info for instructions.
-
On your file system, delete the .idea folder, if present, at the top level of your project.
-
In the Android tool window, open app > res > values > strings.xml.
In the
<string name="app_
element, change the text content to a title that suits your app objective.name"> -
In the Android tool window, open Gradle Scripts > settings.gradle.kts.
Change the value of
root
to a title that suits your app objective.Project.name -
The UI theme composable in Display a map tutorial was
Display
. Rename the theme composable throughout the tutorial by refactoringAMap Theme Display
.AMap Theme Right-click the function name
Display
and select Refactor -> Rename. Replace the name with a name that suits your app objective.AMap Theme -
Click File > Sync Project with Gradle files. Android Studio will recognize your changes and create a new .idea folder.
-
-
Install and setup the ArcGIS Maps SDK for Swift on your development machine. Make sure you fulfill the SDK's system requirements.
-
Follow the Display a map tutorial or download the completed solution to get a starter code for this workflow.
-
Install and setup the ArcGIS Maps SDK for Qt on your development machine. Make sure you fulfill the SDK's system requirements.
-
Start Qt Creator.
-
Click File > New File or Project. Under Projects, select ArcGIS.
-
Select the ArcGIS Maps 200.4.0 Qt Quick C++ app project template (or a later version) and click Choose.
You may have several selections for the ArcGIS project type. Be sure to select ArcGIS Maps 200.4.0 Qt Quick C++ app (or a later version).
-
In the Project Location dialog, name your project something that fits your scenario, e.g. Display_an_offline_map. Click Next.
-
In the Define Build System dialog, select qmake for your build system. Click Next.
-
In the Define Project Details dialog, give this app a description or leave as is. Leave the rest of this dialog as is.
-
Leave the 3D project box unchecked. At the ArcGIS Online Basemap dropdown menu, select Streets. Then click Next.
-
On the Kit Selection dialog, check the kit(s) you previously set up when you installed the API. You should select a Desktop kit to run this tutorial. Then click Next.
-
At the Project Management dialog, the option to Add as a subproject to root project is only available if you have already created a root project. Ignore this dialog for this tutorial. Click Next.
Get an access token
By default, the sharing level of an item is set to Owner and requires an access token, such as an API key to access it in a client-side application.
-
Generate an access token according to your ArcGIS account type.
In your web browser, go to ArcGIS.com and sign in with your ArcGIS Online account.
- Click Content > My Content.
- Click the New Item > Developer credentials.
- In the Create developer credentials window, select API key credentials. Click Next.
- Set an expiration date for your API key. API keys can be valid for up to one year. Then, click Next.
- In the Privileges menu, check the following privileges:
- Location services > Basemaps
- In the Grant item access menu, click Browse items.
- Select the web map you just created. Then, click Next.
- Fill out the following properties:
- Title:
API key - Offline app with a web map
- Tags:
offline
,offline map
,web map
,workflow
- Summary: API key used to access Santa Monica Web Map in an offline app.
- Title:
- Click Next.
- Review your selections and, when you are ready, click Next.
- Click Generate the API key and go to item details page. I am ready to copy and save the key.
- Click Next.
- Copy the API key and store it safely. You will not be able to view it again later. If you lose it, you will have to generate another key.
In your web browser, go to your ArcGIS Enterprise portal website and sign in with your ArcGIS Enterprise account.
- Click Content > My Content.
- Click the New Item > Application.
- Under Application Type, select Other application. Click Next.
- Fill out the following properties:
- Title:
App ID - Offline app with a web map
- Tags:
authentication
,appid
,offline
,workflow
- Summary: Access token used to access Santa Monica Web Map in an offline app.
- Title:
- Click Save. Once saved, you will be redirected to the item page.
- Click the Overview tab.
- Under Credentials, Temporary Token click Copy to clipboard to copy the access token.
-
Paste the access token into your code.
App.xaml.csUse dark colors for code blocks Change line public partial class App : Application { protected override void OnStartup(StartupEventArgs e) { base.OnStartup(e); // Note: it is not best practice to store API keys in source code. // The API key is referenced here for the convenience of this example. Esri.ArcGISRuntime.ArcGISRuntimeEnvironment.ApiKey = "YOUR_ACCESS_TOKEN"; } } }
MainActivity.ktUse dark colors for code blocks Change line private fun setApiKey() { ArcGISEnvironment.apiKey = ApiKey.create("YOUR_ACCESS_TOKEN") }
MainApp.swiftUse dark colors for code blocks Add line. Add line. Add line. @main struct MainApp: App { init() { ArcGISEnvironment.apiKey = APIKey("YOUR_ACCESS_TOKEN") } var body: some SwiftUI.Scene { WindowGroup { ContentView() .ignoresSafeArea() } } }
main.cppUse dark colors for code blocks Change line Change line Change line Change line Change line Change line Change line Change line Change line Change line Change line Change line Change line Change line Change line Change line // Use of Esri location services, including basemaps and geocoding, requires // an access token, see the doc: API key authentication // (https://developers.arcgis.com/documentation/security-and-authentication/types-of-authentication/) const QString apiKey = QString(""); // YOUR_ACCESS_TOKEN should be set here if (apiKey.isEmpty()) { qWarning() << "Use of Esri location services, including basemaps, requires" << "you to authenticate with an access token."; } else { ArcGISRuntimeEnvironment::setApiKey(apiKey); }
Download and display the offline map
-
In the Visual Studio > Solution Explorer, double-click MapViewModel.cs to open the file.
The project uses the Model-View-ViewModel (MVVM) design pattern to separate the application logic (view model) from the user interface (view).
Map
contains the view model class for the application, calledView Model.cs Map
. See the Microsoft documentation for more information about the Model-View-ViewModel pattern.View Model -
Add additional required
using
statements at the top of the class.MapViewModel.csUse dark colors for code blocks Add line. Add line. Add line. Add line. Add line. Add line. using System; using System.Collections.Generic; using System.Text; using Esri.ArcGISRuntime.Geometry; using Esri.ArcGISRuntime.Mapping; using System.ComponentModel; using System.Runtime.CompilerServices; using System.Threading.Tasks; using Esri.ArcGISRuntime.Portal; using Esri.ArcGISRuntime.Symbology; using Esri.ArcGISRuntime.Tasks.Offline; using Esri.ArcGISRuntime.UI; using System.Windows; using System.Diagnostics; using System.Drawing;
-
Get the web map item ID from your ArcGIS Online, for example
8ab76e9c5352400d87ca3315db9ba08e
. -
In MapViewModel.cs, modify the
Setup
function to update the web map's item ID to that of the Santa Monica Parcels.Map() The existing code creates a
Portal
using the item ID and aItem Portal
referencing ArcGIS Online. It sets theMap
property to a newView Model.Map Map
created using thePortal
.Item MapViewModel.csUse dark colors for code blocks private async Task SetupMap() { // Create a portal pointing to ArcGIS Online. ArcGISPortal portal = await ArcGISPortal.CreateAsync(); // Create a portal item for a specific web map id. string webMapId = "YOUR_ITEM_ID"; // Replace with your web map ID PortalItem mapItem = await PortalItem.CreateAsync(portal, webMapId); // Create the map from the item. Map map = new Map(mapItem); // Set the view model "Map" property. this.Map = map;
-
In the MapViewModel class, create a new property named
Graphics
. This will be a collection ofOverlays Graphics
to display a graphic of the area to take offline.Overlay Use dark colors for code blocks Add line. Add line. Add line. Add line. Add line. Add line. Add line. Add line. Add line. Add line. private Map? _map; public Map? Map { get { return _map; } set { _map = value; OnPropertyChanged(); } } private GraphicsOverlayCollection? _graphicsOverlays; public GraphicsOverlayCollection? GraphicsOverlays { get { return _graphicsOverlays; } set { _graphicsOverlays = value; OnPropertyChanged(); } }
-
Modify the
Setup
function. Use anMap() Envelope
to create a newBuilder Envelope
that defines an area to take offline.MapViewModel.csUse dark colors for code blocks Add line. Add line. Add line. Add line. Add line. Add line. Add line. Add line. Add line. Add line. // Set the view model "Map" property. this.Map = map; // Define area of interest (envelope) to take offline. EnvelopeBuilder envelopeBldr = new EnvelopeBuilder(SpatialReferences.Wgs84) { XMin = -118.5064, XMax = -118.4800, YMin = 34.0094, YMax = 34.0259 }; Envelope offlineArea = envelopeBldr.ToGeometry();
-
Display a graphic of the area to take offline.
Use a
Simple
and aLine Symbol Simple
to display a newFill Symbol Graphic
of theoffline
with a red outline. Add the graphic to a newArea Graphics
and set theOverlay Map
property to display it in the map view.View Model.Graphics Overlays MapViewModel.csUse dark colors for code blocks Add line. Add line. Add line. Add line. Add line. Add line. Add line. Add line. Add line. Add line. Add line. Add line. Add line. Add line. Add line. Add line. Add line. Envelope offlineArea = envelopeBldr.ToGeometry(); // Create a graphic to display the area to take offline. SimpleLineSymbol lineSymbol = new SimpleLineSymbol(SimpleLineSymbolStyle.Solid, Color.Red, 2); SimpleFillSymbol fillSymbol = new SimpleFillSymbol(SimpleFillSymbolStyle.Solid, Color.Transparent, lineSymbol); Graphic offlineAreaGraphic = new Graphic(offlineArea, fillSymbol); // Create a graphics overlay and add the graphic. GraphicsOverlay areaOverlay = new GraphicsOverlay(); areaOverlay.Graphics.Add(offlineAreaGraphic); // Add the overlay to a new graphics overlay collection. GraphicsOverlayCollection overlays = new GraphicsOverlayCollection { areaOverlay }; // Set the view model's "GraphicsOverlays" property (will be consumed by the map view). this.GraphicsOverlays = overlays;
-
In the Visual Studio > Solution Explorer, double-click MainWindow.xaml to open the file.
-
Use data binding to bind the
Graphics
property of theOverlays Map
to theView Model Map
control.View Data binding and the Model-View-ViewModel (MVVM) design pattern allow you to separate the logic in your app (the view model) from the presentation layer (the view).
MainWindow.xamlUse dark colors for code blocks Add line. <esri:MapView x:Name="MainMapView" Map="{Binding Map, Source={StaticResource MapViewModel}}" GraphicsOverlays="{Binding GraphicsOverlays, Source={StaticResource MapViewModel}}" />
-
Return to the MapViewModel.cs file and add code to the
Setup
function to create anMap Offline
that references the online map by calling the staticM a p Task Offline
method.M a p Task.Create Async MapViewModel.csUse dark colors for code blocks Add line. Add line. // Set the view model's "GraphicsOverlays" property (will be consumed by the map view). this.GraphicsOverlays = overlays; // Create an offline map task using the current map. OfflineMapTask offlineMapTask = await OfflineMapTask.CreateAsync(map);
-
Get default parameters to generate and download the offline map. Modify them to download a read-only offline map.
This tutorial does not involve editing and updating the contents of the offline map. When an offline map is editable, metadata is stored in ArcGIS to track and synchronize edits. Setting the
Generate
toOffline M a p Update Mode N
avoids the overhead of maintaining this metadata in ArcGIS.o Updates MapViewModel.csUse dark colors for code blocks // Create an offline map task using the current map. OfflineMapTask offlineMapTask = await OfflineMapTask.CreateAsync(map); // Create a default set of parameters for generating the offline map from the area of interest. GenerateOfflineMapParameters parameters = await offlineMapTask.CreateDefaultGenerateOfflineMapParametersAsync(offlineArea); parameters.UpdateMode = GenerateOfflineMapUpdateMode.NoUpdates;
-
Set a download location for the offline map.
MapViewModel.csUse dark colors for code blocks Add line. Add line. Add line. // Create a default set of parameters for generating the offline map from the area of interest. GenerateOfflineMapParameters parameters = await offlineMapTask.CreateDefaultGenerateOfflineMapParametersAsync(offlineArea); parameters.UpdateMode = GenerateOfflineMapUpdateMode.NoUpdates; // Build a folder path named with today's date/time in the "My Documents" folder. string documentsFolder = Environment.GetFolderPath(Environment.SpecialFolder.MyDocuments); string downloadDirectory = System.IO.Path.Combine(documentsFolder, "OfflineMap_" + DateTime.Now.ToFileTime().ToString());
This tutorial code creates a new unique folder in the documents folder using the current date and time.
-
Create a new
Generate
using theOffline M a p Job parameters
anddownload
.Directory MapViewModel.csUse dark colors for code blocks Add line. // Build a folder path named with today's date/time in the "My Documents" folder. string documentsFolder = Environment.GetFolderPath(Environment.SpecialFolder.MyDocuments); string downloadDirectory = System.IO.Path.Combine(documentsFolder, "OfflineMap_" + DateTime.Now.ToFileTime().ToString()); GenerateOfflineMapJob generateJob = offlineMapTask.GenerateOfflineMap(parameters, downloadDirectory);
-
Create a function called
Generate
. This function will respond when the job completes or fails and will track the percent complete as the job runs. Add aJ o b_ Progress Changed try/catch
block to handle exceptions and start by getting a reference to theGenerate
, passed in as theOffline M a p Job sender
argument.MapViewModel.csUse dark colors for code blocks Add line. Add line. Add line. Add line. Add line. Add line. Add line. Add line. Add line. Add line. Add line. Add line. Add line. Add line. Add line. // Build a folder path named with today's date/time in the "My Documents" folder. string documentsFolder = Environment.GetFolderPath(Environment.SpecialFolder.MyDocuments); string downloadDirectory = System.IO.Path.Combine(documentsFolder, "OfflineMap_" + DateTime.Now.ToFileTime().ToString()); GenerateOfflineMapJob generateJob = offlineMapTask.GenerateOfflineMap(parameters, downloadDirectory); } private async void GenerateJob_ProgressChanged(object? sender, EventArgs e) { try { var generateJob = sender as GenerateOfflineMapJob; if(generateJob == null) { return; } } catch (Exception ex) { MessageBox.Show($"Error generating offline map: {ex.Message}"); } }
-
If the job succeeds, set the
Map
property with the offline map result. If it fails, notify the user. If the job is running, write the percent complete to the console.View Model.Map MapViewModel.csUse dark colors for code blocks Add line. Add line. Add line. Add line. Add line. Add line. Add line. Add line. Add line. Add line. Add line. Add line. Add line. Add line. Add line. Add line. Add line. try { var generateJob = sender as GenerateOfflineMapJob; if(generateJob == null) { return; } // If the job succeeds, show the offline map in the map view. if (generateJob.Status == Esri.ArcGISRuntime.Tasks.JobStatus.Succeeded) { var result = await generateJob.GetResultAsync(); this.Map = result.OfflineMap; Debug.WriteLine("Generate offline map: Complete"); } // If the job fails, notify the user. else if (generateJob.Status == Esri.ArcGISRuntime.Tasks.JobStatus.Failed) { MessageBox.Show($"Unable to generate a map for that area: {generateJob?.Error?.Message}"); } else { int percentComplete = generateJob.Progress; Debug.WriteLine($"Generate offline map: {percentComplete}%"); } } catch (Exception ex) { MessageBox.Show($"Error generating offline map: {ex.Message}"); }
-
Return to your code in
Setup
and assign theMap Generate
function to handle theJ o b_ Progress Changed Job.Progress
event.Changed() MapViewModel.csUse dark colors for code blocks Add line. GenerateOfflineMapJob generateJob = offlineMapTask.GenerateOfflineMap(parameters, downloadDirectory); generateJob.ProgressChanged += GenerateJob_ProgressChanged;
-
Start the
generate
by calling itsJob Start
method.MapViewModel.csUse dark colors for code blocks Add line. GenerateOfflineMapJob generateJob = offlineMapTask.GenerateOfflineMap(parameters, downloadDirectory); generateJob.ProgressChanged += GenerateJob_ProgressChanged; generateJob.Start(); }
-
Click Debug > Start Debugging (or press F5 on the keyboard) to run the app.
-
In the Android tool window, open app > kotlin+java > com.example.app > screens > MainScreen.kt. Expand the code block below, and replace the existing import statements in your project with the imports needed for this tutorial.
MainScreen.ktUse dark colors for code blocks import com.arcgismaps.geometry.Envelope import com.arcgismaps.geometry.Point import com.arcgismaps.geometry.SpatialReference import com.arcgismaps.mapping.ArcGISMap import com.arcgismaps.mapping.BasemapStyle import com.arcgismaps.mapping.MobileMapPackage import com.arcgismaps.mapping.PortalItem import com.arcgismaps.mapping.Viewpoint import com.arcgismaps.portal.Portal import com.arcgismaps.tasks.offlinemaptask.OfflineMapTask import com.arcgismaps.toolkit.geoviewcompose.MapView
-
Delete code from the Display a map tutorial that will not be used in this workflow.
Display a Map tutorialUse dark colors for code blocks @Composable fun MainScreen() { val map = remember { createMap() } Scaffold( topBar = { TopAppBar(title = { Text(text = stringResource(id = R.string.app_name)) }) } ) { MapView( modifier = Modifier.fillMaxSize().padding(it), arcGISMap = map ) } } fun createMap(): ArcGISMap { return ArcGISMap(BasemapStyle.ArcGISTopographic).apply { initialViewpoint = Viewpoint( latitude = 34.0270, longitude = -118.8050, scale = 72000.0 ) } }
-
Create a
Map
class. Inside it, create the properties shown in the code below.View Model map
, which is initialized using theby
keyword and a mutable state ofArcGISMap
. The initial viewpoint is a zoomed out view, centered on Santa Monica.context
for the application context.download
to hold the path where the downloaded map will be stored on the file system of your device.Location download
, which creates a directory using the download location and deletes the contents, if any, of the directory.Directory TAG
to pass to the logging functions.
MapViewModelUse dark colors for code blocks class MapViewModel( private val application: Application, private val coroutineScope: CoroutineScope, ): AndroidViewModel(application) { var map by mutableStateOf(ArcGISMap(BasemapStyle.ArcGISNavigationNight).apply { initialViewpoint = Viewpoint(Point(y = 34.008954, x = -118.496132, spatialReference = SpatialReference.wgs84()), scale = 100_000.0) }) val context = application.applicationContext private val downloadLocation by lazy { context.getExternalFilesDir(null)?.path + File.separator + "offlineMapOnDemand" } // Use the download path to create a directory. If the directory already exists, clear its contents. val downloadDirectory = File(downloadLocation).apply { // ensure the directory is empty before starting job if (isDirectory && exists()) { deleteRecursively() } } private val TAG = this.javaClass.name }
-
In
Main
, create the variables shown below. Note that theScreen map
variable instantiates theView Model Map
class.View Model MainScreenUse dark colors for code blocks @Composable fun MainScreen() { val application = LocalContext.current.applicationContext as Application val coroutineScope = rememberCoroutineScope() val mapViewModel = remember { MapViewModel(application, coroutineScope) } }
-
In
Main
, callScreen Scaffold
, passing a top bar that displays the name of the app. Inside the content block, callColumn
, which will hold the map view and three buttons.MainScreenUse dark colors for code blocks @Composable fun MainScreen() { val application = LocalContext.current.applicationContext as Application val coroutineScope = rememberCoroutineScope() val mapViewModel = remember { MapViewModel(application, coroutineScope) } Scaffold( topBar = { TopAppBar(title = { Text(text = stringResource(id = R.string.app_name)) }) } ) { Column( modifier = Modifier.fillMaxSize().padding(it) ) { } } }
-
Inside the content block for
Column
, callMap
and pass in the map from the map view model.View MainScreenUse dark colors for code blocks Scaffold( topBar = { TopAppBar(title = { Text(text = stringResource(id = R.string.app_name)) }) } ) { Column( modifier = Modifier.fillMaxSize().padding(it) ) { MapView( modifier = Modifier.fillMaxSize().weight(1f), arcGISMap = mapViewModel.map, ) } }
-
Add two buttons and call the appropriate map view model functions in the
o
callback. We will code those two functions in the rest of this workflow.n Click MainScreenUse dark colors for code blocks MapView( modifier = Modifier.fillMaxSize().weight(1f), arcGISMap = mapViewModel.map, ) Button( onClick = { coroutineScope.launch { mapViewModel.downloadOfflineMapArea() } } ) { Text(text = "Download offline map area") } Button( onClick = { coroutineScope.launch { mapViewModel.accessOfflineMap() } } ) { Text(text= "Access offline map from local file") }
-
The first button will download an area of interest from the Santa Monica web map.
-
Get the web map item ID from your ArcGIS Online, e.g.
8ab76e9c5352400d87ca3315db9ba08e
. -
In the
Map
class, create a suspend function namedView Model download
. Inside the function, create the variables shown in the code below.Offline M a p Area() - An arcgis.com
Portal
. - A
Portal
with portal and the item ID.Item - An
Offline
with the portal item.M a p Task - An
area
, which is anOf Interest Envelope
specifying the area of the web map to be taken offline.
MapViewModelUse dark colors for code blocks suspend fun downloadOfflineMapArea() { val portal = Portal( url = "https://www.arcgis.com", connection = Portal.Connection.Anonymous ) val portalItem = PortalItem( portal = portal, itemId = "YOUR_ITEM_ID" // Replace with your web map ID ) val offlineMapTask = OfflineMapTask(portalItem) // Create an envelope that defines the area to take offline. val areaOfInterest = Envelope( xMin = -118.5064, yMin = 34.0094, xMax = -118.4800, yMax = 34.0259, spatialReference = SpatialReference.wgs84() ) }
- An arcgis.com
-
-
Create default parameters for generating an offline map area on the server and and downloading the area to the file system of your device.
MapViewModelUse dark colors for code blocks val params = offlineMapTask.createDefaultGenerateOfflineMapParameters(areaOfInterest).getOrElse { error -> return showMessage(context, "No default parameters for generate offline map were created: ${error.message}") }
-
Create a job that will generate the offline map area.
- Call
create
and pass the default parameters and the path of the download directory.Generate Offline M a p Job - In a coroutine scope, set up logging for the progress of the job.
- Start the job.
MainViewModelUse dark colors for code blocks val generateOfflineMapJob = offlineMapTask.createGenerateOfflineMapJob( parameters = params, downloadDirectoryPath = downloadDirectory.path.toString() ) coroutineScope.launch { generateOfflineMapJob.progress.collect { progress -> Log.i(TAG, "Downloading offline map. Job progress: $progress%") } } generateOfflineMapJob.start()
- Call
-
From the result of the generate offline map job, get the downloaded offline map. Assign it to the
map
property ofMap
.View Model MapViewModelUse dark colors for code blocks val jobResult = generateOfflineMapJob.result().getOrElse { error -> return showMessage(context, "Generate offline map job failed: ${error.message}") } map = jobResult.offlineMap
-
(Optional) The code in this workflow displays messages to the user and logs activity in Logcat. Here is a possible implementation.
MapViewModelUse dark colors for code blocks private fun showMessage(context: Context, message: String) { Toast.makeText(context, message, Toast.LENGTH_LONG).show() Log.i(TAG, message) }
-
Click Run > Run > app to run the app.
Initially, you should see the web map centered on Santa Monica, CA, zoomed in to a scale of 1:100,000.
Click the Download offline map area button. The download might take from a few seconds to a few minutes, depending on your internet connection and the load on the server.
After the offline map area is downloaded to the Android device, you will see an area of San Monica near the beach, zoomed in closer than the original view point.
-
In Xcode, in the Project Navigator, click ContentView.swift.
-
Create a
Model
and reference it from theView
.ContentView.swiftUse dark colors for code blocks Add line. Add line. Add line. Add line. private class Model: ObservableObject { } struct ContentView: View { @StateObject private var model = Model() @State private var map = { let map = Map(basemapStyle: .arcGISTopographic) map.initialViewpoint = Viewpoint(latitude: 34.02700, longitude: -118.80500, scale: 72_000) return map }() var body: some View { } }
-
Move
map
toModel
and use it inside theMap
. Change theView Viewpoint
of the map to a latitude of34.0200
, a longitude of-118.4685
, and a scale of36_111.909643
.ContentView.swiftUse dark colors for code blocks Change line Change line Change line Change line Change line Remove line Remove line Remove line Remove line Remove line Change line private class Model: ObservableObject { var map = { let map = Map(basemapStyle: .arcGISTopographic) map.initialViewpoint = Viewpoint(latitude: 34.0200, longitude: -118.4685, scale: 36_111.909643) return map }() } struct ContentView: View { @StateObject private var model = Model() @State private var map = { let map = Map(basemapStyle: .arcGISTopographic) map.initialViewpoint = Viewpoint(latitude: 34.02700, longitude: -118.80500, scale: 72_000) return map }() var body: some View { MapView(map: model.map) } }
-
Create a function called
run
that takes a path to store the downloaded web map as a parameter.Offline M a p Task ContentView.swiftUse dark colors for code blocks Add line. Add line. Add line. func runOfflineMapTask(offlineMapURL: URL) async throws { }
-
Define the area that you want to take offline on your web map using a
Polygon
.ContentView.swiftUse dark colors for code blocks Add line. Add line. Add line. Add line. Add line. Add line. let areaOfInterest = Polygon(points: [ Point(x: -118.5064, y: 34.0259, spatialReference: .wgs84), Point(x: -118.4800, y: 34.0259, spatialReference: .wgs84), Point(x: -118.4800, y: 34.0094, spatialReference: .wgs84), Point(x: -118.5064, y: 34.0094, spatialReference: .wgs84) ])
-
Create a portal item representing the web map you just created, e.g.
8ab76e9c5352400d87ca3315db9ba08e
.ContentView.swiftUse dark colors for code blocks Add line. Add line. Add line. Add line. private let santaMonicaWebMap = PortalItem( portal: .arcGISOnline(connection: .anonymous), id: PortalItem.ID("YOUR_ITEM_ID")! // Replace with your web map ID )
-
Create an
Offline
referencing the portal item. This task object reads the offline properties of the web map and manages downloading an offline map from it.M a p Task ContentView.swiftUse dark colors for code blocks Add line. func runOfflineMapTask(offlineMapURL: URL) async throws { let offlineMapTask = OfflineMapTask(portalItem: santaMonicaWebMap) }
-
Get a set of default
Generate Offline Map Parameters
. These parameters describe how the owner of the web map configured the offline map to be generated and downloaded. You can modify the parameters to fine tune the downloaded offline map.Options include whether to download the basemap or use one that has already been downloaded, how to handle attachments, how to handle related records, whether to include data content for editable layers (useful if an offline application focuses on collection new data), and whether to disable offline editing even if the source web map supports editing.
If the map includes layers that use image tiles, then it is important to specify a scale range for downloaded image tiles. Use the overload constructor and specify minimum scale and maximum scale.
ContentView.swiftUse dark colors for code blocks Add line. func runOfflineMapTask(offlineMapURL: URL) async throws { let offlineMapTask = OfflineMapTask(portalItem: santaMonicaWebMap) let parameters = try await offlineMapTask.makeDefaultGenerateOfflineMapParameters(areaOfInterest: areaOfInterest) }
-
Use the parameters to create a
Generate Offline Map Job
to download the offline map, specifying the download location.ContentView.swiftUse dark colors for code blocks Add line. func runOfflineMapTask(offlineMapURL: URL) async throws { let offlineMapTask = OfflineMapTask(portalItem: santaMonicaWebMap) let parameters = try await offlineMapTask.makeDefaultGenerateOfflineMapParameters(areaOfInterest: areaOfInterest) let job = offlineMapTask.makeGenerateOfflineMapJob(parameters: parameters, downloadDirectory: offlineMapURL) }
-
Start the job and wait for it to complete, returning a
map
, which is ready for use.ContentView.swiftUse dark colors for code blocks Add line. Add line. Add line. func runOfflineMapTask(offlineMapURL: URL) async throws { let offlineMapTask = OfflineMapTask(portalItem: santaMonicaWebMap) let parameters = try await offlineMapTask.makeDefaultGenerateOfflineMapParameters(areaOfInterest: areaOfInterest) let job = offlineMapTask.makeGenerateOfflineMapJob(parameters: parameters, downloadDirectory: offlineMapURL) job.start() let output = try await job.output map = output.offlineMap }
-
The function is now ready to be called to download an offline map area. You can trigger this function from a button click or from the main function.
-
In Projects, double-click Headers > Display_an_offline_map.h to open the file. Add the following classes to the header file.
Display_an_offline_map.hUse dark colors for code blocks Add line. Add line. namespace Esri::ArcGISRuntime { class Map; class MapQuickView; class PortalItem; class OfflineMapTask; }
-
Add the
generate
function declaration and member variablesM a p By Extent() m_
andportal Item m_
. Save and close the file.offline M a p Task Display_an_offline_map.hUse dark colors for code blocks Add line. Add line. Add line. private: Esri::ArcGISRuntime::MapQuickView* mapView() const; void setMapView(Esri::ArcGISRuntime::MapQuickView* mapView); Esri::ArcGISRuntime::Map* m_map = nullptr; Esri::ArcGISRuntime::MapQuickView* m_mapView = nullptr; void generateMapByExtent(); Esri::ArcGISRuntime::PortalItem* m_portalItem = nullptr; Esri::ArcGISRuntime::OfflineMapTask* m_offlineMapTask = nullptr; };
-
In Projects, double-click Sources > Display_an_offline_map.cpp to open the file. Remove the
#include
statement forMap
because the map will be provided by the offline map.Types.h Display_an_offline_map.cppUse dark colors for code blocks Remove line #include "Display_an_offline_map.h" #include "Map.h" #include "MapTypes.h" #include "MapQuickView.h"
-
Add the following
#include
statements. These classes are needed for this application.Display_an_offline_map.cppUse dark colors for code blocks Add line. Add line. Add line. Add line. Add line. Add line. Add line. Add line. Add line. Add line. Add line. Add line. Add line. Add line. Add line. Add line. Add line. Add line. Add line. Add line. Add line. Add line. #include "Display_an_offline_map.h" #include "Map.h" #include "MapQuickView.h" #include "Envelope.h" #include "EnvelopeBuilder.h" #include "Error.h" #include "GenerateOfflineMapParameters.h" #include "GenerateOfflineMapJob.h" #include "GenerateOfflineMapResult.h" #include "Graphic.h" #include "GraphicListModel.h" #include "GraphicsOverlay.h" #include "GraphicsOverlayListModel.h" #include "OfflineMapTask.h" #include "Portal.h" #include "PortalItem.h" #include "SimpleFillSymbol.h" #include "SimpleLineSymbol.h" #include "SpatialReference.h" #include "SymbolTypes.h" #include "TaskTypes.h" #include <QFuture> #include <QDir> #include <QUuid>
-
Delete the comma after
QObject(parent)
and remove theMap
from the constructor.Display_an_offline_map.cppUse dark colors for code blocks Remove line using namespace Esri::ArcGISRuntime; Display_an_mmpk::Display_an_mmpk(QObject* parent /* = nullptr */): QObject(parent), m_map(new Map(BasemapStyle::ArcGISStreets, this))
-
Get the web map item ID from your ArcGIS Online, e.g.
8ab76e9c5352400d87ca3315db9ba08e
-
Instantiate a
Portal
and from that, aPortal
using the web map item ID. Use that to create a newItem Map
. Then create a newOffline
referencing that portal item.M a p Task Display_an_offline_map.cppUse dark colors for code blocks Add line. Add line. Add line. Add line. Display_an_offline_map::Display_an_offline_map(QObject* parent /* = nullptr */): QObject(parent) { Portal* portal = new Portal(false, this); m_portalItem = new PortalItem(portal, "YOUR_ITEM_ID", this); // Replace with your web map ID m_map = new Map(m_portalItem, this); m_offlineMapTask = new OfflineMapTask(m_portalItem, this);
-
Add the call to
generate
.M a p By Extent Display_an_offline_map.cppUse dark colors for code blocks Add line. // Set the view (created in QML) void Display_an_offline_map::setMapView(MapQuickView* mapView) { if (!mapView || mapView == m_mapView) { return; } m_mapView = mapView; m_mapView->setMap(m_map); generateMapByExtent();
-
Begin to implement the
generate
function. UseM a p By Extent() Envelope
to set four parameters and then callBuilder t
to create the envelope.o Envelope() Display_an_offline_map.cppUse dark colors for code blocks Add line. Add line. Add line. Add line. Add line. Add line. Add line. Add line. Add line. Add line. Add line. Add line. // Set the view (created in QML) void Display_an_offline_map::setMapView(MapQuickView* mapView) { if (!mapView || mapView == m_mapView) { return; } m_mapView = mapView; m_mapView->setMap(m_map); generateMapByExtent(); emit mapViewChanged(); } void Display_an_offline_map::generateMapByExtent() { // Create envelope to define area of interest EnvelopeBuilder* envelopeBuilder = new EnvelopeBuilder(SpatialReference::wgs84(), this); envelopeBuilder->setXMin(-118.5064); envelopeBuilder->setXMax(-118.4800); envelopeBuilder->setYMin(34.0094); envelopeBuilder->setYMax(34.0259); Envelope offlineArea = envelopeBuilder->toEnvelope(); }
-
Add a graphic to
generate
to show the area you will take offline.M a p By Extent() Create a
Graphic
using the envelope,Simple
andFill Symbol Simple
. From this create aLine Symbol Graphics
and add it to theOverlay map
.View Display_an_offline_map.cppUse dark colors for code blocks Add line. Add line. Add line. Add line. Add line. Add line. Add line. Add line. void Display_an_offline_map::generateMapByExtent() { // Create envelope to define area of interest EnvelopeBuilder* envelopeBuilder = new EnvelopeBuilder(SpatialReference::wgs84(), this); envelopeBuilder->setXMin(-118.5064); envelopeBuilder->setXMax(-118.4800); envelopeBuilder->setYMin(34.0094); envelopeBuilder->setYMax(34.0259); Envelope offlineArea = envelopeBuilder->toEnvelope(); Graphic* box = new Graphic(offlineArea, new SimpleFillSymbol(SimpleFillSymbolStyle::Solid, Qt::transparent, new SimpleLineSymbol(SimpleLineSymbolStyle::Solid, Qt::red, 3, this), this), this); GraphicsOverlay* boxOverlay = new GraphicsOverlay(this); boxOverlay->graphics()->append(box); // add graphics overlay to the map view m_mapView->graphicsOverlays()->append(boxOverlay);
-
Add the following
create
method that creates aDefault Generate Offline M a p Parameters Async Generate
object. These offline map parameters will serves as the input to create aOffline M a p Parameters Generate
. Store the resulting offline mobile map package (MMPK) at a desired local folder.Offline M a p Job Display_an_offline_map.cppUse dark colors for code blocks Add line. Add line. Add line. Add line. Add line. Add line. Add line. Add line. Add line. Add line. Graphic* box = new Graphic(offlineArea, new SimpleFillSymbol(SimpleFillSymbolStyle::Solid, Qt::transparent, new SimpleLineSymbol(SimpleLineSymbolStyle::Solid, Qt::red, 3, this), this), this); GraphicsOverlay* boxOverlay = new GraphicsOverlay(this); boxOverlay->graphics()->append(box); // add graphics overlay to the map view m_mapView->graphicsOverlays()->append(boxOverlay); // generate the offline map parameters m_offlineMapTask->createDefaultGenerateOfflineMapParametersAsync(offlineArea) .then(this,[this](const GenerateOfflineMapParameters& params) { // Output to generate offline map job after offline map parameters are created. // Store the resulting mmpk in the desired path. const QString outputPath = QDir::homePath() + "/ArcGIS/Runtime/Data/offlinemap.mmpk"; GenerateOfflineMapJob* generateJob = m_offlineMapTask->generateOfflineMap(params, outputPath); if (!generateJob) return;
-
Add a
connect
that monitors the status of theGenerate
and returns changes to status.Offline M a p Job Display_an_offline_map.cppUse dark colors for code blocks Add line. Add line. Add line. Add line. Add line. Add line. Add line. Add line. Add line. Add line. Add line. Add line. Add line. Add line. Add line. Add line. Add line. // generate the offline map parameters m_offlineMapTask->createDefaultGenerateOfflineMapParametersAsync(offlineArea) .then(this,[this](const GenerateOfflineMapParameters& params) { // Output to generate offline map job after offline map parameters are created. // Store the resulting mmpk in the desired path. const QString outputPath = QDir::homePath() + "/ArcGIS/Runtime/Data/offlinemap.mmpk"; GenerateOfflineMapJob* generateJob = m_offlineMapTask->generateOfflineMap(params, outputPath); if (!generateJob) return; // use connect to monitor job status for changes and return job status connect(generateJob, &GenerateOfflineMapJob::statusChanged, this, [this, generateJob]() { if (generateJob->jobStatus() == JobStatus::Succeeded) { qDebug() << "generating offline map"; m_mapView->setMap(generateJob->result()->offlineMap(this)); qDebug() << (generateJob->error().isEmpty() ? "No errors" : (generateJob->error().message() + generateJob->error().additionalMessage())); } else if (generateJob->jobStatus() == JobStatus::Failed) { qWarning() << generateJob->error().message() << generateJob->error().additionalMessage(); } });
-
Add another
connect
(optional) that displays progress of theGenerate
as the job executes. Add the final codeOffline M a p Job generate
and the final closing code (required) to complete the first connect function.Job->start() Display_an_offline_map.cppUse dark colors for code blocks Add line. Add line. Add line. Add line. Add line. Add line. Add line. Add line. // use connect to monitor job status for changes and return job status connect(generateJob, &GenerateOfflineMapJob::statusChanged, this, [this, generateJob]() { if (generateJob->jobStatus() == JobStatus::Succeeded) { qDebug() << "generating offline map"; m_mapView->setMap(generateJob->result()->offlineMap(this)); qDebug() << (generateJob->error().isEmpty() ? "No errors" : (generateJob->error().message() + generateJob->error().additionalMessage())); } else if (generateJob->jobStatus() == JobStatus::Failed) { qWarning() << generateJob->error().message() << generateJob->error().additionalMessage(); } }); // use connect to monitor job progress changes and return progress return job progress connect(generateJob, &GenerateOfflineMapJob::progressChanged, this, [generateJob]() { qDebug() << "Job status:" << generateJob->progress() << "%"; }); generateJob->start(); });
-
Press Ctrl + R to run the app.
Initially, you should see the map Santa Monica, CA, with a red outline as before. At the Application Output tab in Creator, the Job status
percentage should increment up to 100%, and then you should see the offline map for the specified area of Santa Monica, CA. Remove your network connection and you will still be able to use the mouse to drag, scroll, and double-click the map view to explore this offline map.
Access the offline map
-
Inside
Map
, create aView Model.cs private async
function returning aTask
calledAccess
.Map() MapViewModel.csUse dark colors for code blocks Copy private async Task AccessMap() { }
-
Inside the function, create a
Mobile
that references the path to the downloaded offline map area.M a p Package MapViewModel.csUse dark colors for code blocks Add line. private async Task AccessMap() { var mobileMapPackage = await MobileMapPackage.OpenAsync(_downloadLocation); }
-
Load the mobile map package and read the
Map
from it.MapViewModel.csUse dark colors for code blocks Add line. Add line. private async Task AccessMap() { var mobileMapPackage = await MobileMapPackage.OpenAsync(_downloadLocation); await mobileMapPackage.LoadAsync(); this.Map = mobileMapPackage.Maps.First(); }
-
The function is now ready to be called to access a previously downloaded offline map area. You can trigger this function from a UI button click or by calling it directly from the constructor.
-
Click Debug > Start Debugging (or press F5 on the keyboard) to run the app.
-
Create a function called
access
. Inside it, check if the offline map package exists on the device file system.Offline Map() MapViewModelUse dark colors for code blocks suspend fun accessOfflineMap() { if (!File(downloadLocation).exists()) { return showMessage(context, "No offline map!") } val mobileMapPackage = MobileMapPackage(downloadLocation) mobileMapPackage.load().onFailure { error -> return showMessage(context, "Mobile map package failed to load: ${error.message}") } map = mobileMapPackage.maps.first() }
-
Create a
Mobile
referencing the path to the offline map. Then load the mobile map package.M a p Package MapViewModelUse dark colors for code blocks suspend fun accessOfflineMap() { if (!File(downloadLocation).exists()) { return showMessage(context, "No offline map!") } val mobileMapPackage = MobileMapPackage(downloadLocation) mobileMapPackage.load().onFailure { error -> return showMessage(context, "Mobile map package failed to load: ${error.message}") } map = mobileMapPackage.maps.first() }
-
Read the first
map
from the mobile map package.MapViewModelUse dark colors for code blocks suspend fun accessOfflineMap() { if (!File(downloadLocation).exists()) { return showMessage(context, "No offline map!") } val mobileMapPackage = MobileMapPackage(downloadLocation) mobileMapPackage.load().onFailure { error -> return showMessage(context, "Mobile map package failed to load: ${error.message}") } map = mobileMapPackage.maps.first() }
-
Create a function called
make
which accepts a file path of the downloaded offline map as a parameter.Mobile M a p Package ContentView.swiftUse dark colors for code blocks Add line. Add line. Add line. func makeMobileMapPackage(offlineMapURL: URL) async throws { }
-
Create a
Mobile
referencing the downloaded offline map.M a p Package ContentView.swiftUse dark colors for code blocks Add line. func makeMobileMapPackage(offlineMapURL: URL) async throws { let mobileMapPackage = MobileMapPackage(fileURL: offlineMapURL) }
-
Load the mobile map package and read the
map
from it.ContentView.swiftUse dark colors for code blocks Add line. Add line. func makeMobileMapPackage(offlineMapURL: URL) async throws { let mobileMapPackage = MobileMapPackage(fileURL: offlineMapURL) try await mobileMapPackage.load() let map = mobileMapPackage.maps.first }
-
The function is now ready to be called to access a previously downloaded offline map area. You can trigger this function from a button click or from the main function.
-
In Projects, double-click Headers > Display_an_offline_map.h to open the file. Add the
access
function declaration.Offline Map() Display_an_offline_map.hUse dark colors for code blocks Add line. private: Esri::ArcGISRuntime::MapQuickView* mapView() const; void setMapView(Esri::ArcGISRuntime::MapQuickView* mapView); Esri::ArcGISRuntime::Map* m_map = nullptr; Esri::ArcGISRuntime::MapQuickView* m_mapView = nullptr; void generateMapByExtent(); Esri::ArcGISRuntime::PortalItem* m_portalItem = nullptr; Esri::ArcGISRuntime::OfflineMapTask* m_offlineMapTask = nullptr; void accessOfflineMap(); };
-
In Projects, double-click Sources > Display_an_offline_map.cpp to open the file. Then, add the following
#include
statement.Display_an_offline_map.hUse dark colors for code blocks Add line. #include "Envelope.h" #include "EnvelopeBuilder.h" #include "Error.h" #include "GenerateOfflineMapParameters.h" #include "GenerateOfflineMapJob.h" #include "GenerateOfflineMapResult.h" #include "Graphic.h" #include "GraphicListModel.h" #include "GraphicsOverlay.h" #include "GraphicsOverlayListModel.h" #include "OfflineMapTask.h" #include "Portal.h" #include "PortalItem.h" #include "SimpleFillSymbol.h" #include "SimpleLineSymbol.h" #include "SpatialReference.h" #include "SymbolTypes.h" #include "TaskTypes.h" #include <QFuture> #include <QDir> #include <QUuid> #include "MobileMapPackage.h"
-
Create a
Mobile
that references the path where the downloaded web map area is located.M a p Package Display_an_offline_map.cppUse dark colors for code blocks Add line. Add line. void Display_an_offline_map::accessOfflineMap() { MobileMapPackage* mmpk = new MobileMapPackage("path//to//mmpk", this); return; }
-
Call
load()
on the mobile map package and display the map area once the load finishes.Display_an_offline_map.cppUse dark colors for code blocks Add line. Add line. Add line. Add line. Add line. Add line. Add line. Add line. Add line. Add line. Add line. Add line. Add line. void Display_an_offline_map::accessOfflineMap() { MobileMapPackage* mmpk = new MobileMapPackage("path//to//mmpk", this); connect(mmpk, &MobileMapPackage::doneLoading, this, [this, mmpk](const Error& e) { if (e.isEmpty()) { m_map = mmpk->maps().at(0); m_mapView->setMap(m_map); } else { qDebug() << e.message() << e.additionalMessage(); } }); mmpk->load(); return; }
-
The function is now ready to be called to access a previously downloaded offline map area. You can trigger this function from a UI button click or by calling it from another function.
-
Press Ctrl + R to run the app.