Learn how to create and manage an API key using API key credentials.
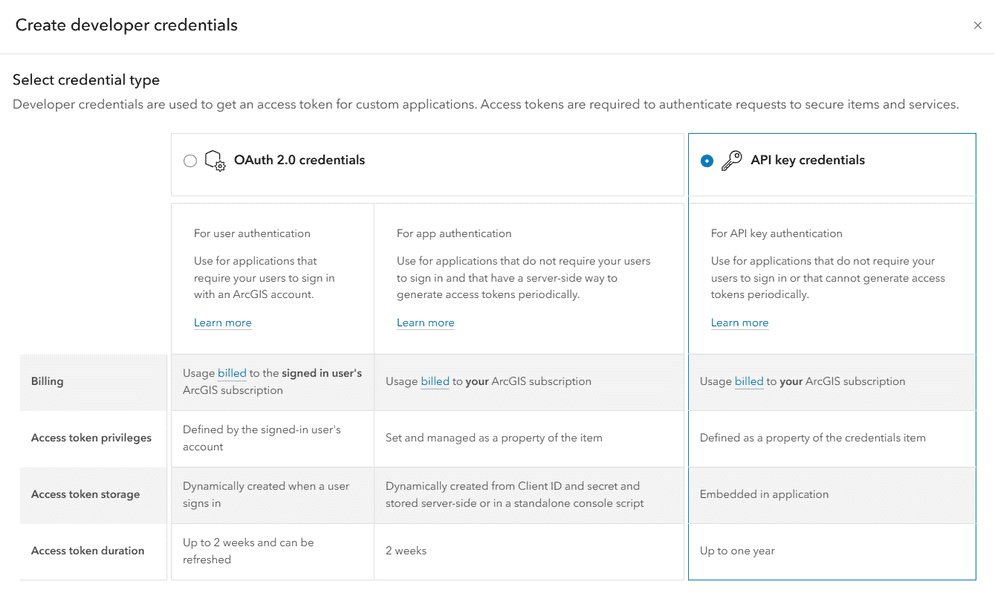
An API key is a long-lived access token that authorizes your application to access secure services, content, and functionality in ArcGIS. API keys are generated using API key credentials, a type of item you create and manage in your portal. API key credentials contain settings that allow you to generate API keys and manage properties such as their privileges and expiration date.
This tutorial shows you how to use your portal to create API key credentials to do the following:
-
Generate long-lived API keys and save them in your application.
-
Configure privileges to allow your API keys to access ArcGIS services, content, and functionality.
-
Set the expiration date and referrer URLs of an API key.
-
Manage API keys using the item page of your API key credentials.
Prerequisites
-
You need an ArcGIS Location Platform account, ArcGIS Online account, or an ArcGIS Enterprise account. To create API keys, ArcGIS Online and ArcGIS Enterprise accounts must have administrator access or a custom role with the correct privileges.
-
You need to know the privileges to assign to your API key. The privileges assigned allow your application to access specific ArcGIS services and resources.
Steps
Create an API key credential
You use your portal to create and manage items, including API key credentials.
-
In your web browser, go to https://location.arcgis.com, and sign in with your ArcGIS Location Platform account. In the dashboard, click My portal to go to your portal.
-
In your portal, click Content > My content > New item.
-
Click Developer credentials > API key credentials and click Next.
You use your portal to create and manage items, including API key credentials.
-
Sign in to your portal with your ArcGIS Online account.
-
In your portal, click Content > My content > New item.
-
Click Developer credentials > API key credentials and click Next.
In your web browser, go to your ArcGIS Enterprise portal and sign in to your portal with your ArcGIS Enterprise account.
API key credentials are not supported in ArcGIS Enterprise versions prior to 11.4.
-
In your portal, click Content > My content > New item.
-
Click Developer credentials > API key credentials and click Next.
Set the expiration date and referrers
API key credentials generate long-lived access tokens called API keys. API keys are valid for up to one year, and their expiration date is set when they are generated. You can also set referrers on an API key, which restrict the key to only be usable from authorized domains.
-
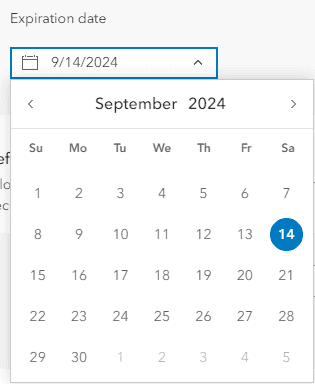
In the Create developer credentials window, click on the Expiration date field. Set the expiration date of the access token to one month from today's date.
-
Set the Referrers field to the web domains you would like to restrict the access token to. This is highly recommended for security purposes. To learn more about referrers, go to API key credentials.

-
Click Next.
Select privileges
You can configure the settings of API key credentials to configure the privileges of access tokens. For an access token to work in your application, it needs to have the correct privileges to access the content and services your app is using. Select the privileges you require to apply them to your API key access token.
-
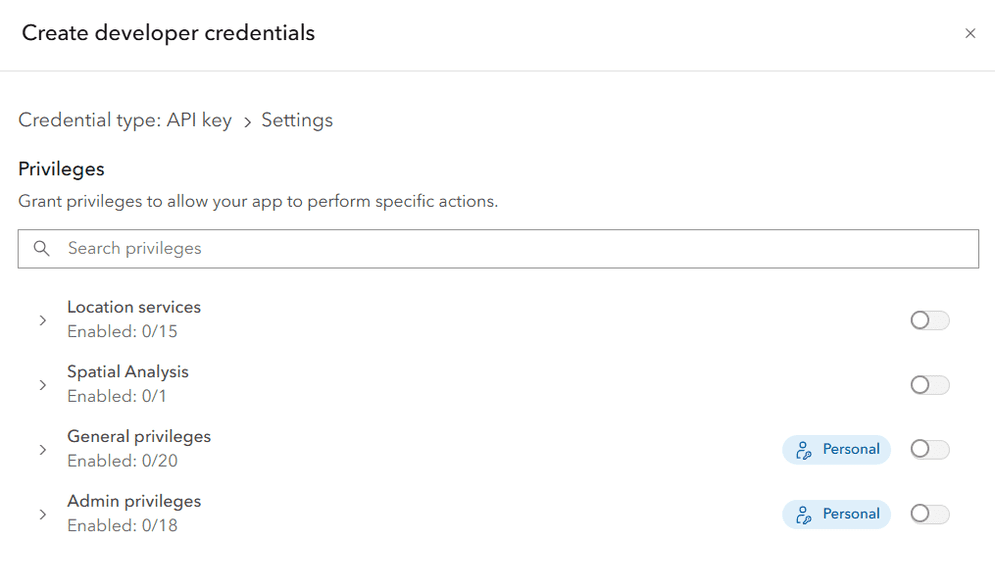
In the Create developer credentials > Privileges window, browse the available privileges.
-
Browse the table below to view the available privileges, privilege strings, and descriptions based on your account type:
Category Label Privilege string Description Basemaps Basemap styles service premium:user :basemaps Allow application to access the basemap styles service. Learn more Basemaps Static basemap tiles (beta) premium:user :staticbasemaptiles Allow application to access the static basemap tiles service. Learn more Data enrichment GeoEnrichment service premium:user :geoenrichment Allow application to access the GeoEnrichment service. Learn more Elevation Elevation service (beta) premium:user :elevation Allow application to access the elevation service. Geocoding Geocode (stored) premium:user :geocode :stored Allow application to access the geocoding service and perform stored geocodes. Learn more Geocoding Geocode (not stored) premium:user :geocode :temporary Allow application to access the geocoding service and perform geocodes that are not stored. Learn more Places Place finding premium:user :places Allow application to access the places service. Learn more Routing Routing premium:user :networkanalysis :routing Allow application to access the routing service and perform standard routing operations. Learn more Routing Closest facility premium:user :networkanalysis :closestfacility Allow application to access the routing service and perform closest facility routing operations. Learn more Routing Location allocation premium:user :networkanalysis :locationallocation Allow application to access the routing service and perform location allocation operations. Learn more Routing Optimized routing premium:user :networkanalysis :optimizedrouting Allow application to access the routing service and perform optimized routing operations. Learn more Routing Origin/destination cost matrix premium:user :networkanalysis :origindestinationcostmatrix Allow application to access the routing service and generate travel cost matrices. Learn more Routing Service area premium:user :networkanalysis :servicearea Allow application to access the routing service and generate service areas. Learn more Routing Multi-vehicle routing premium:user :networkanalysis :vehiclerouting Allow application to access the routing service and perform fleet routing operations. Learn more Routing Last mile premium:user :networkanalysis :lastmiledelivery Allow application to access the routing service and perform routing operations for last mile delivery. Learn more Category Label Privilege string Description Feature analysis Spatial analysis service premium:user :spatialanalysis Allow application to access the spatial analysis service. Learn more Content Create, update, and delete portal:user :create Item Allow member to create, edit, and delete their own content. Learn more Content Publish hosted feature layers portal:publisher :publish Features Allow member to publish hosted feature layers from shapefiles, CSVs, etc. Learn more Category Label Privilege string Description Members View portal:user :view Org Users Allow application to view members of the organization. Groups Join organizational groups portal:user :join Group Allow application to join groups within your organization. Groups Join external groups portal:user :join Non Org Group Allow application to join groups external to your organization. Groups View groups shared with organization portal:user :view Org Groups Allow application to view groups shared with the organization. Content Create, update, and delete portal:user :create Item Allow application to create, edit, and delete their own content. Content Publish hosted feature layers portal:publisher :publish Features Allow application to publish hosted feature layers from shapefiles, CSVs, etc. Content Publish hosted tile layers portal:publisher :publish Tiles Allow application to publish hosted tile layers from tile packages, features, etc. Content Publish hosted scene layers portal:publisher :publish Scenes Allow application to publish hosted scene layers. Content Published hosted tiled imagery layers portal:publisher :publish Tiled Imagery Allow application to publish hosted tiled imagery layers from a single image or collection of images. Requires an ArcGIS Image for ArcGIS Online user type extension. Content View content shared with organization portal:user :view Org Items Allow application to view content shared to the organization. Content View location tracks portal:user :view Tracks Allow application to view members' location tracks via shared track views when location sharing is enabled. Content Reassign content portal:user :reassign Items Allow application to reassign ownership of content owned by the account to another member. Content Receive content portal:user :receive Items Allow application to receive content assigned to them by another member. Content Create and run data pipelines portal:publisher :create Data Pipelines Allow application to create, edit, and run data pipelines. Content View hosted feature services portal:user :view Hosted Feature Services Allow application to view hosted feature services. Content View hosted tile services portal:user :view Hosted Tile Services Allow application to view hosted tile services. Content Categorize items portal:user :categorize Items Allow application to set the category of items you own. Sharing Share with groups portal:user :share To Group Allow application to share content to groups. Sharing Share with organization portal:user :share To Org Allow application to share content to your organization. Sharing Share with public portal:user :share To Public Allow application to share their content publicly if permitted by the organization's public sharing policy. Sharing Make groups visible to organization portal:user :share Group To Org Allow application to make groups discoverable by your organization. Sharing Make groups visible to public portal:user :share Group To Public Allow application to make groups discoverable by the public. Sharing Make groups available to Open Data opendata:user :designate Group Allow application to designate groups as being available for use in Open Data sites. Features Edit features:user :edit Allow application to edit features in editable layers that are not public, based on the edit options enabled on the layer. Features Edit with full control features:user :full Edit Allow application to add, delete, and update features in an editable, hosted feature layer, regardless of the editing options enabled on the layer. Category Label Privilege string Description Groups View all portal:admin :view Groups Allow application to view all groups within your organization. Groups Update portal:admin :update Groups Allow application to update groups within your organization. Groups Delete portal:admin :delete Groups Allow application to delete groups within your organization. Groups Reassign ownership portal:admin :reassign Groups Allow application to reassign groups to other members within your organization. Groups Assign members portal:admin :assign To Groups Allow application to assign your members to, update your member's group role, and remove your members from groups within your organization. Groups Create with update capabilities portal:admin :create Update Capable Group Allow application to create groups with update capabilities. Groups Create with leaving disallowed portal:admin :create Leaving Disallowed Group Allow application to create and own groups that do not allow members to leave (administrative groups). Content View all portal:admin :view Items Allow application to view all content within your organization. Content Update items portal:admin :update Items Allow application to update and categorize content and edit hosted feature layers in your organization. Content Delete items portal:admin :delete Items Allow application to delete content within your organization. Content Reassign item ownership portal:admin :reassign Items Allow application to reassign content to other members within your organization. Content Categorize items portal:admin :categorize Items Allow application to set the categories of organization content. Content Manage categories portal:admin :update Item Category Schema Allow application to configure organization content categories. Content Publish web tools portal:publisher :publish Server GP Services Allow application to publish web tools. Content Share member content with organization portal:admin :share To Org Allow application to share content owned by other members in your organization with the organization. Content Create and manage administrative reports portal:admin :create Reports Allow application to create and manage administrative reports for your organization Organization settings Security and infrastructure portal:admin :manage Security Allow application to manage the organization's security and infrastructure settings. Organization settings Organization website portal:admin :manage Website Allow application to manage the organization's website settings. Organization settings Collaborations portal:admin :manage Collaborations Allow application to manage the organization's collaborations. Organization settings Credits portal:admin :manage Credits Allow application to manage the organization's credit budgeting settings. Organization settings Utility services portal:admin :manage Utility Services Allow application to manage the organization's utility service settings -
Select the the privileges required by your application and click Next.
-
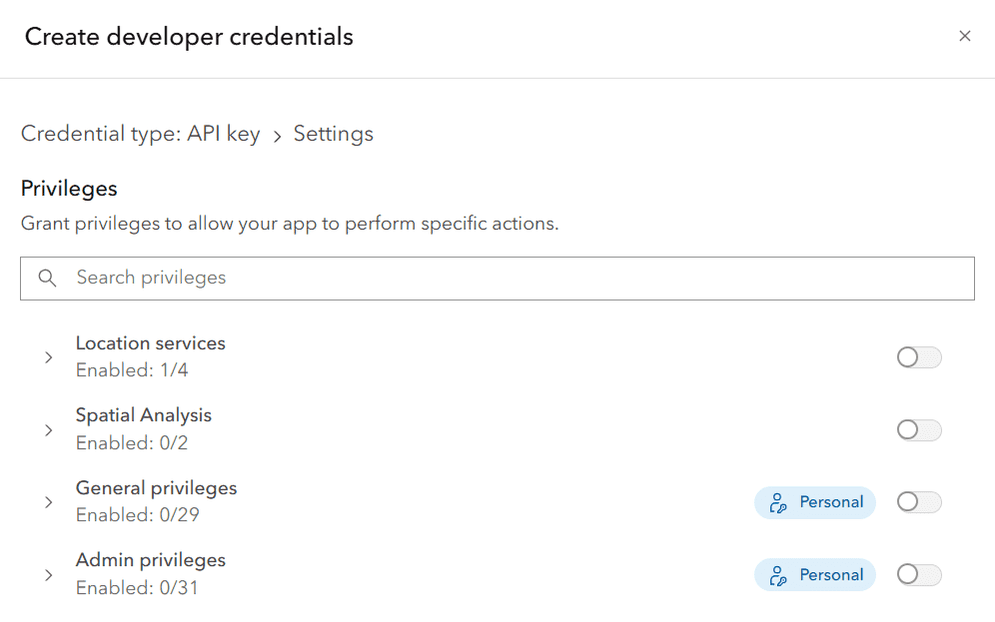
In the Create developer credentials > Privileges window, browse the available privileges.
-
Browse the table below to view the available privileges, privilege strings, and descriptions based on your account type:
Category Label Privilege string Description Basemaps Basemap styles service premium:user :basemaps Allow application to access the basemap styles service. Learn more Data enrichment GeoEnrichment service premium:user :geoenrichment Allow application to access the GeoEnrichment service. Learn more Geocoding Geocode service premium:user :geocode Allow application to access the geocoding service. Learn more Routing Routing (Network analysis) premium:user :networkanalysis Allow application to access the routing service. Learn more Category Label Privilege string Description Feature analysis Spatial analysis service premium:user :spatialanalysis Allow application to access the spatial analysis service. Learn more Content Create, update, and delete portal:user :create Item Allow member to create, edit, and delete their own content. Learn more Content Publish hosted feature layers portal:publisher :publish Features Allow member to publish hosted feature layers from shapefiles, CSVs, etc. Learn more Image analysis Image analysis service premium:publisher :rasteranalysis Allow application to access image services to perform analysis. Learn more Content Published hosted tiled imagery layers portal:publisher :publish Tiled Imagery Allow application to publish hosted tiled imagery layers from a single image or collection of images. Requires an ArcGIS Image for ArcGIS Online user type extension. Learn more Content Publish hosted dynamic imagery layers portal:publisher :publish Dynamic Imagery Allow application to publish hosted dynamic imagery layers from a single image or collection of images. Learn more Category Label Privilege string Description Members View portal:user :view Org Users Allow application to view members of the organization. Groups Create, update, and delete portal:user :create Group Allow application to create, edit, and delete their own groups. Groups Join organizational groups portal:user :join Group Allow application to join groups within your organization. Groups Join external groups portal:user :join Non Org Group Allow application to join groups external to your organization. Groups View groups shared with organization portal:user :view Org Groups Allow application to view groups shared with the organization. Groups Invite partnered organization members portal:user :invite Partnered Collaboration Members Allow application to invite members from partnered collaboration organizations to groups. Groups Add members from other organizations portal:user :add External Members To Group Allow application to create groups that allow members from other organizations, as well as invite external members to groups. Content Create, update, and delete portal:user :create Item Allow application to create, edit, and delete their own content. Content Publish hosted feature layers portal:publisher :publish Features Allow application to publish hosted feature layers from shapefiles, CSVs, etc. Content Publish hosted tile layers portal:publisher :publish Tiles Allow application to publish hosted tile layers from tile packages, features, etc. Content Publish hosted scene layers portal:publisher :publish Scenes Allow application to publish hosted scene layers. Content Published hosted tiled imagery layers portal:publisher :publish Tiled Imagery Allow application to publish hosted tiled imagery layers from a single image or collection of images. Requires an ArcGIS Image for ArcGIS Online user type extension. Content Publish hosted dynamic imagery layers portal:publisher :publish Dynamic Imagery Allow application to publish hosted dynamic imagery layers from a single image or collection of images. Content View content shared with organization portal:user :view Org Items Allow application to view content shared to the organization. Content View location tracks portal:user :view Tracks Allow application to view members' location tracks via shared track views when location sharing is enabled. Content Reassign content portal:user :reassign Items Allow application to reassign ownership of content owned by the account to another member. Content Receive content portal:user :receive Items Allow application to receive content assigned to them by another member. Content Create and run data pipelines portal:publisher :create Data Pipelines Allow application to create, edit, and run data pipelines. Content Publish real-time analytics portal:publisher :publish Real Time Analytics Allow application to publish real-time analytics to analyze and process real-time data using ArcGIS Velocity. Content Categorize items portal:user :categorize Items Allow application to set the category of items you own. Content Publish big data analytics portal:publisher :publish Big Data Analytics Allow application to publish big data analytics and process historical observation data using ArcGIS Velocity. Content Publish feeds portal:publisher :publish Feeds Allow application to publish feeds. Content Generate API keys portal:user :generate Api Tokens Allow application to generate API keys. Content Assign privileges to OAuth 2.0 applications portal:user :assign Privileges To Apps Allow application to assign privileges to OAuth 2.0 applications. Sharing Share with groups portal:user :share To Group Allow application to share content to groups. Sharing Share with organization portal:user :share To Org Allow application to share content to your organization. Sharing Share with public portal:user :share To Public Allow application to share their content publicly if permitted by the organization's public sharing policy. Sharing Make groups visible to organization portal:user :share Group To Org Allow application to make groups discoverable by your organization. Sharing Make groups visible to public portal:user :share Group To Public Allow application to make groups discoverable by the public. Sharing Make groups available to Open Data oprndata:user :designate Group Allow application to designate groups as being available for use in Open Data sites. Features Edit features:user :edit Allow application to edit features in editable layers that are not public, based on the edit options enabled on the layer. Features Edit with full control features:user :full Edit Allow application to add, delete, and update features in an editable, hosted feature layer, regardless of the editing options enabled on the layer. Premium content Create notebooks premium:publisher :create Notebooks Allow application to create and edit interactive notebooks. Premium content Schedule notebooks premium:publisher :schedule Notebooks Allow application to schedule future automated runs of a notebook. Premium content Create advanced notebooks premium:publisher :create Advanced Notebooks Allow application to import and use ArcPy modules in ArcGIS Notebooks. Premium content Demographic maps premium:user :demographics Allow application to access demographic maps in ArcGIS Living Atlas. Premium content Feature report premium:user :featurereport Allow application to create feature reports in ArcGIS Survey123. Premium content Run web tools portal:user :run Web Tool Allow application to run web tools. Category Label Privilege string Description Members View all portal:admin :view Users Allow application to view full member account information within your organization. Members Update portal:admin :update Users Allow application to reset passwords, update member account information, and update member categories within your organization. Members Delete portal:admin :delete Users Allow application to delete member accounts within your organization. Members Invite portal:admin :invite Users Allow application to invite members to your organization. Members Disable portal:admin :disable Users Allow application to enable and disable member accounts within your organization. Members Change roles portal:admin :change User Roles Allow application to change the role a member account is assigned. Note, only members with the Administrator role can assign or unassign the Administrator role to other accounts. Members Manage licenses portal:admin :manage Licenses Allow application to assign licenses to members of your organization. Members Manage categories portal:admin :update Member Category Schema Allow application to configure organization member categories. Groups View all portal:admin :view Groups Allow application to view all groups within your organization. Groups Update portal:admin :update Groups Allow application to update groups within your organization. Groups Delete portal:admin :delete Groups Allow application to delete groups within your organization. Groups Reassign ownership portal:admin :reassign Groups Allow application to reassign groups to other members within your organization. Groups Assign members portal:admin :assign To Groups Allow application to assign your members to, update your member's group role, and remove your members from groups within your organization. Groups Link to organization-specific group portal:admin :manage Enterprise Groups Allow application to link group membership to an organization-specific group. Groups Create with update capabilities portal:admin :create Update Capable Group Allow application to create groups with update capabilities. Groups Create with leaving disallowed portal:admin :create Leaving Disallowed Group Allow application to create and own groups that do not allow members to leave (administrative groups). Content View all portal:admin :view Items Allow application to view all content within your organization. Content Update items portal:admin :update Items Allow application to update and categorize content and edit hosted feature layers in your organization. Content Delete items portal:admin :delete Items Allow application to delete content within your organization. Content Reassign item ownership portal:admin :reassign Items Allow application to reassign content to other members within your organization. Content Categorize items portal:admin :categorize Items Allow application to set the categories of organization content. Content Manage categories portal:admin :update Item Category Schema Allow application to configure organization content categories. Content Publish web tools portal:publisher :publish Server GP Services Allow application to publish web tools. Content Share member content with organization portal:admin :share To Org Allow application to share content owned by other members in your organization with the organization. Content Share member content with public portal:admin :share To Public Allow application to share content owned by other members in your organization with the public. Content Create and manage administrative reports portal:admin :create Reports Allow application to create and manage administrative reports for your organization ArcGIS Marketplace Subscriptions Create and manage marketplace:admin :manage Allow application to create listings, list items, manage subscriptions within ArcGIS Marketplace, as well as manage purchasers and contact information for your organization. Use of this privilege depends on your organization obtaining listing and publishing access to the ArcGIS Marketplace. ArcGIS Marketplace Subscriptions Purchase and get free products marketplace:admin :purchase Allow application to send purchase requests and access free products from providers in ArcGIS Marketplace. To allow members to purchase products using credit cards, you must designate them as Marketplace purchasers. Learn more ArcGIS Marketplace Subscriptions Start trials marketplace:admin :start Trial Allow application to start trial subscriptions within ArcGIS Marketplace Organization settings Security and infrastructure portal:admin :manage Security Allow application to manage the organization's security and infrastructure settings. Organization settings Organization website portal:admin :manage Website Allow application to manage the organization's website settings. Organization settings Collaborations portal:admin :manage Collaborations Allow application to manage the organization's collaborations. Organization settings Credits portal:admin :manage Credits Allow application to manage the organization's credit budgeting settings. Organization settings Member roles portal:admin :manage Roles Allow application to manage the organization's member roles. Organization settings Utility services portal:admin :manage Utility Services Allow application to manage the organization's utility service settings -
Select the the privileges required by your application and click Next.
In ArcGIS Enterprise versions prior to 11.4, setting privileges on API key credentials is not supported. Please proceed to the next step.
-
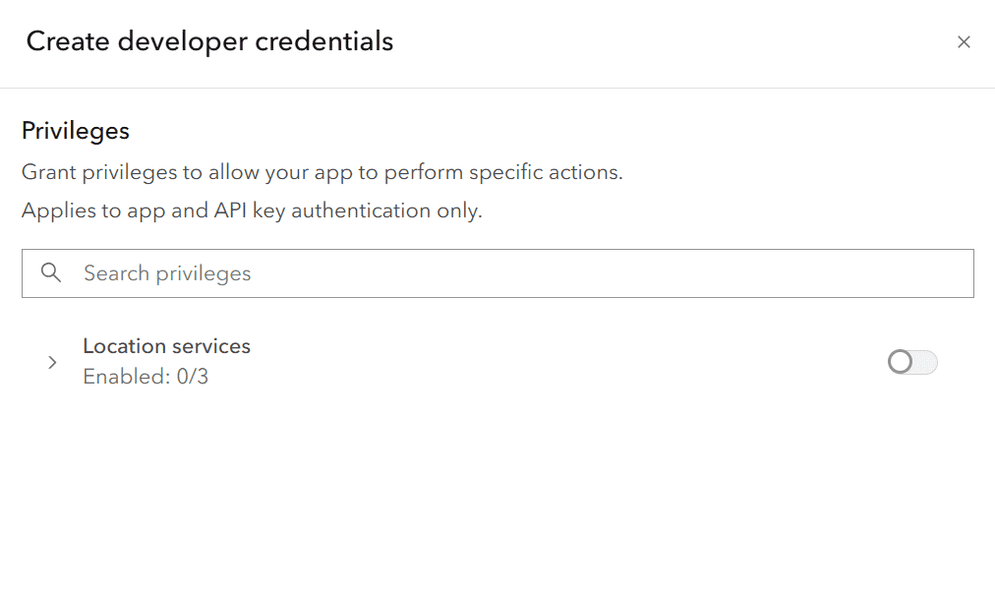
In the Create developer credentials > Privileges window, browse the available privileges.
-
Browse the table below to view the available privileges, privilege strings, and descriptions based on your account type:
Category Label Privilege string Description Feature analysis Spatial analysis service premium:user :spatialanalysis Allow application to access the spatial analysis service. Learn more Content Create, update, and delete portal:user :create Item Allow member to create, edit, and delete their own content. Learn more Content Publish hosted feature layers portal:publisher :publish Features Allow member to publish hosted feature layers from shapefiles, CSVs, etc. Learn more Image analysis Image analysis service premium:publisher :rasteranalysis Allow application to access image services to perform analysis. Learn more Content Published hosted tiled imagery layers portal:publisher :publish Tiled Imagery Allow application to publish hosted tiled imagery layers from a single image or collection of images. Learn more Content Publish hosted dynamic imagery layers portal:publisher :publish Dynamic Imagery Allow application to publish hosted dynamic imagery layers from a single image or collection of images. Learn more Category Label Privilege string Description Members View portal:user :view Org Users Allow application to view members of the organization. Groups Create, update, and delete portal:user :create Group Allow application to create, edit, and delete their own groups. Groups Join organizational groups portal:user :join Group Allow application to join groups within your organization. Groups View groups shared with organization portal:user :view Org Groups Allow application to view groups shared with the organization. Groups Add members from other organizations portal:user :add External Members To Group Allow application to create groups that allow members from other organizations, as well as invite external members to groups. Content Generate API keys portal:user :generate Api Tokens Allow application to generate API keys. Content Assign privileges to OAuth 2.0 applications portal:user :assign Privileges To Apps Allow application to assign privileges to OAuth 2.0 applications. Content Create, update, and delete portal:user :create Item Allow application to create, edit, and delete their own content. Content Publish hosted feature layers portal:publisher :publish Features Allow application to publish hosted feature layers from shapefiles, CSVs, etc. Content Publish hosted tile layers portal:publisher :publish Tiles Allow application to publish hosted tile layers from tile packages, features, etc. Content Publish hosted scene layers portal:publisher :publish Scenes Allow application to publish hosted scene layers. Content Published hosted tiled imagery layers portal:publisher :publish Tiled Imagery Allow application to publish hosted tiled imagery layers from a single image or collection of images. Requires an ArcGIS Image for ArcGIS Online user type extension. Content Publish hosted dynamic imagery layers portal:publisher :publish Dynamic Imagery Allow application to publish hosted dynamic imagery layers from a single image or collection of images. Content View content shared with organization portal:user :view Org Items Allow application to view content shared to the organization. Content View location tracks portal:user :view Tracks Allow application to view members' location tracks via shared track views when location sharing is enabled. Content Reassign content portal:user :reassign Items Allow application to reassign ownership of content owned by the account to another member. Content Receive content portal:user :receive Items Allow application to receive content assigned to them by another member. Content Publish livestream video portal:publisher :publish Livestream Video Allow application to publish livestream videos. Content Publish real-time analytics portal:publisher :publish Real Time Analytics Allow application to publish real-time analytics to analyze and process real-time data using ArcGIS Velocity. Content Publish server-based layers portal:publisher :publish Server Services Allow application to publish server-based layers. Content Publish video portal:publisher :publish Video Allow application to publish videos. Content Register data stores portal:publisher :register Data Stores Allow application to register video stores. Content View hosted feature services portal:user :view Hosted Feature Services Allow application to view hosted feature services. Content View hosted tile services portal:user :view Hosted Tile Services Allow application to view hosted tile services. Content Categorize items portal:user :categorize Items Allow application to set the category of items you own. Content Manage feature layer webhooks portal:publisher :create Feature Webhook Allow application to manage webhooks for feature layers. Content Bulk publish from data stores portal:publisher :bulk Publish From Data Stores Allow application to bulk publish data from data stores. Content Publish big data analytics portal:publisher :publish Big Data Analytics Allow application to publish big data analytics and process historical observation data using ArcGIS Velocity. Content Publish feeds portal:publisher :publish Feeds Allow application to publish feeds. Content Publish knowledge graphs portal:publisher :publish Knowledge Graph Allow application to publish knowledge graphs. Sharing Share with groups portal:user :share To Group Allow application to share content to groups. Sharing Share with organization portal:user :share To Org Allow application to share content to your organization. Sharing Share with public portal:user :share To Public Allow application to share their content publicly if permitted by the organization's public sharing policy. Sharing Make groups visible to organization portal:user :share Group To Org Allow application to make groups discoverable by your organization. Sharing Make groups visible to public portal:user :share Group To Public Allow application to make groups discoverable by the public. Features Edit features:user :edit Allow application to edit features in editable layers that are not public, based on the edit options enabled on the layer. Features Edit with full control features:user :full Edit Allow application to add, delete, and update features in an editable, hosted feature layer, regardless of the editing options enabled on the layer. Features Manage feature layer versions features:user :manage Versions Allow application to manage feature layer version control settings. Premium content Create notebooks premium:publisher :create Notebooks Allow application to create and edit interactive notebooks. Premium content Schedule notebooks premium:publisher :schedule Notebooks Allow application to schedule future automated runs of a notebook. Premium content Create advanced notebooks premium:publisher :create Advanced Notebooks Allow application to import and use ArcPy modules in ArcGIS Notebooks. Premium content Demographic maps premium:user :demographics Allow application to access demographic maps in ArcGIS Living Atlas. Premium content Feature report premium:user :featurereport Allow application to create feature reports in ArcGIS Survey123. Premium content Run web tools portal:user :run Web Tool Allow application to run web tools. Category Label Privilege string Description Members View all portal:admin :view Users Allow application to view full member account information within your organization. Members Update portal:admin :update Users Allow application to reset passwords, update member account information, and update member categories within your organization. Members Delete portal:admin :delete Users Allow application to delete member accounts within your organization. Members Invite portal:admin :invite Users Allow application to invite members to your organization. Members Disable portal:admin :disable Users Allow application to enable and disable member accounts within your organization. Members Change roles portal:admin :change User Roles Allow application to change the role a member account is assigned. Note, only members with the Administrator role can assign or unassign the Administrator role to other accounts. Members Manage licenses portal:admin :manage Licenses Allow application to assign licenses to members of your organization. Members Manage categories portal:admin :update Member Category Schema Allow application to configure organization member categories. Groups View all portal:admin :view Groups Allow application to view all groups within your organization. Groups Update portal:admin :update Groups Allow application to update groups within your organization. Groups Delete portal:admin :delete Groups Allow application to delete groups within your organization. Groups Reassign ownership portal:admin :reassign Groups Allow application to reassign groups to other members within your organization. Groups Assign members portal:admin :assign To Groups Allow application to assign your members to, update your member's group role, and remove your members from groups within your organization. Groups Link to organization-specific group portal:admin :manage Enterprise Groups Allow application to link group membership to an organization-specific group. Groups Create with update capabilities portal:admin :create Update Capable Group Allow application to create groups with update capabilities. Groups Create with leaving disallowed portal:admin :create Leaving Disallowed Group Allow application to create and own groups that do not allow members to leave (administrative groups). Content View all portal:admin :view Items Allow application to view all content within your organization. Content Update items portal:admin :update Items Allow application to update and categorize content and edit hosted feature layers in your organization. Content Delete items portal:admin :delete Items Allow application to delete content within your organization. Content Reassign item ownership portal:admin :reassign Items Allow application to reassign content to other members within your organization. Content Categorize items portal:admin :categorize Items Allow application to set the categories of organization content. Content Manage categories portal:admin :update Item Category Schema Allow application to configure organization content categories. Content Publish web tools portal:publisher :publish Server GP Services Allow application to publish web tools. Content Geoprocessing webhook portal:admin :create GP Webhook Allow application to create geoprocessing webhooks. Content Manage servers portal:admin :manage Servers Allow application to manage servers. Content Manage webhooks portal:admin :manage Webhooks Allow application to manage webhooks. Content Share member content with organization portal:admin :share To Org Allow application to share content owned by other members in your organization with the organization. Content Share member content with public portal:admin :share To Public Allow application to share content owned by other members in your organization with the public. Content Create and manage administrative reports portal:admin :create Reports Allow application to create and manage administrative reports for your organization Organization settings Security and infrastructure portal:admin :manage Security Allow application to manage the organization's security and infrastructure settings. Organization settings Organization website portal:admin :manage Website Allow application to manage the organization's website settings. Organization settings Collaborations portal:admin :manage Collaborations Allow application to manage the organization's collaborations. Organization settings Member roles portal:admin :manage Roles Allow application to manage the organization's member roles. Organization settings Utility services portal:admin :manage Utility Services Allow application to manage the organization's utility service settings -
Select the required privileges and click Next.
Select items (optional)
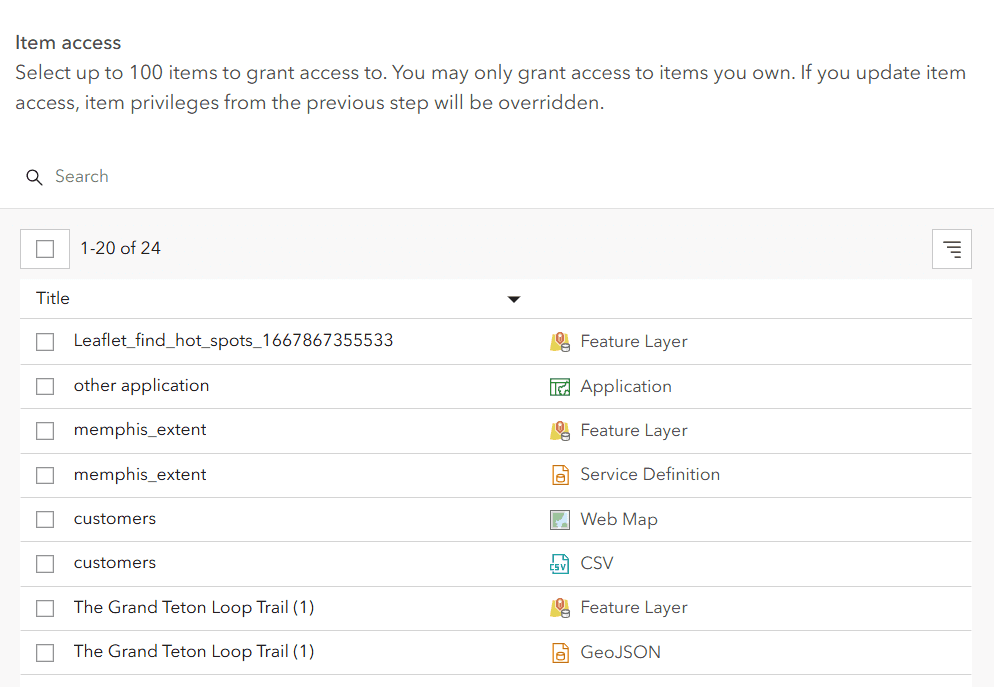
If your application will require access to specific private items, you will need to configure your developer credentials to access them. The Item access menu allows you to browse your portal's content and grant your API key access to specific items.
-
If your token does not require item access, click Skip.
-
In the Grant item access window, click Browse items.

-
Select the items you want to grant access to. You can select up to 100 items in this menu.
-
Click Add items.
Save the item
After configuring the properties of your API key credentials, you can save the credentials as a new item.
-
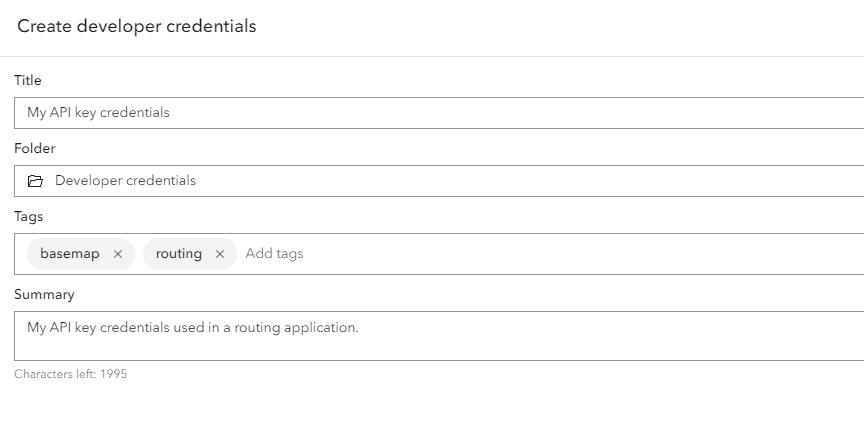
In the Create developer credentials window, set the following properties:
- Title:
My API key credentials - Folder:
Developer credentials(Create a new folder) - Tags: Add tags related to the privileges of the credentials.
- Description: Describe the application that these developer credentials will be used in.
Click Next.
- Title:
-
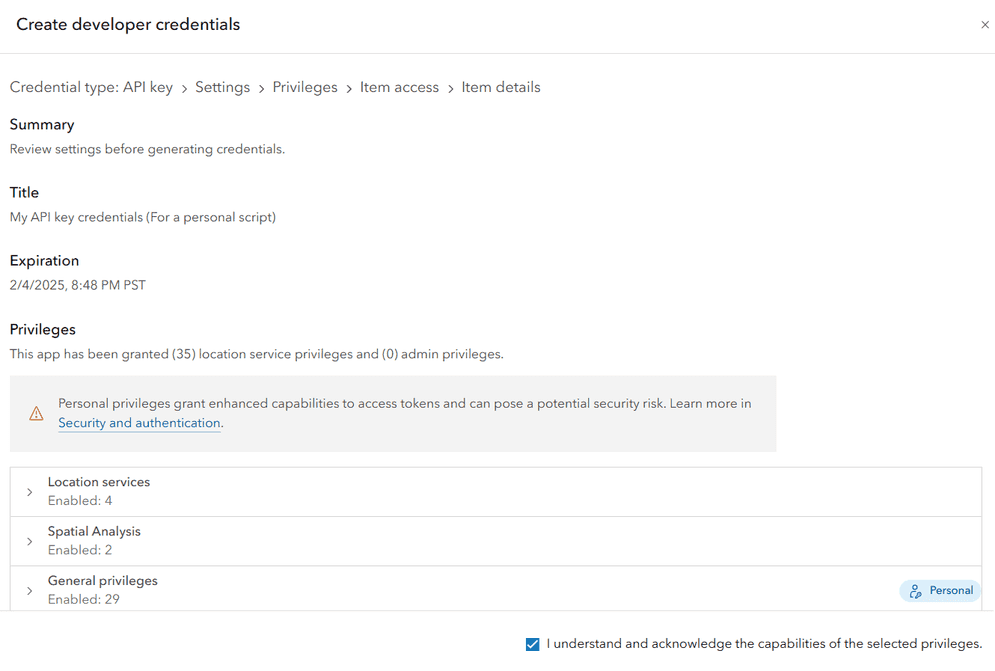
In the Summary window, review the properties, privileges, and item access you have set. If you selected any privileges with a personal scope, you must acknowledge the security implications before moving forward.
-
Click Next.
Copy the API key
-
In the Create developer credentials > Generate API key window, select Generate the API key and go to item details page. I am ready to copy and save the key.

-
Click Next.
-
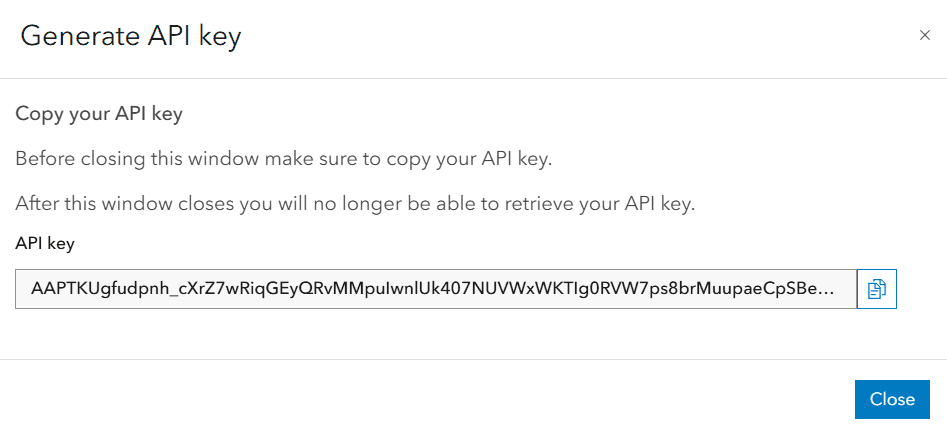
Copy the API key from the window that appears and paste it into your application.
Manage your credentials (optional)
After creating an API key credentials item, its properties can be managed at any time by going to the item page. The Settings menu allows you to manage the following properties of API keys:
-
Generate a secondary API key: You can generate a secondary API key in the same credentials with identical privileges and a new expiration date.
-
Regenerate an API key: If you lose access to an API key, you can regenerate it with a new expiration date.
-
Invalidate an API key: You can invalidate an API key so that it no longer functions in applications.
-
Edit privileges: You can edit the privileges of your API key credentials to adjust the authorization level of your API keys.
-
Edit item access: You can edit the items that your API key credentials are authorized to access.
-
Monitor key usage: You can monitor the usage of your API keys to track their consumption of services and view billing information. To learn more, go to API key credentials.
What's next?
Learn how to use your API key to access secure ArcGIS resources in the following guides: