The Implicit flow is an OAuth 2.0 authorization protocol that can be used to implement user authentication. This page provides an overview of the flow and explains how to implement it.
The Implicit flow is an OAuth 2.0 workflow previously used in client-facing web applications. Authorization occurs in a single step, with the app requesting an access token directly from the authorization endpoint.
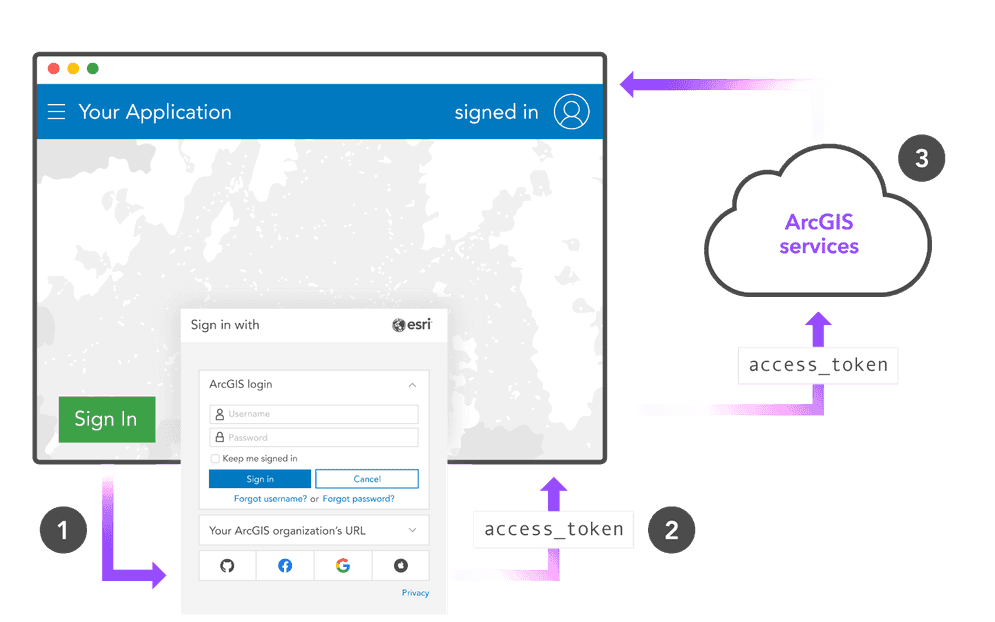
The general steps of how the Implicit flow works are:
-
Application sends a request to the authorization endpoint that includes a
clientand_id redirectfrom OAuth credentials. The_url responseis specified as_type token. -
The application user signs in with an ArcGIS account. The authorization endpoint verifies the user's identity and returns an access token to the specified redirect URL.
-
Application uses the access token to authorize requests to secure resources.
Manual implementation
The remainder of this page shows how to manually implement user authentication without using an ArcGIS API or Maps SDK. Instead, authentication is implemented by directly making HTTP requests to the proper REST API endpoints.
This sample is written in JavaScript, but can be implemented in any language. It adheres to the OAuth 2.0 specification for the Implicit flow.
Create OAuth credentials
User authentication requires a set of OAuth credentials.
The steps to create OAuth credentials with an ArcGIS Location Platform account are:
-
Sign in to your ArcGIS portal.
-
Click Content > My content > New item and select Developer credentials.
-
In the Credential types menu, select OAuth credentials.
-
Add a redirect URL and click Next.
-
In the Privileges and Grant item access menus, click Next; these are not required for user authentication.
-
Name the credentials and click Next to review. When you are ready to create the credentials, click Create.
Configure authentication variables
-
Copy your client ID and chosen redirect URL from your OAuth credentials and include them in your app.
index.htmlUse dark colors for code blocks const clientId = '<YOUR_CLIENT_ID>'; const redirectUri = '<YOUR_REDIRECT_URL>'; let session = null; let map = null; const signInButton = document.getElementById('sign-in'); const signOutButton = document.getElementById('sign-out');
Request an access token
-
Format a GET request to the authorization endpoint. Include your
clientand_id redirect, and set the_uri responseparameter to_type token.index.htmlUse dark colors for code blocks const authorizationEndpoint = 'https://www.arcgis.com/sharing/rest/oauth2/authorize'+ '?client_id=' + clientId + '&redirect_uri=' + window.encodeURIComponent(redirectUri)+ '&response_type=token'+ '&expiration=20160'; -
When the user clicks 'Sign in', open the authorization endpoint in a new window.
index.htmlUse dark colors for code blocks const authorizationEndpoint = 'https://www.arcgis.com/sharing/rest/oauth2/authorize'+ '?client_id=' + clientId + '&redirect_uri=' + window.encodeURIComponent(redirectUri)+ '&response_type=token'+ '&expiration=20160'; signInButton.addEventListener('click', () => window.open(authorizationEndpoint, 'oauth-window', 'height=400,width=600,menubar=no,location=yes,resizable=yes,scrollbars=yes,status=yes'));
Create a callback
-
Create a callback function in
index.htmlthat will receive the authorization code.index.htmlUse dark colors for code blocks const oauthCallback = (authorizationCode) => { } window.oauthCallback = oauthCallback; //required due to the module scope of this script -
Create a new HTML page at the location of your redirect URI. When a user successfully authenticates at the authorization endpoint, they will be redirected to this page.
callback.htmlUse dark colors for code blocks <!DOCTYPE html> <head> <title>ArcGIS user authentication OAuth 2.0 callback (vanilla JS)</title> </head> <body> <script type="module"> </script> </body> </html> -
Retried the access token returned from the endpoint. It is found in the
hashparameter of the URL. Pass the token to the callback function created inindex.html.callback.htmlUse dark colors for code blocks <!DOCTYPE html> <head> <title>ArcGIS user authentication OAuth 2.0 callback (vanilla JS)</title> </head> <body> <script type="module"> const match = (window.location.hash) ? window.location.hash.match(/\token=([^&]+)/) : false; // if we found an access token in the URL, pass the token up to a global function in index.html if(match[1]) { window.opener.oauthCallback(match[1]); } window.close(); </script> </body> </html>
Serialize session info
-
Serialize the session information from the authorization endpoint and add it to local storage to make the session persistent across page refreshes.
index.htmlUse dark colors for code blocks Copy const updateSession = (sessionInfo) => { const userInfo = document.getElementById('user-info'); if (!sessionInfo) { localStorage.removeItem("__ARCGIS_USER_SESSION__"); session = null; destroyApp(); // signed out sidebar state userInfo.classList.add('hide'); userInfo.innerHTML = ``; signOutButton.classList.add('hide'); signInButton.classList.remove('hide'); } else { session = sessionInfo; localStorage.setItem("__ARCGIS_USER_SESSION__", JSON.stringify(session)); // signed in sidebar state userInfo.classList.remove('hide'); userInfo.innerHTML = `Welcome, ${sessionInfo.username}.`; signOutButton.classList.remove('hide'); signInButton.classList.add('hide'); } }