This topic describes how to create, build, and deploy a server object interceptor (SOI) under the Maven framework using IntelliJ. It also describes how to consume the SOI from the ArcGIS Server Services Directory.
The SOI that you will create in this topic is also provided as a sample, named Simple SOI in the ArcGIS Enterprise SDK(..\).
Create the SOI project
To create an SOI using IntelliJ, complete the following steps:
-
Ensure that ArcGIS Enterprise SDK, Java, and Maven are all installed on your development environment. See more details at the installation section.
-
Launch IntelliJ and Click File in the main menu.
-
Click New and Select Project.
-
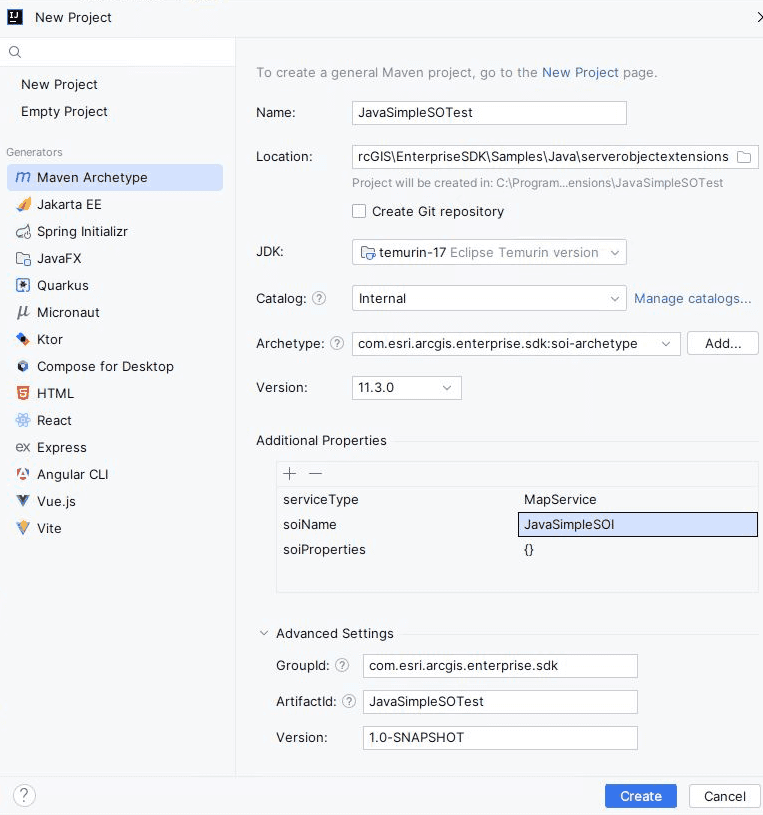
Choose Maven Archetype on the left menu.
-
Give name for the project and choose the location you would like to use
-
Ensure the project SDK is set to the supported JDK (JDK 11 or JDK 17).
-
Keep the Catalog as Internal
-
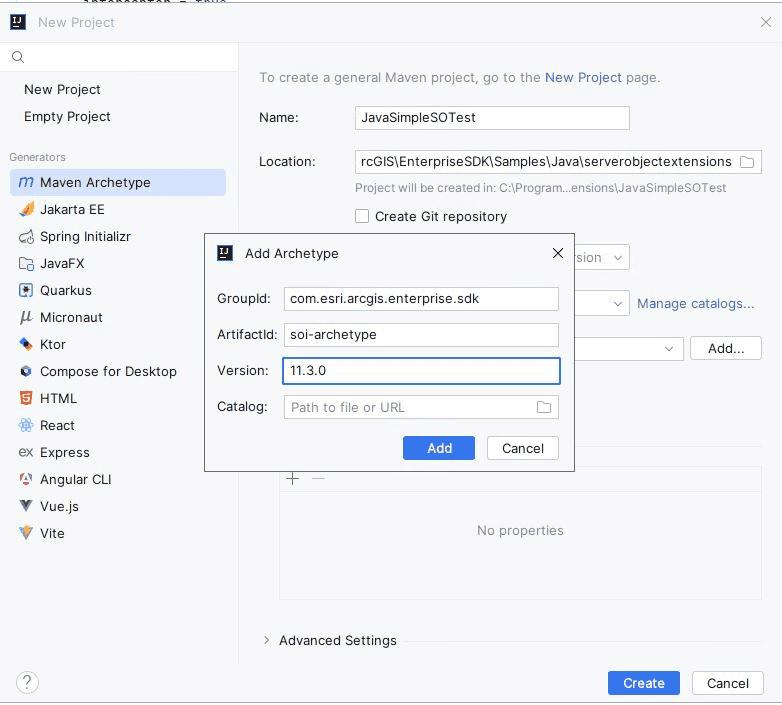
For Archetype
Click the Add... button on the right, type the following values in the Add Archetype wizard, and then click Add:
-
GroupId:
com.esri.arcgis.enterprise.sdk -
ArtifactId:
soi-archetype -
Version:
11.3.0(use11.2.0for 11.2.0 SDK and11.0for 11.0 SDK)
The
soi-archetypeis now added. Select this archetype and click Create. -
-
To set up the Advance Settings before creating the SOI, click Advanced Settings.

-
A new SOI project is created. You should see
Build Successon the right of the bottom Run Tool Window.
If you see any warnings, you can ignore them for now as long as the project successfully generates the entsdksamples.soi package and Java class under the src\main\java folder. You will address those warnings during project build. Continue to build the SOI project now.
Verifying the servicetype
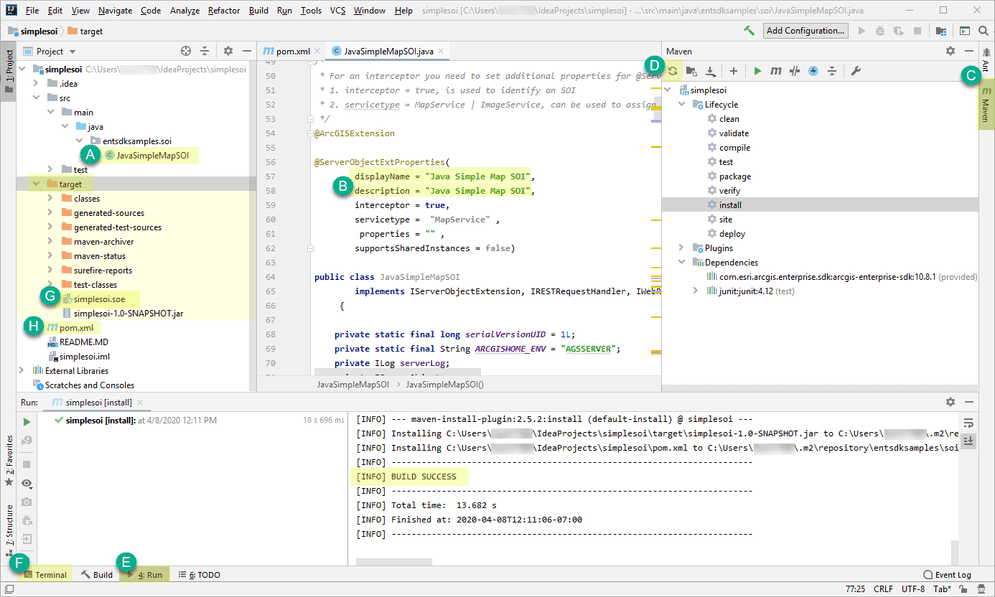
Since the Rest SOE project has already been created, please confirm which type of SOE you would like to generate: Map Service or Image Service. If you are working with a Map Service, simply keep the default settings shown in the screenshot below, where servicetype = "MapService". However, if you need an Image Service, update servicetype to "ImageService".
Build the SOI project
Building an SOI project will package the project's classes, dependencies, and resources into a .soe file, which can be deployed to ArcGIS Server. Since it's a Maven project, the Maven build lifecycle must be followed to build the SOI. Read more about project build.
You can build the SOI project in either the Maven tool window or the Terminal tool window.

Because the project is created from soi-archetype, it automatically loads the boilerplate code that implements a ready-to-use SOI. For now, you can customize the display and description of the SOI and leave the rest of the code as is for now.
-
Open the SOI class
Java, located in theSimple Map SOI src\main\javafolder (see A in the example above). -
Set the
displayandName descriptionto beJava Simple SOI(see B). -
Now follow these steps to build the project.
-
To build the project in the Maven tool window, do the following:
a. Click the Maven tab on the right side of IntelliJ (see C).
b. Expand
simplesoi. You should see Lifecycle, Plugins and Dependencies listed.c. If you don't see Dependencies, click the Reimport All Maven Projects button (see D) on the far left of the tool bar in the Maven tool window.
d. Now you should see Dependencies, and com.esri.arcgis.enterprise.sdk:arcgis-enterprise-sdk:version is listed as one of the dependencies.
e. Expand Lifecycle and click install. You can also click clean and click install for a clean build of the project.
f. The project is built successfully with detailed log messages in the Run tool window (see E).
-
Alternatively, to build the project in the Terminal tool window, do the following:
a. Click the Terminal tab at the bottom of IntelliJ (see F).
b. Ensure the directory is pointing to the project's root directory.
c. Type
mvn clean install. This command does a clean build of the project, and you should seeBuild Success.
-
-
Once the build finishes, a new folder named
targetappears in the project's base directory, and you can find the SOI filesimplesoi.soein this folder (see G).
If you would like to add third-party libraries as dependencies, you can add them to the project's pom.xml (see H). The POM contains project configuration information, such as the Java compiler (JDK) used, plug-ins used, project's dependencies, and project's version. Learn more about POM dependency management.
Deploy the SOI and testing the SOI's functions
To deploy and test the Simple SOI's functions, follow the instructions at Audit requests in SOIs.