Learn how to display geometries in different projections.
A geometry projection transforms the vertices of a geometric shape from one coordinate system (a spatial reference) to another. For example, you can project a geographic coordinate system such as World Geodetic System 1984 (wkid=4326) to a projected coordinate system such as World Sinusoidal (wkid=54008). A spatial reference has a unique integer identifier, or well-known id (wkid), defined by GIS standards organizations.
Each projection can maintain one of the following: area, angle, or direction. The projection you use is based on your application's requirements. For example, if you have data centered on the North Pole, the Web Mercator (wkid=3857) spatial reference is typically not used, as the pole features are not correctly represented by the projection; there is a large area distortion. Instead, you might use the North Pole Gnomonic (wkid=102034) spatial reference because it preserves the area around the North Pole.
In this tutorial, you will access a feature service that has a spatial reference of Web Mercator (wkid=3857). The layer's polygon features will be projected on-the-fly to the new spatial reference as they are displayed in the map view. You can select a different spatial reference from a list, and the features will be reprojected to that spatial reference. Tap a location on the map to display a point buffer and a callout that shows the point's x/y coordinates. As you change spatial references, observe the buffer and coordinates change for that same location on the earth. Additionally, for a given spatial reference, you can tap around the map to see how the buffer distorts at different locations.
For detailed information on projected coordinate systems, including well-known IDs (WKIDs), areas of use, and maximum/minimum latitude and longitude, download the Coordinate systems and transformation zip file and see the Projected Coordinate System tables PDF.
For general information on spatial references, see Spatial references in Reference topics.
For specific information on spatial references in ArcGIS Maps SDKs for Native Apps, see Spatial references.
Prerequisites
Before starting this tutorial, you need the following:
-
An ArcGIS Location Platform or ArcGIS Online account.
-
A development and deployment environment that meets the system requirements.
-
An IDE for Android development in Kotlin.
Steps
Get an access token
You need an access token to use the location services used in this tutorial.
-
Go to the Create an API key tutorial to obtain an access token using your ArcGIS Location Platform or ArcGIS Online account.
-
Ensure that the following privilege is enabled: Location services > Basemaps > Basemap styles service.
-
Copy the access token as it will be used in the next step.
To learn more about other ways to get an access token, go to Types of authentication.
Open an Android Studio project
-
To start this tutorial, complete the Display a map tutorial, or download and unzip the Display a map solution in a new folder.
-
Modify the old project for use in this new tutorial.
-
On your file system, delete the .idea folder, if present, at the top level of your project.
-
In the Android view, open app > res > values > strings.xml.
In the
<string name="appelement, change the text content to Display projected geometries._name" > strings.xmlUse dark colors for code blocks <resources> <string name="app_name">Display projected geometries</string> </resources> -
In the Android view, open Gradle Scripts > settings.gradle.kts.
Change the value of
rootto "Display projected geometries".Project.name settings.gradle.ktsUse dark colors for code blocks dependencyResolutionManagement { repositoriesMode.set(RepositoriesMode.FAIL_ON_PROJECT_REPOS) repositories { google() mavenCentral() maven { url = uri("https://esri.jfrog.io/artifactory/arcgis") } } } rootProject.name = "Display projected geometries" include(":app") -
The UI theme composable in Display a map tutorial was
Display. Rename the theme composable throughout the tutorial by refactoringA Map Theme Display.A Map Theme In the Android view, open app > kotlin+java > com.exmple.app > ui.theme > Theme.kt.
Right-click the function name
Displayand select Refactor -> Rename. Replace the name withA Map Theme Display.Projected Geometries Theme.ktUse dark colors for code blocks Copy @Composable fun DisplayAMapTheme( darkTheme: Boolean = isSystemInDarkTheme(), // Dynamic color is available on Android 12+ dynamicColor: Boolean = true, content: @Composable () -> Unit ) { val colorScheme = when { dynamicColor && Build.VERSION.SDK_INT >= Build.VERSION_CODES.S -> { val context = LocalContext.current if (darkTheme) dynamicDarkColorScheme(context) else dynamicLightColorScheme(context) } darkTheme -> DarkColorScheme else -> LightColorScheme } -
Click File > Sync Project with Gradle files. Android Studio will recognize your changes and create a new .idea folder.
-
-
Set the API key using the copied access token.
An API Key gives your app access to secure resources used in this tutorial.
-
In Android Studio: in the Android view, open app > java > com.example.app > MainActivity.
-
In the
setfunction, find theApi Key() ApiKey.create()call and paste your copied access token inside the double quotes, replacing YOUR_ACCESS_TOKEN.MainActivity.ktUse dark colors for code blocks Copy private fun setApiKey() { ArcGISEnvironment.apiKey = ApiKey.create("YOUR_ACCESS_TOKEN") }
-
Add imports
Modify import statements to reference the packages and classes required for this tutorial.
@file:OptIn(ExperimentalMaterial3Api::class)
package com.example.app.screens
import android.util.Log
import androidx.compose.foundation.layout.Arrangement
import androidx.compose.foundation.layout.Column
import androidx.compose.foundation.layout.PaddingValues
import androidx.compose.foundation.layout.fillMaxSize
import androidx.compose.foundation.layout.fillMaxWidth
import androidx.compose.foundation.layout.padding
import androidx.compose.material3.DropdownMenuItem
import androidx.compose.material3.ExperimentalMaterial3Api
import androidx.compose.material3.ExposedDropdownMenuBox
import androidx.compose.material3.ExposedDropdownMenuDefaults
import androidx.compose.material3.MaterialTheme
import androidx.compose.material3.MenuAnchorType
import androidx.compose.material3.Scaffold
import androidx.compose.material3.Text
import androidx.compose.material3.TextField
import androidx.compose.material3.TopAppBar
import androidx.compose.runtime.Composable
import androidx.compose.runtime.getValue
import androidx.compose.runtime.mutableIntStateOf
import androidx.compose.runtime.mutableStateOf
import androidx.compose.runtime.remember
import androidx.compose.runtime.rememberCoroutineScope
import androidx.compose.runtime.setValue
import androidx.compose.ui.Modifier
import androidx.compose.ui.res.stringResource
import androidx.compose.ui.text.TextStyle
import androidx.compose.ui.unit.TextUnit
import androidx.compose.ui.unit.TextUnitType
import androidx.compose.ui.unit.dp
import com.arcgismaps.Color
import com.arcgismaps.data.ServiceFeatureTable
import com.arcgismaps.geometry.Envelope
import com.arcgismaps.geometry.GeodeticCurveType
import com.arcgismaps.geometry.GeometryEngine
import com.arcgismaps.geometry.LinearUnit
import com.arcgismaps.geometry.Point
import com.arcgismaps.geometry.SpatialReference
import com.arcgismaps.mapping.ArcGISMap
import com.arcgismaps.mapping.layers.FeatureLayer
import com.arcgismaps.mapping.symbology.SimpleFillSymbol
import com.arcgismaps.mapping.symbology.SimpleFillSymbolStyle
import com.arcgismaps.mapping.symbology.SimpleLineSymbol
import com.arcgismaps.mapping.symbology.SimpleLineSymbolMarkerStyle
import com.arcgismaps.mapping.symbology.SimpleLineSymbolStyle
import com.arcgismaps.mapping.symbology.SimpleMarkerSymbol
import com.arcgismaps.mapping.symbology.SimpleMarkerSymbolStyle
import com.arcgismaps.mapping.view.Graphic
import com.arcgismaps.mapping.view.GraphicsOverlay
import com.arcgismaps.mapping.view.SingleTapConfirmedEvent
import com.arcgismaps.toolkit.geoviewcompose.MapView
import com.arcgismaps.toolkit.geoviewcompose.theme.CalloutDefaults
import com.arcgismaps.toolkit.geoviewcompose.MapViewScope
import com.example.app.R
import kotlinx.coroutines.launch
import kotlin.math.round
Add utilities
Delete some unneeded code inherited from the Display a map tutorial. Then add some utilities.
-
In
Main, delete the body of theScreen.kt Maincomposable and the entireScreen() createfunction.Map() MainScreen.ktUse dark colors for code blocks @Composable fun MainScreen() { val map = remember { createMap() } Scaffold( topBar = { TopAppBar(title = { Text(text = stringResource(id = R.string.app_name)) }) } ) { MapView( modifier = Modifier.fillMaxSize().padding(it), arcGISMap = map ) } } fun createMap(): ArcGISMap { return ArcGISMap(BasemapStyle.ArcGISTopographic).apply { initialViewpoint = Viewpoint( latitude = 34.0270, longitude = -118.8050, scale = 72000.0 ) } } -
At the top-level of the file, create two utilities that will be used throughout this tutorial: a function to log errors and an extension function to round
Doublevalues to five decimal places.Top-level in MainScreen.ktUse dark colors for code blocks private fun logError(error: Throwable) { Log.e("MainScreen.kt", error.message.toString(), error.cause) } private fun Double.roundToFiveDecimals(): Double { return round(this * 100000.0) / 100000.0 }
Create a graphic and a callout
A line graphic will show the full extent of the current map. A callout will indicate a point on the map and display the point's x/y coordinates.
-
Create a
Graphicto represent the world extent using dashed-lines to denote the boundaries. Then create aGraphicsOverlayand add the world boundary graphic to it. The envelope for the extent is expressed in WGS84, but the vertices will be projected on-the-fly to the spatial reference of the map.Top-level in MainScreen.ktUse dark colors for code blocks private val worldBoundaryGraphic = Graphic( symbol = SimpleFillSymbol( style = SimpleFillSymbolStyle.Solid, color = Color.transparent, outline = SimpleLineSymbol().apply { color = Color.fromRgba(r = 50, g = 50, b = 50, a = 192) width = 0.5f style = SimpleLineSymbolStyle.Dash } ), // The envelope covers the world extent of the map. geometry = Envelope( xMin = -180.0, yMin = -90.0, xMax = 180.0, yMax = 90.0, spatialReference = SpatialReference.wgs84() ) ) private val boundaryGraphicsOverlay by mutableStateOf( GraphicsOverlay(graphics = listOf(worldBoundaryGraphic)) ) -
Create a variable with mutable state named
callout. Initialize it to (10.0, -30.0), specifying the WGS84 spatial reference.Point Top-level in MainScreen.ktUse dark colors for code blocks // Keep track of the state of the callout point. private var calloutPoint: Point by mutableStateOf( Point(x = -10.0, y = 30.0, SpatialReference.wgs84()) ) -
Define a composable function named
Calloutthat adds the ArcGIS Maps SDK for Kotlin ToolkitContainer Calloutcomponent. TheCallouttakes aContainer MapViewScopeparameter.Note that the callout will be visible when the app launches.
Top-level in MainScreen.ktUse dark colors for code blocks // Show a callout using the callout point for location and text. @Composable private fun CalloutContainer(mapViewScope: MapViewScope) { mapViewScope.Callout( location = calloutPoint, // Optional parameters to customize the callout appearance. shapes = CalloutDefaults.shapes(calloutContentPadding = PaddingValues(8.dp)) ) { Column { Text( text = "x = ${calloutPoint.x.roundToFiveDecimals()}\ny = ${calloutPoint.y.roundToFiveDecimals()}", style = MaterialTheme.typography.labelSmall ) } } }
Create a blank map and a feature layer
In this tutorial, you will create a map using just a spatial reference instead of using a Basemap. A feature layer will be then be added to the map. The World Countries (Generalized) feature service used in this tutorial has been published with Web Mercator spatial reference. When displayed in the map view, features are projected on-the-fly to the spatial reference of the current map.
First, create a new map.
-
Create a mutable state
ArcGISMapwith the WGS84 spatial reference and a white background to hide the grid. Note that the map starts out as blank.Top-level in MainScreen.ktUse dark colors for code blocks private var map by mutableStateOf( ArcGISMap(SpatialReference.wgs84()).apply { backgroundColor = Color.white } ) -
Create a
ServiceFeatureTablefrom the feature service. Then create aFeatureLayerfrom that table.Top-level in MainScreen.ktUse dark colors for code blocks private val serviceFeatureTable = ServiceFeatureTable( uri = "https://services3.arcgis.com/GVgbJbqm8hXASVYi/ArcGIS/rest/services/World_Countries_(Generalized)/FeatureServer/0" ) private val featureLayer = FeatureLayer.createWithFeatureTable(featureTable = serviceFeatureTable)
Add feature layer and project callout point
When the map's spatial reference is ready to access, the Map invokes a callback, where you can add the feature layer to the map and project the callout point.
-
Create the callback
onas a suspend function that takes the spatial reference. Then add the feature layer to the map's operational layers, and load the layer.Spatial Reference Changed() Top-level in MainScreen.ktUse dark colors for code blocks private suspend fun onSpatialReferenceChanged(newSpatialReference: SpatialReference) { map.operationalLayers.add(featureLayer) featureLayer.load().onFailure { error -> logError(error) } } -
Project the callout point to the spatial reference.
Top-level in MainScreen.ktUse dark colors for code blocks private suspend fun onSpatialReferenceChanged(newSpatialReference: SpatialReference) { map.operationalLayers.add(featureLayer) featureLayer.load().onFailure { error -> logError(error) } // Project the callout point so it has the right spatial reference when used by the callout. calloutPoint = GeometryEngine.projectOrNull( geometry = calloutPoint, spatialReference = newSpatialReference ) ?: return logError(Exception("Callout point's projection is null.")) }
Enable user to select a spatial reference
The user will select a spatial reference by name from a drop-down menu to see the feature layer projected in a different spatial reference.
The projection's name is the same as the short name of the spatial reference to which it is projecting (the output spatial reference of the projection).
Your finished app will have two drop-down menus, one above the other. The upper menu displays the projection types, such as "maintain area" or "maintain length". The lower menu displays the projection names for that type.
-
Create an enum that contains a constant for each projection that a user can select. Each enum constant has two properties:
labelandwkid.Top-level in MainScreen.ktUse dark colors for code blocks // List of various projection names along with their respective label and wkid. // The name of a projection is the spatial reference it projects to. private enum class ProjectionName(val label: String, val wkid: Int) { WGS84(label = "WGS84 (GCS) -> pseudo Plate Carrée (Cylindrical)", wkid = 4326), WorldCassini(label = "World Cassini (Cylindrical)", wkid = 54028), WorldEquidistant(label = "World Equidistant conic (Conic)", wkid = 54027), WorldStereographic(label = "World Stereographic (Azimuthal)", wkid = 54026), WorldEckertVI(label = "World Eckert VI (Pseudocylindrical)", wkid = 54010), WorldSinusoidal(label = "World Sinusoidal (Pseudocylindrical)", wkid = 54008), NorthPoleGnomonic(label = "North Pole Gnomonic (Azimuthal", wkid = 102034), WebMercator(label = "Web Mercator Auxiliary Sphere (Cylindrical)", wkid = 3857), WorldGallStereographic(label = "World Gall Stereographic (Cylindrical)", wkid = 54016), WorldWinkelTripel(label = "World Winkel Tripel (Pseudoazimuthal)", wkid = 54042), WorldFullerDymaxionMap(label = "World Fuller / Dymaxion map (Polyhedral)", wkid = 54050) } -
Create a list of projection types. Each item in the list is a
Pairin which the first element is the projection type and the second element is a list of projection names that have that type. Note that each projection name belongs to only one projection type.Top-level in MainScreen.ktUse dark colors for code blocks // List of various projection types long with their respective list of spatial references. private val projectionTypes = listOf( "Equidistant (maintain length)" to listOf( ProjectionName.WGS84, ProjectionName.WorldCassini, ProjectionName.WorldEquidistant ), "Conformal (maintain angles)" to listOf( ProjectionName.WorldStereographic ), "Equal-area (maintain area)" to listOf( ProjectionName.WorldEckertVI, ProjectionName.WorldSinusoidal ), "Gnomonic (distances)" to listOf( ProjectionName.NorthPoleGnomonic ), "Compromise (distort all)" to listOf( ProjectionName.WebMercator, ProjectionName.WorldGallStereographic, ProjectionName.WorldWinkelTripel, ProjectionName.WorldFullerDymaxionMap ) ) -
Create a composable named
Projectionthat will contain the two drop-down menus.By Type Dropdown Menu Define state for the drop-down menus:
is: Boolean for whether the projection type drop-down menu is currently expanded.Projection Type Expanded is: Boolean for whether the projection name drop-down menu is currently expanded.Projection Name Expanded selected: Index of the current selection in the projection type menu.Projection Type Index selected: Index of the current selection in the projection name menu.Projection Name Index
Top-level in MainScreen.ktUse dark colors for code blocks @OptIn(ExperimentalMaterial3Api::class) @Composable private fun ProjectionByTypeDropdownMenu(onProjectionSelected: (ProjectionName) -> Unit) { // Expanded boolean for the projection type drop-down menu. var isProjectionTypeExpanded by remember { mutableStateOf(false) } // Expanded boolean for the project name drop-down menu. var isProjectionNameExpanded by remember { mutableStateOf(false) } // The index of the current selection in project types menu. var selectedProjectionTypeIndex by remember { mutableIntStateOf(0) } // The index of the current selection in the project name menu. var selectedProjectionNameIndex by remember { mutableIntStateOf(0) } } -
Inside the new
Projectioncomposable, create the upper drop-down menu for selecting the projection type. Add anBy Type Dropdown Menu Exposed.Drop Down Menu Box In ProjectionByTypeDropdownMenu()Use dark colors for code blocks ExposedDropdownMenuBox(modifier = Modifier.fillMaxWidth(), expanded = isProjectionTypeExpanded, onExpandedChange = { isProjectionTypeExpanded = !isProjectionTypeExpanded }) { TextField( label = { Text("Select a projection type") }, value = projectionTypes[selectedProjectionTypeIndex].first, onValueChange = {}, readOnly = true, trailingIcon = { ExposedDropdownMenuDefaults.TrailingIcon(expanded = isProjectionTypeExpanded) }, modifier = Modifier .fillMaxWidth() .menuAnchor(MenuAnchorType.PrimaryNotEditable, true) ) ExposedDropdownMenu( expanded = isProjectionTypeExpanded, onDismissRequest = { isProjectionTypeExpanded = false } ) { projectionTypes.forEachIndexed { index, selectedOption -> DropdownMenuItem( text = { Text(text = selectedOption.first) }, onClick = { selectedProjectionTypeIndex = index isProjectionTypeExpanded = false selectedProjectionNameIndex = 0 onProjectionSelected(selectedOption.second[0]) } ) } } } -
Create the lower drop-down menu for selecting projections of a selected type. Add an
Exposed.Drop Down Menu Box In ProjectionByTypeDropdownMenu()Use dark colors for code blocks ExposedDropdownMenuBox(expanded = isProjectionNameExpanded, onExpandedChange = { isProjectionNameExpanded = !isProjectionNameExpanded }) { TextField( textStyle = TextStyle(fontSize = TextUnit(14f, TextUnitType.Sp)), value = projectionTypes[selectedProjectionTypeIndex].second[selectedProjectionNameIndex].label, label = { Text( text = "Select spacial reference using projection type", fontSize = TextUnit(10f, TextUnitType.Sp) ) }, onValueChange = {}, readOnly = true, trailingIcon = { ExposedDropdownMenuDefaults.TrailingIcon(expanded = isProjectionNameExpanded) }, modifier = Modifier .fillMaxWidth() .menuAnchor(MenuAnchorType.PrimaryNotEditable, true) ) ExposedDropdownMenu( expanded = isProjectionNameExpanded, onDismissRequest = { isProjectionNameExpanded = false } ) { projectionTypes[selectedProjectionTypeIndex].second.forEachIndexed { index, selectedOption -> DropdownMenuItem( text = { Text(text = selectedOption.label) }, onClick = { selectedProjectionNameIndex = index isProjectionNameExpanded = false onProjectionSelected(selectedOption) } ) } } }
Change the spatial reference
To display the feature layer in a new spatial reference, you create a new SpatialReference using the selected projection name, and then create a new map with that spatial reference.
-
Create a suspend function named
changethat takes theSpatial Reference() Projectionselected by the user. Create a new spatial reference, using theName wkidof the selected option. If the new spatial reference is the same as the current one, the user has selected the same projection name in the drop-down menu. Return without creating a new map.Top-level in MainScreen.ktUse dark colors for code blocks private suspend fun changeSpatialReference(selectedOption: ProjectionName) { val newSpatialReference = SpatialReference(selectedOption.wkid) // If user clicked on the same spatial reference then, don't create a new map. if (newSpatialReference == map.spatialReference) return } -
Remove the feature layer from the operational layers of the current map so the layer is no longer owned by that map. Then create a new
ArcGISMapusing the new spatial reference, and load the map.Top-level in MainScreen.ktUse dark colors for code blocks private suspend fun changeSpatialReference(selectedOption: ProjectionName) { val newSpatialReference = SpatialReference(selectedOption.wkid) // If user clicked on the same spatial reference then, don't create a new map. if (newSpatialReference == map.spatialReference) return // Remove the feature layer on the old map so the layer is free to be used on the new map. map.operationalLayers.remove(featureLayer) map = ArcGISMap(newSpatialReference).apply { backgroundColor = Color.white } map.load().onFailure { error -> logError(error) } }
When the map's spatial reference is ready to be accessed, the on you created in an earlier step will be automatically invoked.
Create buffer graphics
You will need graphics to display a geodetic buffer and its point.
-
Create graphics to display a point and a geodetic buffer around the point. Then create a
GraphicsOverlayand add the graphics to it.Top-level in MainScreen.ktUse dark colors for code blocks private var bufferPointGraphic = Graphic( geometry = null, symbol = SimpleMarkerSymbol( style = SimpleMarkerSymbolStyle.Circle, color = Color.red, size = 5f ).apply { outline = SimpleLineSymbol( style = SimpleLineSymbolStyle.Dot, color = Color.white, width = 0.5f, markerStyle = SimpleLineSymbolMarkerStyle.None ) } ) var bufferGraphic = Graphic( geometry = null, symbol = SimpleFillSymbol( style = SimpleFillSymbolStyle.Solid, color = Color.fromRgba(r = 150, g = 130, b = 220, a = 216), outline = SimpleLineSymbol( style = SimpleLineSymbolStyle.Dash, color = Color.fromRgba(r = 255, g = 255, b = 255, a = 255), width = 0.5f, markerStyle = SimpleLineSymbolMarkerStyle.None ) ) ) private val bufferGraphicsOverlay by mutableStateOf( GraphicsOverlay(graphics = listOf(bufferPointGraphic, bufferGraphic)) )
Visualize spatial distortion effects
When you tap on the map, the buffer graphics display at the tapped point, and the Callout moves to that location. As you tap around the map, the buffer becomes distorted in size and/or shape. The distortions vary, depending on the current spatial reference.
The screen tap results in a single-tap confirmed event, whose map property returns the tapped point in the spatial reference of the map. Use the map point to create a point buffer and trigger the callout.
-
Create a function that takes a single-tap confirmed event.
Get the map point from the event and call
GeometryEngine.bufferGeodeticOrNull()with the map point, a distance of 1000 kilometers, and curve type of geodesic. Next, display the graphics by assigning the buffer as the geometry of the buffer graphic, and the map point as the geometry of the buffer point graphic.Top-level in MainScreen.ktUse dark colors for code blocks private fun createBuffer(singleTapConfirmedEvent: SingleTapConfirmedEvent) { val mapPoint = singleTapConfirmedEvent.mapPoint ?: return logError(Exception("Tap event has no map point.")) val buffer = GeometryEngine.bufferGeodeticOrNull( geometry = mapPoint, distance = 1000.0, distanceUnit = LinearUnit.kilometers, maxDeviation = Double.NaN, curveType = GeodeticCurveType.Geodesic ) ?: return logError(Exception("Failed to create a buffer from the map point")) bufferGraphic.geometry = buffer bufferPointGraphic.geometry = mapPoint } -
Assign the map point to
callout. In response, thePoint Calloutwill display at the map point, showing the point's x/y coordinates in the current spatial reference.Top-level in MainScreen.ktUse dark colors for code blocks bufferGraphic.geometry = buffer bufferPointGraphic.geometry = mapPoint calloutPoint = mapPoint
Connect your functionality to the map view
You will now connect your functionality to the MapView composable. Pass additional parameters to the Map so it can display UI for your top-level functions and properties.
-
In the
Maincomposable, create a local variable namedScreen coroutine.Scope In MainScreen() composableUse dark colors for code blocks @Composable fun MainScreen() { val coroutineScope = rememberCoroutineScope() } -
Add a
Scaffoldwith the following code, which adds aColumnand theMapView.Note that in the
Column's content, you call theProjectioncomposable, passing in a lambda. The lambda takes aBy Type Dropdown Menu() dropdownparameter and callsSelection : Projection Name changewith it.Spatial Reference() In MainScreen() composableUse dark colors for code blocks @Composable fun MainScreen() { val coroutineScope = rememberCoroutineScope() Scaffold(topBar = { TopAppBar(title = { Text(text = stringResource(id = R.string.app_name)) }) }) { innerPadding -> Column( modifier = Modifier.padding(innerPadding), verticalArrangement = Arrangement.spacedBy(12.dp) ) { ProjectionByTypeDropdownMenu( onProjectionSelected = { dropdownSelection -> coroutineScope.launch { changeSpatialReference(dropdownSelection) } } ) MapView( modifier = Modifier .fillMaxSize() .weight(1f), arcGISMap = map, ) { } } } } -
In the
MapViewcall, pass the following additional parameters:- A list of the two graphics overlays.
- A lambda that invokes your
oncallback, if the new spatial reference is not null.Spatial Reference Changed() - A function reference to your
createcallback that handles the single tap confirmed event.Buffer()
In MainScreen() composableUse dark colors for code blocks MapView( modifier = Modifier .fillMaxSize() .weight(1f), arcGISMap = map, graphicsOverlays = listOf(boundaryGraphicsOverlay, bufferGraphicsOverlay), onSpatialReferenceChanged = { newSpatialReference -> newSpatialReference?.let { coroutineScope.launch { onSpatialReferenceChanged(newSpatialReference) } } }, onSingleTapConfirmed = ::createBuffer ) { } -
In
MapView's content lambda, callCallout, passing inContainer this, which is a reference to theMap.View Scope In MainScreen() composableUse dark colors for code blocks onSingleTapConfirmed = ::createBuffer ) { CalloutContainer(this) }
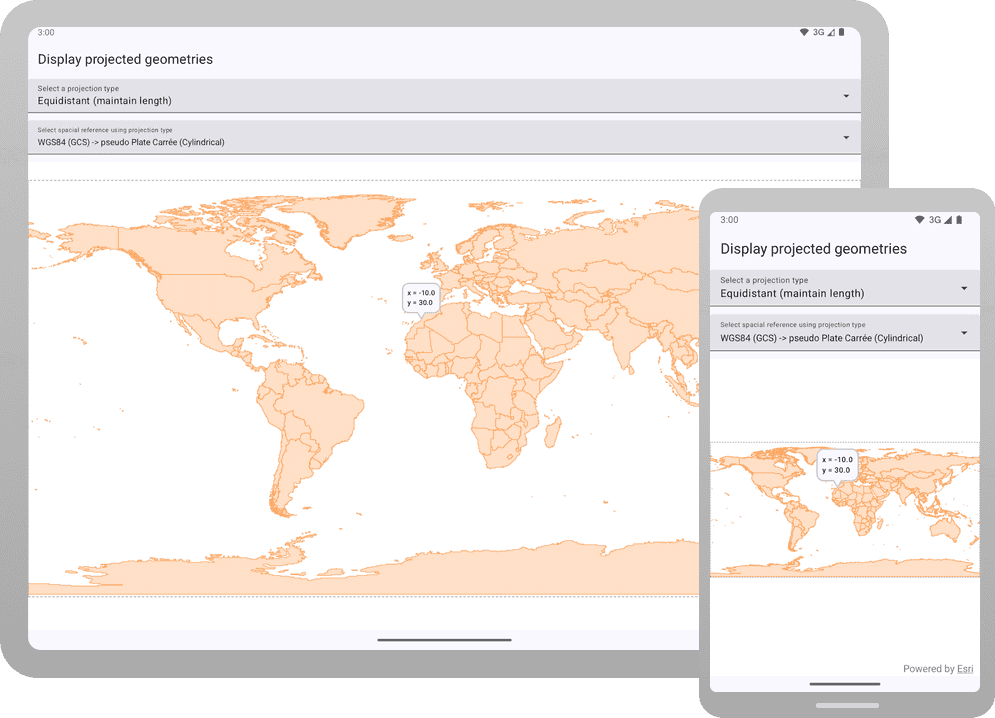
Click Run > Run > app to run the app.
You should see an orange feature layer with no basemap. The initial projection type is Maintain length and the initial spatial reference is WGS84. You should also see a callout pointing to the location at (x = -10, y = 30).
You can interact with this app in two ways to learn about spatial references:
-
View coordinates of the same point in different projections: When the app launches, examine the callout and the point coordinates it displays. Then select other projections from the drop-down menus. You should see that same point with different coordinates for each spatial reference.
-
View spatial distortions of the buffer: In any spatial reference, tap on the map. The point buffer should display on the map, with the tapped point's x/y coordinates showing in a callout. Tap around the map and watch how the buffer's size and shape get distorted. Try other projections and observe how the distortions differ from one spatial reference to another.
What's next?
Learn how to use additional API features, ArcGIS location services, and ArcGIS tools in these tutorials: