Learn how to use a URL to access and display a feature layer in a map.
A map contains layers of geographic data. A map contains a basemap layer and, optionally, one or more data layers. This tutorial shows you how to access and display a feature layer in a map. You access feature layers with an item ID or URL. You will use URLs to access the Trailheads, Trails, and Parks and Open Spaces feature layers and display them in a map.
A feature layer is a dataset in a feature service hosted in ArcGIS. Each feature layer contains features with a single geometry type (point, line, or polygon), and a set of attributes. You can use feature layers to store, access, and manage large amounts of geographic data for your applications.
In this tutorial, you use URLs to access and display three different feature layers hosted in ArcGIS Online:
Prerequisites
Before starting this tutorial:
-
You need an ArcGIS Location Platform or ArcGIS Online account.
-
Ensure your development environment meets the system requirements.
Optionally, you may want to install the ArcGIS Maps SDK for .NET to get access to project templates in Visual Studio (Windows only) and offline copies of the NuGet packages.
Develop or download
You have two options for completing this tutorial:
Option 1: Develop the code
To start the tutorial, complete the Display a map tutorial. This creates a map to display the Santa Monica Mountains in California using the topographic basemap from the ArcGIS basemap styles service.
Open a Visual Studio solution
- Open the Visual Studio solution you created by completing the Display a map tutorial.
- Continue with the following instructions to add feature layers that will display above the basemap.
Update the tutorial name used in the project (optional)
The Visual Studio solution, project, and the namespace for all classes currently use the name Display. You can rename these if you prefer them to reflect the current tutorial. Renaming is not required, your code will still work if you keep the original name.
The tutorial instructions and code use the name Add for the solution, project, and namespace. You can choose any name you like, but it should be the same for each of these.
-
Update the name for the solution and the project.
- In Visual Studio, in the Solution Explorer, right-click the solution name and choose Rename. Provide the new name for your solution.
- In the Solution Explorer, right-click the project name and choose Rename. Provide the new name for your project.
-
Rename the namespace used by classes in the project.
- In the Solution Explorer, expand the project node.
- Double-click MapViewModel.cs in the Solution Explorer to open the file.
- In the
Mapclass, double-click the namespace name (View Model Display) to select it, and then right-click and choose Rename....A Map - Provide the new name for the namespace.
- Click Apply in the Rename: DisplayAMap window that appears in the upper-right of the code window. This will rename the namespace throughout your project.
-
Build the project.
- Choose Build > Build solution (or press <F6>).
Create URIs to reference feature service data
To display three new data layers (also known as operational layers) on top of the current basemap, you will create FeatureLayers using URIs to reference datasets hosted in ArcGIS Online.
-
Open a browser and navigate to the URL for Parks and Open Spaces to view metadata about the layer. To display the layer in your app, you only need the URL.
The ArcGIS REST Services Directory page provides information such as the geometry type, the geographic extent, the minimum and maximum scale at which features are visible, and the attributes (fields) it contains. You can preview the layer by clicking on ArcGIS.com Map in the "View In:" list at the top of the page.
-
In the Visual Studio > Solution Explorer, double-click MapViewModel.cs to open the file.
The project uses the Model-View-ViewModel (MVVM) design pattern to separate the application logic (view model) from the user interface (view).
Mapcontains the view model class for the application, calledView Model.cs Map. See the Microsoft documentation for more information about the Model-View-ViewModel pattern.View Model -
In the
Setupfunction, add code that defines the URIs to the hosted layers. You will add: Trailheads (points), Trails (lines), and Parks and Open Spaces (polygons).Map() Use dark colors for code blocks private void SetupMap() { // Create a new map with a 'topographic vector' basemap. Map map = new Map(BasemapStyle.ArcGISTopographic); // Set the initial viewpoint around the Santa Monica Mountains in California. var mapCenterPoint = new MapPoint(-118.805, 34.027, SpatialReferences.Wgs84); map.InitialViewpoint = new Viewpoint(mapCenterPoint, 100000); // Set the view model's Map property with the map. Map = map; var parksUri = new Uri( "https://services3.arcgis.com/GVgbJbqm8hXASVYi/ArcGIS/rest/services/Parks_and_Open_Space/FeatureServer/0" ); var trailsUri = new Uri( "https://services3.arcgis.com/GVgbJbqm8hXASVYi/ArcGIS/rest/services/Trails/FeatureServer/0" ); var trailheadsUri = new Uri( "https://services3.arcgis.com/GVgbJbqm8hXASVYi/arcgis/rest/services/Trailheads/FeatureServer/0" );
Create feature layers to display the hosted data
You will create three new FeatureLayer to display the hosted layer at each URI.
-
In the
Setupfunction, create new feature layers and pass the appropriate URI to the constructor for each.Map() Use dark colors for code blocks var trailheadsUri = new Uri( "https://services3.arcgis.com/GVgbJbqm8hXASVYi/arcgis/rest/services/Trailheads/FeatureServer/0" ); var parksLayer = new FeatureLayer(parksUri); var trailsLayer = new FeatureLayer(trailsUri); var trailheadsLayer = new FeatureLayer(trailheadsUri); -
Add the feature layers to the map. Data layers are displayed in the order in which they are added. Polygon layers should be added before layers with lines or points if there's a chance the polygon symbols will obscure features beneath.
Use dark colors for code blocks var parksLayer = new FeatureLayer(parksUri); var trailsLayer = new FeatureLayer(trailsUri); var trailheadsLayer = new FeatureLayer(trailheadsUri); map.OperationalLayers.Add(parksLayer); map.OperationalLayers.Add(trailsLayer); map.OperationalLayers.Add(trailheadsLayer); -
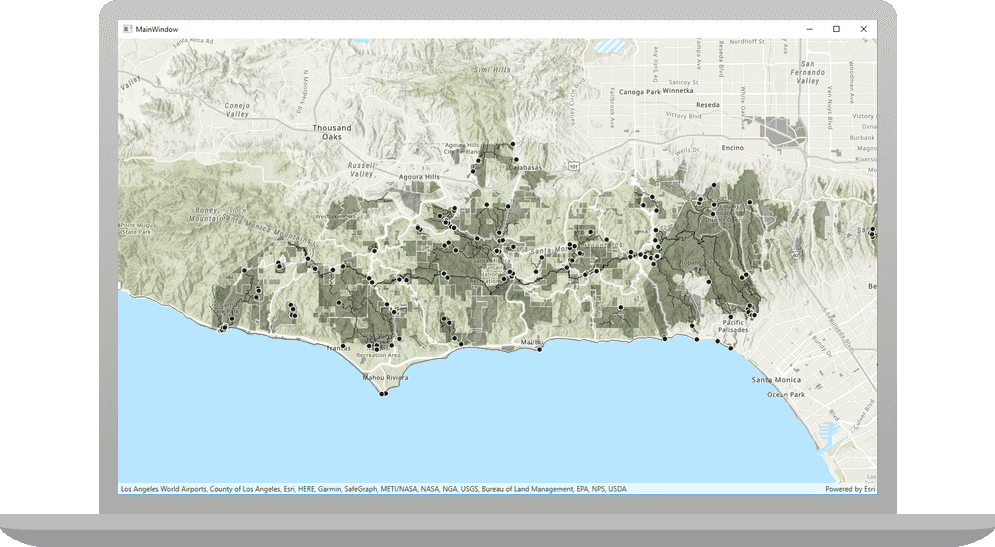
Click Debug > Start Debugging (or press <F5> on the keyboard) to run the app. If your app uses user authentication, enter your ArcGIS Online credentials when prompted.
You should see point, line, and polygon features (representing trailheads, trails, and parks) draw on the map for an area in the Santa Monica Mountains.
Alternatively, you can download the tutorial solution, as follows.
Option 2: Download the solution
-
Click the Download solution link in the right-hand panel of the page.
-
Unzip the file to a location on your machine.
-
Open the
.slnfile in Visual Studio.
Since the downloaded solution does not contain authentication credentials, you must first set up authentication to create credentials, and then add the developer credentials to the solution.
Set up authentication
To access the secure ArcGIS location services used in this tutorial, you must implement API key authentication or user authentication using an ArcGIS Location Platform or an ArcGIS Online account.
You can implement API key authentication or user authentication in this tutorial. Compare the differences below:
API key authentication
- Users are not required to sign in.
- Requires creating an API key credential with the correct privileges.
- API keys are long-lived access tokens.
- Service usage is billed to the API key owner/developer.
- Simplest authentication method to implement.
- Recommended approach for new ArcGIS developers.
Learn more in API key authentication.
User authentication
- Users are required to sign in with an ArcGIS account.
- User accounts must have privilege to access the ArcGIS services used in application.
- Requires creating OAuth credentials.
- Application uses a redirect URL and client ID.
- Service usage is billed to the organization of the user signed into the application.
Learn more in User authentication.
Create a new API key access token with privileges to access the secure resources used in this tutorial.
-
Complete the Create an API key tutorial and create an API key with the following privilege(s):
- Privileges
- Location services > Basemaps
- Privileges
-
Copy and paste the API key access token into a safe location. It will be used in a later step.
Set developer credentials in the solution
To allow your app users to access ArcGIS location services, use the developer credentials that you created in the Set up authentication step to authenticate requests for resources.
-
In Visual Studio, in the Solution Explorer, click App.xaml.cs to open the file.
-
Set the
ArcGISproperty with your API key access token.Environment. Api Key App.xaml.csUse dark colors for code blocks protected override void OnStartup(StartupEventArgs e) { base.OnStartup(e); // Set the access token for ArcGIS Maps SDK for .NET. Esri.ArcGISRuntime.ArcGISRuntimeEnvironment.ApiKey = "YOUR_ACCESS_TOKEN"; // Call a function to set up the AuthenticationManager for OAuth. UserAuth.ArcGISLoginPrompt.SetChallengeHandler(); } -
Remove the code that sets up user authentication.
App.xaml.csUse dark colors for code blocks protected override void OnStartup(StartupEventArgs e) { base.OnStartup(e); // Set the access token for ArcGIS Maps SDK for .NET. Esri.ArcGISRuntime.ArcGISRuntimeEnvironment.ApiKey = "YOUR_ACCESS_TOKEN"; // Call a function to set up the AuthenticationManager for OAuth. UserAuth.ArcGISLoginPrompt.SetChallengeHandler(); }
Best Practice: The access token is stored directly in the code as a convenience for this tutorial. Do not store credentials directly in source code in a production environment.
Run the solution
Click Debug > Start Debugging (or press <F5> on the keyboard) to run the app. If your app uses user authentication, enter your ArcGIS Online credentials when prompted.
You should see point, line, and polygon features (representing trailheads, trails, and parks) draw on the map for an area in the Santa Monica Mountains.
What's next?
Learn how to use additional API features, ArcGIS location services, and ArcGIS tools in these tutorials: