Learn how to create and display a map from a web map stored in ArcGIS.
A web map contains the definition of a map, including properties such as the basemap, initial extent, layers, styles, pop-ups, and labels. You can author and save web maps using the Map Viewer or ArcGIS Pro and share them in ArcGIS. Each web map is stored as an item in ArcGIS Online or ArcGIS Enterprise, allowing you to access a web map from a portal using its item ID and display it in your app.
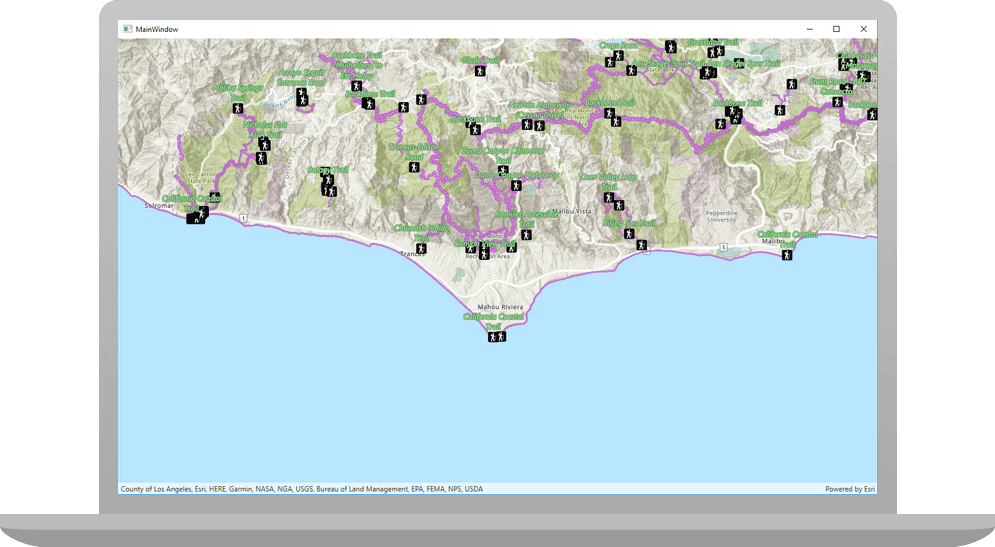
In this tutorial, you use a web map's item ID to display a map of trails, trailheads and parks in the Santa Monica Mountains . The web map is hosted in ArcGIS Online.
Prerequisites
Before starting this tutorial:
-
You need an ArcGIS Location Platform or ArcGIS Online account.
-
Ensure your development environment meets the system requirements.
Optionally, you may want to install the ArcGIS Maps SDK for .NET to get access to project templates in Visual Studio (Windows only) and offline copies of the NuGet packages.
Develop or download
You have two options for completing this tutorial:
Option 1: Develop the code
To start the tutorial, complete the Display a map tutorial. This creates a map to display the Santa Monica Mountains in California using the topographic basemap from the ArcGIS basemap styles service.
Open a Visual Studio solution
- Open the Visual Studio solution you created by completing the Display a map tutorial.
- Continue with the following instructions to display a web map hosted in ArcGIS Online in the map view.
Update the tutorial name used in the project (optional)
The Visual Studio solution, project, and the namespace for all classes currently use the name Display. Follow the steps below if you prefer the name to reflect the current tutorial. These steps are not required, your code will still work if you keep the original name.
The tutorial instructions and code use the name Display for the solution, project, and namespace. You can choose any name you like, but it should be the same for each of these.
-
Update the name for the solution and the project.
- In Visual Studio, in the Solution Explorer, right-click the solution name and choose Rename. Provide the new name for your solution.
- In the Solution Explorer, right-click the project name and choose Rename. Provide the new name for your project.
-
Rename the namespace used by classes in the project.
- In the Solution Explorer, expand the project node.
- Double-click MapViewModel.cs in the Solution Explorer to open the file.
- In the
Mapclass, double-click the namespace name (View Model Display) to select it, and then right-click and choose Rename....A Map - Provide the new name for the namespace.
- Click Apply in the Rename: DisplayAMap window that appears in the upper-right of the code window. This will rename the namespace throughout your project.
-
Build the project.
- Choose Build > Build solution (or press <F6>).
Get the web map item ID
You can use ArcGIS tools to create and view web maps. Use the Map Viewer to identify the web map item ID. This item ID will be used later in the tutorial.
- Go to the LA Trails and Parks web map in the Map Viewer in ArcGIS Online. This web map displays trails, trailheads and parks in the Santa Monica Mountains.
- Make a note of the item ID at the end of the browser's URL. The item ID should be
41281c51f9de45edaf1c8ed44bb10e30
Display the web map
You can display a web map using the web map's item ID. Create a map from the web map portal item, and display it in your app.
-
In Visual Studio, in the Solution Explorer, double-click MapViewModel.cs to open the file.
The project uses the Model-View-ViewModel (MVVM) design pattern to separate the application logic (view model) from the user interface (view).
Mapcontains the view model class for the application, calledView Model.cs Map. See the Microsoft documentation for more information about the Model-View-ViewModel pattern.View Model -
Add additional required
usingstatements at the top of the class.MapViewModel.csUse dark colors for code blocks using System; using System.Collections.Generic; using System.Text; using Esri.ArcGISRuntime.Geometry; using Esri.ArcGISRuntime.Mapping; using System.ComponentModel; using System.Runtime.CompilerServices; using Esri.ArcGISRuntime.Portal; using System.Threading.Tasks; -
In the MapViewModel class, remove all the existing code in the
Setupfunction.Map() MapViewModel.csUse dark colors for code blocks private void SetupMap() { // Create a new map with a 'topographic vector' basemap. var map = new Map(BasemapStyle.ArcGISTopographic); // Set the initial viewpoint around the Santa Monica Mountains in California. var mapCenterPoint = new MapPoint(-118.805, 34.027, SpatialReferences.Wgs84); map.InitialViewpoint = new Viewpoint(mapCenterPoint, 100000); // Set the view model's Map property with the map. Map = map; } -
Modify the signature of the
Setupfunction to include theMap() asynckeyword and returnTaskrather thanvoid.MapViewModel.csUse dark colors for code blocks private async Task SetupMap() { }When calling methods asynchronously inside a function (using the
awaitkeyword), theasynckeyword is required in the signature.Although a
voidreturn type would continue to work, this is not considered best practice. Exceptions thrown by anasync voidmethod cannot be caught outside of that method, are difficult to test, and can cause serious side effects if the caller is not expecting them to be asynchronous. The only circumstance whereasync voidis acceptable is when using an event handler, such as a button click.See the Microsoft documentation for more information about Asynchronous programming with async and await.
-
Modify the call to
Setup(in theMap() Mapconstructor) to avoid a compilation warning. After changingView Model Setupto an asynchronous method, the following warning appears in the Visual Studio Error List.Map() Use dark colors for code blocks Copy Because this call is not awaited, execution of the current method continues before the call is completed. Consider applying the 'await' operator to the result of the call.Because your code does not anticipate a return value from this call, the warning can be ignored. To be more specific about your intentions with this call and to address the warning, add the following code to store the return value in a discard.
MapViewModel.csUse dark colors for code blocks public MapViewModel() { _ = SetupMap(); }From the Microsoft documentation:
"[Discards] are placeholder variables that are intentionally unused in application code. Discards are equivalent to unassigned variables; they don't have a value. A discard communicates intent to the compiler and others that read your code: You intended to ignore the result of an expression."
-
Add code to the
Setupfunction to create aMap() PortalItemfor the web map. To do this, provide the web map's item ID and anArcGISPortalreferencing ArcGIS Online.MapViewModel.csUse dark colors for code blocks private async Task SetupMap() { // Create a portal. If a URI is not specified, www.arcgis.com is used by default. ArcGISPortal portal = await ArcGISPortal.CreateAsync(); // Get the portal item for a web map using its unique item id. PortalItem mapItem = await PortalItem.CreateAsync(portal, "41281c51f9de45edaf1c8ed44bb10e30"); } -
Create a
Mapusing thePortalItem. To display the map, set theMapproperty to this newView Model. Map Map.MapViewModel.csUse dark colors for code blocks private async Task SetupMap() { // Create a portal. If a URI is not specified, www.arcgis.com is used by default. ArcGISPortal portal = await ArcGISPortal.CreateAsync(); // Get the portal item for a web map using its unique item id. PortalItem mapItem = await PortalItem.CreateAsync(portal, "41281c51f9de45edaf1c8ed44bb10e30"); // Create the map from the item. Map map = new Map(mapItem); // To display the map, set the MapViewModel.Map property, which is bound to the map view. this.Map = map; } -
Click Debug > Start Debugging (or press <F5> on the keyboard) to run the app. If your app uses user authentication, enter your ArcGIS Online credentials when prompted.
You will see a map of trails, trailheads and parks in the Santa Monica Mountains . Click, drag, and scroll the mouse wheel on the map view to explore the map.
Alternatively, you can download the tutorial solution, as follows.
Option 2: Download the solution
-
Click the Download solution link in the right-hand panel of the page.
-
Unzip the file to a location on your machine.
-
Open the
.slnfile in Visual Studio.
Since the downloaded solution does not contain authentication credentials, you must first set up authentication to create credentials, and then add the developer credentials to the solution.
Set up authentication
To access the secure ArcGIS location services used in this tutorial, you must implement API key authentication or user authentication using an ArcGIS Location Platform or an ArcGIS Online account.
You can implement API key authentication or user authentication in this tutorial. Compare the differences below:
API key authentication
- Users are not required to sign in.
- Requires creating an API key credential with the correct privileges.
- API keys are long-lived access tokens.
- Service usage is billed to the API key owner/developer.
- Simplest authentication method to implement.
- Recommended approach for new ArcGIS developers.
Learn more in API key authentication.
User authentication
- Users are required to sign in with an ArcGIS account.
- User accounts must have privilege to access the ArcGIS services used in application.
- Requires creating OAuth credentials.
- Application uses a redirect URL and client ID.
- Service usage is billed to the organization of the user signed into the application.
Learn more in User authentication.
Create a new API key access token with privileges to access the secure resources used in this tutorial.
-
Complete the Create an API key tutorial and create an API key with the following privilege(s):
- Privileges
- Location services > Basemaps
- Privileges
-
Copy and paste the API key access token into a safe location. It will be used in a later step.
Set developer credentials in the solution
To allow your app users to access ArcGIS location services, use the developer credentials that you created in the Set up authentication step to authenticate requests for resources.
-
In Visual Studio, in the Solution Explorer, click App.xaml.cs to open the file.
-
Set the
ArcGISproperty with your API key access token.Environment. Api Key App.xaml.csUse dark colors for code blocks protected override void OnStartup(StartupEventArgs e) { base.OnStartup(e); // Set the access token for ArcGIS Maps SDK for .NET. Esri.ArcGISRuntime.ArcGISRuntimeEnvironment.ApiKey = "YOUR_ACCESS_TOKEN"; // Call a function to set up the AuthenticationManager for OAuth. UserAuth.ArcGISLoginPrompt.SetChallengeHandler(); } -
Remove the code that sets up user authentication.
App.xaml.csUse dark colors for code blocks protected override void OnStartup(StartupEventArgs e) { base.OnStartup(e); // Set the access token for ArcGIS Maps SDK for .NET. Esri.ArcGISRuntime.ArcGISRuntimeEnvironment.ApiKey = "YOUR_ACCESS_TOKEN"; // Call a function to set up the AuthenticationManager for OAuth. UserAuth.ArcGISLoginPrompt.SetChallengeHandler(); }
Best Practice: The access token is stored directly in the code as a convenience for this tutorial. Do not store credentials directly in source code in a production environment.
Run the solution
Click Debug > Start Debugging (or press <F5> on the keyboard) to run the app. If your app uses user authentication, enter your ArcGIS Online credentials when prompted.
You should see a map of trails, trailheads and parks in the Santa Monica Mountains . Click, drag, and scroll the mouse wheel on the map view to explore the map.
What's next?
Learn how to use additional API features, ArcGIS location services, and ArcGIS tools in these tutorials: