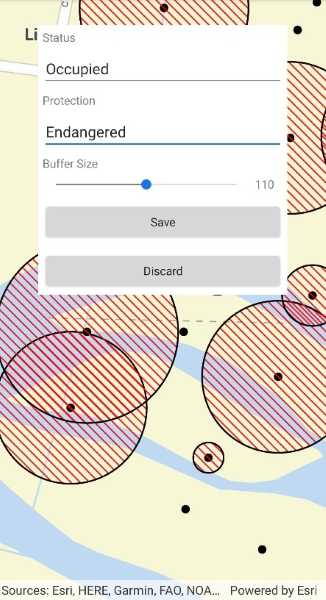
Create and add features whose attribute values satisfy a predefined set of contingencies.

Use case
Contingent values are a data design feature that allow you to make values in one field dependent on values in another field. Your choice for a value on one field further constrains the domain values that can be placed on another field. In this way, contingent values enforce data integrity by applying additional constraints to reduce the number of valid field inputs.
For example, a field crew working in a sensitive habitat area may be required to stay a certain distance away from occupied bird nests, but the size of that exclusion area differs depending on the bird's level of protection according to presiding laws. Surveyors can add points of bird nests in the work area and their selection of the size of the exclusion area will be contingent on the values in other attribute fields.
How to use the sample
Tap on the map to add a feature symbolizing a bird's nest. Then choose values describing the nest's status, protection, and buffer size. Notice how different values are available depending on the values of preceding fields. Once the contingent values are validated, tap "Done" to add the feature to the map.
How it works
- Create and load the
Geodatabasefrom the mobile geodatabase location on file. - Load the
GeodatabaseFeatureTable. - Load the
ContingentValuesDefinitionfrom the feature table withGeodatabaseFeatureTable.ContingentValuesDefinition.LoadAsync(). - Create a new
FeatureLayerfrom the feature table and add it to the map. - Create a new
ArcGISFeatureusingGeodatabaseFeatureTable.CreateFeature(). - Add the new
ArcGISFeatureto the feature table usingGeodatabaseFeatureTable.AddFeatureAsync(newFeature). - After selecting a value from the initial coded values for the first field, retrieve the remaining valid contingent values for each field as you select the values for the attributes.
i. Get theContingentValueResults by usingGeodatabaseFeatureTable.GetContingentValues(newFeature, fieldName)with the feature and the target field by name.
ii. Get a list of validContingentValuesfromContingentValuesResult.ContingentValuesByFieldGroupdictionary with the name of the relevant field group.
iii. Iterate through the list of valid contingent values to create a list ofContingentCodedValuenames or the minimum and maximum values of aContingentRangeValuedepending on the type ofContingentValuereturned. - Set the
ArcGISFeatureattribute values by name withArcGISFeature.SetAttributeValue(fieldName, fieldValue). - Validate the feature's contingent values by using
GeodatabaseFeatureTable.ValidateContingencyConstraints(newFeature)with the created feature. If the resulting list is empty, the selected values are valid.
Relevant API
- CodedValue
- CodedValueDomain
- ContingencyConstraintViolation
- ContingentCodedValue
- ContingentRangeValue
- ContingentValuesDefinition
- ContingentValuesResult
- FeatureTable
Offline data
This sample uses the Contingent values birds nests mobile geodatabase and the Fillmore topographic map vector tile package for the basemap.
About the data
The mobile geodatabase contains birds nests in the Fillmore area, defined with contingent values. Each feature contains information about its status, protection, and buffer size.
Additional information
Learn more about contingent values and how to utilize them on the ArcGIS Pro documentation.
Tags
coded values, contingent values, feature table, geodatabase
Sample Code
<ContentPage x:Class="ArcGISRuntimeXamarin.Samples.AddFeaturesWithContingentValues.AddFeaturesWithContingentValues"
xmlns="http://xamarin.com/schemas/2014/forms"
xmlns:x="http://schemas.microsoft.com/winfx/2009/xaml"
xmlns:esriUI="clr-namespace:Esri.ArcGISRuntime.Xamarin.Forms;assembly=Esri.ArcGISRuntime.Xamarin.Forms">
<Grid>
<esriUI:MapView x:Name="MyMapView" GeoViewTapped="MyMapView_GeoViewTapped" />
<Frame x:Name="FeatureAttributesPopup"
Margin="30"
Padding="0"
BackgroundColor="White"
CornerRadius="0"
HorizontalOptions="Center"
IsVisible="False"
VerticalOptions="Start"
WidthRequest="300">
<StackLayout Margin="5">
<Label Text="Status" />
<Picker x:Name="StatusPicker" />
<Label Text="Protection" />
<Picker x:Name="ProtectionPicker" />
<Label Text="Buffer Size" />
<StackLayout Orientation="Horizontal">
<Slider x:Name="BufferSizeSlider"
MaximumTrackColor="Gray"
MinimumTrackColor="Gray"
ValueChanged="BufferSizeSlider_ValueChanged"
WidthRequest="250" />
<Label x:Name="BufferSizeLabel"
Margin="0,0"
HeightRequest="20"
WidthRequest="40" />
</StackLayout>
<Button x:Name="SaveButton"
Margin="0,5"
Clicked="SaveButton_Clicked"
HorizontalOptions="Center"
Text="Save"
WidthRequest="300" />
<Button x:Name="DiscardButton"
Clicked="DiscardButton_Clicked"
HorizontalOptions="Center"
Text="Discard"
WidthRequest="300" />
</StackLayout>
</Frame>
</Grid>
</ContentPage>