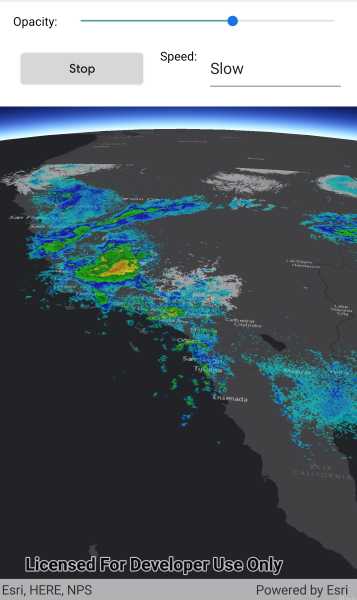
Animate a series of images with an image overlay.

Use case
An image overlay is useful for displaying fast and dynamic images; for example, rendering real-time sensor data captured from a drone. Each frame from the drone becomes a static image which is updated on the fly as the data is made available.
How to use the sample
The application loads a map of the Southwestern United States. Tap the "Start" or "Stop" buttons to start or stop the radar animation. Use the drop down menu to select how quickly the animation plays. Move the slider to change the opacity of the image overlay.
How it works
- Create an
ImageOverlayand add it to theSceneView. - Set up a timer with an initial interval time of 67ms, which will display approximately 15 image frames per second.
- Connect an event to the timer.
- Create a new
ImageFrameevery timeout and set it on the image overlay.
Relevant API
- ImageFrame
- ImageOverlay
- SceneView
Offline data
This sample uses radar images captured by the National Weather Service.
About the data
These radar images were captured by the US National Weather Service (NWS). They highlight the Pacific Southwest sector which is made up of part the western United States and Mexico. For more information visit the National Weather Service website.
Additional information
The supported image formats are GeoTIFF, TIFF, JPEG, and PNG. ImageOverlay does not support the rich processing and rendering capabilities of a RasterLayer. Use Raster and RasterLayer for static image rendering, analysis, and persistence.
Tags
3d, animation, drone, dynamic, image frame, image overlay, real time, rendering
Sample Code
<ContentPage x:Class="ArcGISRuntimeXamarin.Samples.AnimateImageOverlay.AnimateImageOverlay"
xmlns="http://xamarin.com/schemas/2014/forms"
xmlns:x="http://schemas.microsoft.com/winfx/2009/xaml"
xmlns:esriUI="clr-namespace:Esri.ArcGISRuntime.Xamarin.Forms;assembly=Esri.ArcGISRuntime.Xamarin.Forms"
xmlns:resources="clr-namespace:Forms.Resources;assembly=ArcGISRuntime">
<RelativeLayout>
<esriUI:SceneView x:Name="MySceneView"
BindingContext="{x:Reference Name=ResponsiveFormContainer}"
Style="{StaticResource SceneWithFormStyle}" />
<resources:ResponsiveFormContainer x:Name="ResponsiveFormContainer">
<StackLayout>
<Grid>
<Grid.ColumnDefinitions>
<ColumnDefinition Width="auto" />
<ColumnDefinition Width="*" />
</Grid.ColumnDefinitions>
<Label Grid.Column="0"
Margin="5"
Text="Opacity:" />
<Slider Grid.Column="1"
Maximum="1"
MaximumTrackColor="CadetBlue"
Minimum="0"
MinimumTrackColor="CadetBlue"
ValueChanged="ChangeOpacity"
Value="1" />
</Grid>
<Grid Margin="5">
<Grid.ColumnDefinitions>
<ColumnDefinition Width="*" />
<ColumnDefinition Width="auto" />
<ColumnDefinition Width="*" />
</Grid.ColumnDefinitions>
<Button Grid.Column="0"
Margin="5"
Clicked="StartStopAnimation"
Text="Stop" />
<Label Grid.Column="1"
Margin="5"
Text="Speed:" />
<Picker x:Name="SpeedComboBox"
Grid.Column="2"
SelectedIndexChanged="SpeedSelected" />
</Grid>
</StackLayout>
</resources:ResponsiveFormContainer>
</RelativeLayout>
</ContentPage>