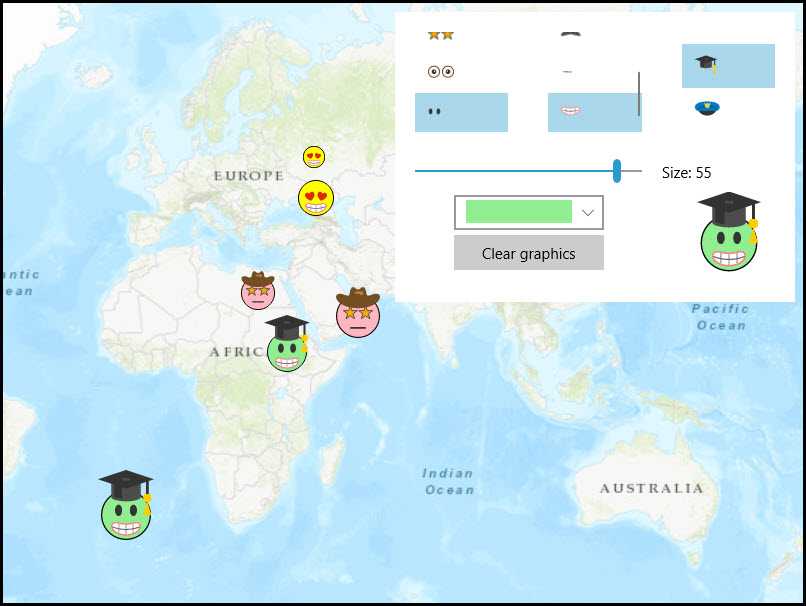
Combine multiple symbols from a mobile style file into a single symbol.

Use case
You may choose to display individual elements of a dataset like a water infrastructure network (such as valves, nodes, or endpoints) with the same basic shape, but wish to modify characteristics of elements according to some technical specifications. Multilayer symbols lets you add or remove components or modify the colors to create advanced symbol styles.
How to use the sample
Select a symbol and a color from each of the category lists to create an emoji. A preview of the symbol is updated as selections are made. The size of the symbol can be set using the slider. Click the map to create a point graphic using the customized emoji symbol, and click "Reset" to clear all graphics from the display.
How it works
- On startup, read a mobile style file using
SymbolStyle.OpenAsync. - Get a list of all symbols in the style by calling
SearchSymbolsAsyncwith the default search parameters. - Iterate the list of
SymbolStyleSearchResultand add symbols to list boxes according to their category. Display a preview of each symbol withCreateSwatchAsync. - When symbol selections change, create a new multilayer symbol by passing the keys for the selected symbols into
GetSymbolAsync. Color lock all symbol layers except the base layer and update the current symbol preview image. - Create graphics symbolized with the current symbol when the user taps the map view.
Relevant API
- MultilayerPointSymbol
- MultilayerSymbol.CreateSwatchAsync
- SymbolLayer
- SymbolStyle
- SymbolStyle.GetSymbolAsync
- SymbolStyleSearchParameters
Offline data
About the data
The mobile style file used in this sample was created using ArcGIS Pro, and is hosted on ArcGIS Online. It contains symbol layers that can be combined to create emojis.
Additional information
While each of these symbols can be created from scratch, a more convenient workflow is to author them using ArcGIS Pro and store them in a mobile style file (.stylx). ArcGIS Runtime can read symbols from a mobile style, and you can modify and combine them as needed in your app.
Tags
advanced symbology, mobile style, multilayer, stylx
Sample Code
<UserControl x:Class="ArcGISRuntime.WinUI.Samples.SymbolsFromMobileStyle.SymbolsFromMobileStyle"
xmlns="http://schemas.microsoft.com/winfx/2006/xaml/presentation"
xmlns:x="http://schemas.microsoft.com/winfx/2006/xaml"
xmlns:esriUI="using:Esri.ArcGISRuntime.UI.Controls"
xmlns:local="using:ArcGISRuntime.WinUI.Samples.SymbolsFromMobileStyle">
<UserControl.Resources>
<local:ColorToSolidBrushConverter x:Key="ColorToBrushConverter" />
</UserControl.Resources>
<Grid>
<esriUI:MapView x:Name="MyMapView" />
<Border Width="400"
Height="290"
Margin="0,20,20,0"
Padding="0"
Style="{StaticResource BorderStyle}">
<Grid Grid.Column="0">
<Grid.RowDefinitions>
<RowDefinition Height="140" />
<RowDefinition Height="40" />
<RowDefinition Height="40" />
<RowDefinition Height="40" />
</Grid.RowDefinitions>
<Grid.ColumnDefinitions>
<ColumnDefinition />
<ColumnDefinition />
<ColumnDefinition />
</Grid.ColumnDefinitions>
<ListBox x:Name="EyeSymbolList"
Grid.Row="0"
Grid.Column="0"
Margin="20"
BorderThickness="1"
SelectionChanged="SymbolPropertyChanged"
SelectionMode="Single">
<ListBox.ItemTemplate>
<DataTemplate>
<Image Height="15"
HorizontalAlignment="Center"
VerticalAlignment="Center"
Source="{Binding ImageSrc}" />
</DataTemplate>
</ListBox.ItemTemplate>
</ListBox>
<ListBox x:Name="MouthSymbolList"
Grid.Row="0"
Grid.Column="1"
Margin="20"
BorderThickness="1"
SelectionChanged="SymbolPropertyChanged"
SelectionMode="Single">
<ListBox.ItemTemplate>
<DataTemplate>
<Image Height="15"
HorizontalAlignment="Center"
VerticalAlignment="Center"
Source="{Binding ImageSrc}" />
</DataTemplate>
</ListBox.ItemTemplate>
</ListBox>
<ListBox x:Name="HatSymbolList"
Grid.Row="0"
Grid.Column="2"
Margin="20"
BorderThickness="1"
SelectionChanged="SymbolPropertyChanged"
SelectionMode="Single">
<ListBox.ItemTemplate>
<DataTemplate>
<Image Height="20"
HorizontalAlignment="Center"
VerticalAlignment="Center"
Source="{Binding ImageSrc}" />
</DataTemplate>
</ListBox.ItemTemplate>
</ListBox>
<Slider x:Name="SizeSlider"
Grid.Row="1"
Grid.Column="0"
Grid.ColumnSpan="2"
Margin="20,0"
LargeChange="5"
Maximum="60"
Minimum="8"
SmallChange="1"
Value="20" />
<TextBlock x:Name="SizeLabel"
Grid.Row="1"
Grid.Column="2"
VerticalAlignment="Center">
<Run Text="Size:" />
<Run Text="{Binding ElementName=SizeSlider, Path=Value}" />
</TextBlock>
<ComboBox x:Name="FaceColorComboBox"
Grid.Row="2"
Grid.Column="0"
Grid.ColumnSpan="2"
Width="150"
Height="35"
HorizontalAlignment="Center"
VerticalAlignment="Center"
HorizontalContentAlignment="Center"
SelectionChanged="SymbolPropertyChanged">
<ComboBox.ItemTemplate>
<DataTemplate>
<Border Width="150"
Height="35"
Background="{Binding Converter={StaticResource ColorToBrushConverter}}" />
</DataTemplate>
</ComboBox.ItemTemplate>
</ComboBox>
<Image x:Name="SymbolPreviewImage"
Grid.Row="2"
Grid.RowSpan="2"
Grid.Column="3"
Width="80"
Height="80" />
<Button x:Name="ClearGraphicsButton"
Grid.Row="3"
Grid.Column="0"
Grid.ColumnSpan="2"
Width="150"
Height="35"
HorizontalAlignment="Center"
VerticalAlignment="Center"
HorizontalContentAlignment="Center"
Click="ClearGraphicsClick"
Content="Clear graphics" />
</Grid>
</Border>
</Grid>
</UserControl>