Learn how to display the current device location on a map or scene.
You can display the device location on a map or scene. This is important for workflows that require the user's current location, such as finding nearby businesses, navigating from the current location, or identifying and collecting geospatial information.
By default, location display uses the device's location provider. Your app can also process input from other location providers, such as an external GPS receiver or a provider that returns a simulated location. For more information, see the Show device location topic.
Prerequisites
Before starting this tutorial:
-
You need an ArcGIS Location Platform or ArcGIS Online account.
-
Your system meets the system requirements.
-
The ArcGIS Maps SDK for Qt, version 200.6.0 or later is installed.
-
The Qt 6.5.6 software development framework is installed.
Set up authentication
To access the secure ArcGIS location services used in this tutorial, you must implement API key authentication using an ArcGIS Location Platform or an ArcGIS Online account.
Create a new API key access token with privileges to access the secure resources used in this tutorial.
-
Complete the Create an API key tutorial and create an API key with the following privilege(s):
- Privileges
- Location services > Basemaps
- Privileges
-
Copy and paste the API key access token into a safe location. It will be used in a later step.
Develop or Download
You have two options for completing this tutorial:
Option 1: Develop the code
Create a new ArcGIS Maps Qt Creator Project
-
Start Qt Creator.
-
In the top menu bar, click File > New Project.
-
In the New Project dialog, in the left frame, under Projects, select ArcGIS. Then select the ArcGIS Maps 200.6.0 Qt Quick C++ app project template (or a later version) and click Choose. This will launch the template wizard.
-
In the Project Location template, name your project Display_device_location. You can specify your own "create in" location for where the project will be created or leave the default. Click Next.
-
In the Define Build System template, select qmake for your build system. Click Next.
-
In the Define Project Details template, give this app a description or leave as is. Leave the 3D project box unchecked. At the ArcGIS Online Basemap dropdown menu, select Topographic. There is no need to supply an API Key (also called an access token) at this time, you can leave it blank. We will discuss this more in the next section. Click Next.
-
In the Kit Selection template, check on the kit you previously set up when you installed Qt (Desktop Qt 6.5.6 MSVC2019 64bit or higher required). Click Next.
-
In the Project Management template, the option to Add as a subproject to root project is only available if you have already created a root project. If you have a version control system set up, you can select it in the dropdown but it is not needed to complete this tutorial. Click Finish to complete the template wizard.
Set developer credentials
To allow your app users to access ArcGIS location services, use the developer credentials that you created in the Set up authentication step to authenticate requests for resources.
-
In the Projects window, in the Sources folder, open the main.cpp file.
-
Modify the code to set the
accessusing your API key access token.Token main.cppUse dark colors for code blocks // 2. API key authentication: Get a long-lived access token that gives your application access to // ArcGIS location services. Go to the tutorial at https://links.esri.com/create-an-api-key. // Copy the API Key access token. const QString accessToken = QString(""); -
Save and close the
main.cppfile.
Best Practice: The access token is stored directly in the code as a convenience for this tutorial. Do not store credentials directly in source code in a production environment.
Declare the new method in the header file
-
In the Projects window, open the Headers folder. Double-click the file display_device_location.h to open it. Add the new method declaration under
private. Then save and close the file.: Display_device_location.hUse dark colors for code blocks private: Esri::ArcGISRuntime::MapQuickView* mapView() const; void setMapView(Esri::ArcGISRuntime::MapQuickView* mapView); void startLocation();
Include header files in the source code
To create this app you will need to include additional class header files from the ArcGIS Maps Qt C++ API.
-
In the Projects window, open the Sources folder. Open the display_device_location.cpp file and add the following include statements.
Display_device_location.cppUse dark colors for code blocks #include "Display_device_location.h" #include "Map.h" #include "MapTypes.h" #include "MapQuickView.h" #include "LocationDisplay.h" #include "MapViewTypes.h"
Show the current location
Each map view has its own instance of a LocationDisplay for showing the current location (point) of the device. The location is displayed as an overlay in the map view.
-
Add the following method. This code enables
LocationDisplayfor the map view and assigns aLocationDisplayAutoPanModethat centers the map at the device location.Display_device_location.cppUse dark colors for code blocks MapQuickView* Display_device_location::mapView() const { return m_mapView; } void Display_device_location::startLocation() { // start location display m_mapView->locationDisplay()->start(); // center the location display around the device location m_mapView->locationDisplay()->setAutoPanMode(LocationDisplayAutoPanMode::Recenter); }The
setmethod appearing later in this file gets a handle to theMap View Mapobject that was declared in QML code and sets theView Mapon theMapfor display. This code is installed by the templates that ArcGIS provides when creating a new project in Qt.View -
Within the
setmethod, add the call to the new method.Map View Display_device_location.cppUse dark colors for code blocks // Set the view (created in QML) void Display_device_location::setMapView(MapQuickView* mapView) { if (!mapView || mapView == m_mapView) { return; } m_mapView = mapView; m_mapView->setMap(m_map); startLocation(); -
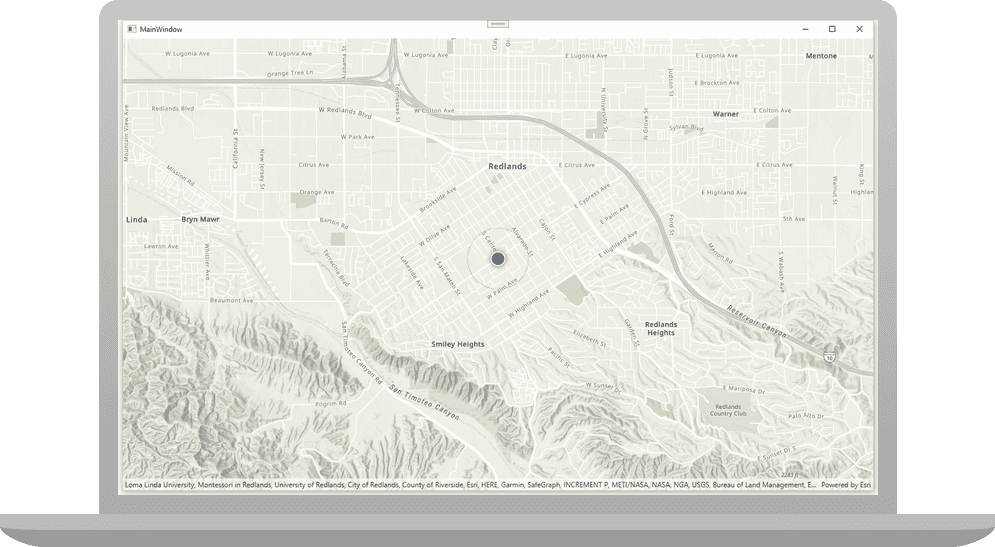
Press Ctrl + R to run the app.
You should see your current location displayed on the map. Different location symbols are used depending on the auto pan mode and whether a location is acquired. See LocationDisplayAutoPanMode for details.
By default, a round blue symbol is used to display the device's location. The location data source tries to get the most accurate location available but depending upon signal strength, satellite positions, and other factors, the location reported could be an approximation. A semi-transparent circle around the location symbol indicates the range of accuracy. As the device moves and location updates are received, the location symbol will be repositioned on the map.
Alternatively, you can download the tutorial solution, as follows.
Option 2: Download the solution
-
Click the
Download solutionlink underSolutionand unzip the file to a location on your machine. -
Open the project in Qt Creator.
Since the downloaded solution does not contain authentication credentials, you must add the developer credentials that you created in the set up authentication section.
Set developer credentials in the solution
To allow your app users to access ArcGIS location services, use the developer credentials that you created in the Set up authentication step to authenticate requests for resources.
-
In the Projects window, go to the Sources folder
-
Open the main.cpp file.
-
Modify the code to set the
accessusing your API key access token.Token main.cppUse dark colors for code blocks // 2. API key authentication: Get a long-lived access token that gives your application access to // ArcGIS location services. Go to the tutorial at https://links.esri.com/create-an-api-key. // Copy the API Key access token. const QString accessToken = QString(""); -
Save and close the file.
Best Practice: The access token is stored directly in the code as a convenience for this tutorial. Do not store credentials directly in source code in a production environment.
Run the app
Press Ctrl + R to run the app.
You should see your current location displayed on the map. Different location symbols are used depending on the auto pan mode and whether a location is acquired. See LocationDisplayAutoPanMode for details.
By default, a round blue symbol is used to display the device's location. The location data source tries to get the most accurate location available but depending upon signal strength, satellite positions, and other factors, the location reported could be an approximation. A semi-transparent circle around the location symbol indicates the range of accuracy. As the device moves and location updates are received, the location symbol will be repositioned on the map.
Learn how to use additional API features, ArcGIS location services, and ArcGIS tools in these tutorials: