Augmented reality (AR) experiences can be implemented with three common patterns: tabletop, flyover, and world-scale.
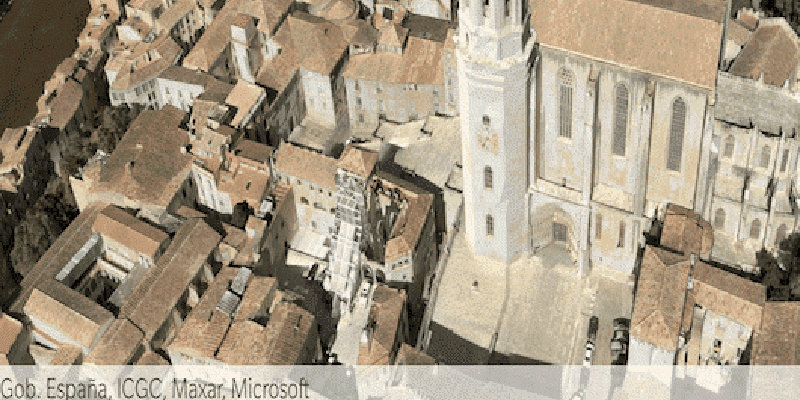
- Flyover – With flyover AR you can explore a scene using your device as a window into the virtual world. A typical flyover AR scenario starts with the scene’s virtual camera positioned over an area of interest. You can walk around and reorient the device to focus on specific content in the scene.
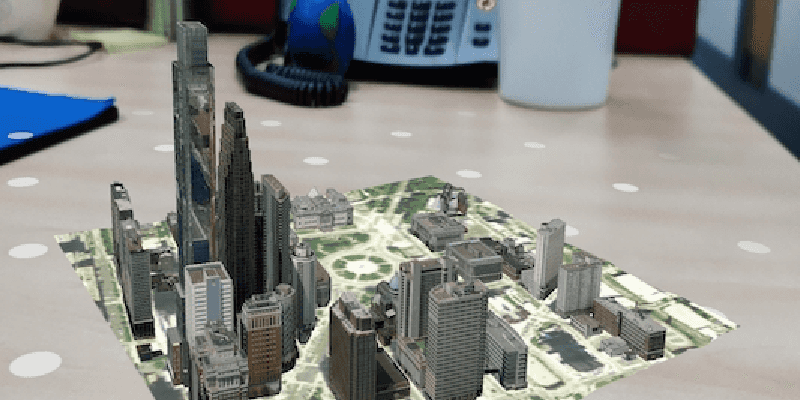
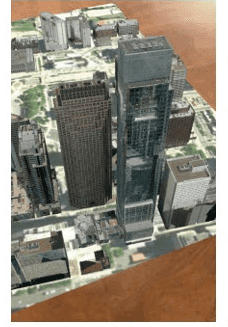
- Tabletop – Tabletop AR provides scene content anchored to a physical surface, as if it were a 3D-printed model. You can walk around the tabletop and view the scene from different angles.
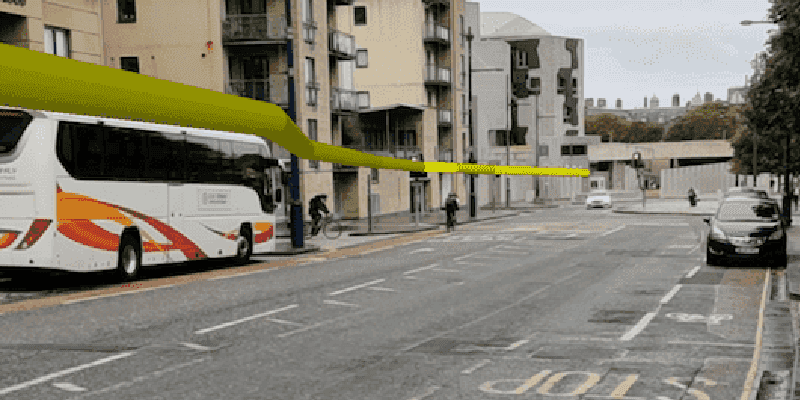
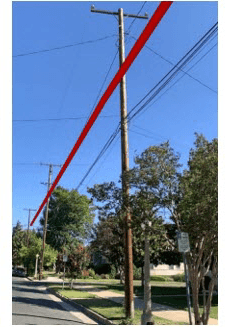
- World-scale – A kind of AR scenario where scene content is rendered exactly where it would be in the physical world. This is used in scenarios ranging from viewing hidden infrastructure to displaying waypoints for navigation. In AR, the real world, rather than a basemap, provides the context for your GIS data.
| Flyover | Tabletop | World-scale |
|---|---|---|
|
|
|
| On screen, flyover is visually indistinguishable from normal scene rendering. | In tabletop, scene content is anchored to a real-world surface. | In world-scale AR, scene content is integrated with the real world. |
Support for augmented reality is provided through components available in the ArcGIS Maps SDK for Swift Toolkit.
Enable your app for AR
- To install the toolkit, see the Toolkit Installation Instructions.
- Configure privacy and permissions.
- Now you're ready to add flyover AR, add tabletop AR, or add world scale AR.
Configure privacy and permissions
Before you use augmented reality, you must make the following adjustments:
- Set the
Privacy - Camera Usage Descriptionproperty in the app's info.plist to request camera permissions. - If you’d like to restrict your app to installing only on devices that support ARKit (see Apple's System requirements for details), add
arkitto the required device capabilities section of info.plist:
<key>UIRequiredDeviceCapabilities</key>
<array>
<string>arkit</string>
</array>Once you have installed the toolkit and configured your app to meet privacy requirements, you can begin implementing your AR experience.
General AR guidelines
To create an optimal virtual experience, follow these guidelines:
- Provide user feedback for ARKit tracking issues. See Apple's Developer Guide for details.
- Set expectations about lighting before starting the experience. AR doesn't work well in low light.
- Don't allow users to view arbitrary content in AR. Use curated content that has been designed.
Understand Common AR Patterns
The ArcGIS Maps SDK for Swift offers three patterns for you to build augmented reality experiences:
- Flyover – Flyover AR is an experience that allows you to explore a scene using your device as a window into the virtual world. A typical flyover AR scenario will start with the scene’s virtual camera positioned over an area of interest. You can walk around and reorient the device to focus on specific content in the scene.
- Tabletop – A kind of AR scenario where scene content is anchored to a physical surface, as if it were a 3D-printed model. You can walk around the tabletop and view the scene from different angles.
- World-scale – A kind of AR scenario where scene content is rendered exactly where it would be in the physical world. This is used in scenarios ranging from viewing hidden infrastructure to displaying waypoints for navigation. In AR, the real world, rather than a basemap, provides the context for your GIS data.
Each experience is built using a combination of the features, toolkit, and some suggested user experiences, such as:
| AR pattern | Origin camera | Translation factor | Scene view | Base surface |
|---|---|---|---|---|
| Flyover AR | Above the tallest content in the scene | A large value to enable rapid traversal; 0 to restrict movement | Space effect: Stars Atmosphere: horizonOnly | Displayed |
| Tabletop AR | On the ground at the center or lowest point on the scene | Based on the size of the target content and the physical table | Space effect: Transparent Atmosphere: horizonOnly | Optional |
| World-scale AR | At the same location as the physical device camera | 1, to keep virtual content in sync with real-world environment | Space effect: Transparent Atmosphere: None | Optional for calibration |
Add flyover AR to your app
Flyover AR displays a scene while using the movement of the physical device to move the scene view camera. For example, you can walk around while holding up your device as a window into the scene. Unlike other AR experiences, the camera feed is not displayed to the user, making flyover more similar to a traditional virtual reality (VR) experience.
Flyover is the simplest AR scenario to implement, as there is only a loose relationship between the physical world and the rendered virtual world. With flyover, you can imagine your device as a window into the virtual scene.
Implement flyover AR
-
Create the scene and add any content. This example uses the Yosemite Valley Hotspots web scene. Set the camera navigation to
unconstrained. In this mode the camera may pass above and below the elevation surface.Use dark colors for code blocks Copy @State private var scene: ArcGIS.Scene = { let scene = Scene( item: PortalItem( portal: .arcGISOnline(connection: .anonymous), id: PortalItem.ID("7558ee942b2547019f66885c44d4f0b1")! ) ) scene.baseSurface.navigationConstraint = .unconstrained return scene }() -
Flyoveris an ArcGIS Maps SDK for Swift Toolkit component. Create aScene View Flyoverusing the initial location, translation factor, and scene view.Scene View - The initial location is the scene view's camera position. Place it above the content you want the user to explore, ideally in the center.
- Set the translation factor to provide an appropriate speed for traversing the scene as the devices moves. The translation factor defines the relationship between physical device movement and virtual camera movement.
- The
Flyoverclosure builds aScene View Sceneto be overlayed on top of the augmented reality video feed. It contains aView Sceneparameter that allows the closure to access operations of theView Proxy Scene. In this example,View Seneis not used and thus, unlabeled asView Proxy _. - To create a more immersive experience, set the atmosphere effect on the
ScenetoView .realistic.
Use dark colors for code blocks Copy var body: some View { FlyoverSceneView( initialLocation: Point(x: 4.4777, y: 51.9244, z: 1_000, spatialReference: .wgs84), translationFactor: 1_000 ) { _ in SceneView(scene: scene) .atmosphereEffect(.realistic) } }
Add tabletop AR to your app
Tabletop AR allows you to use your device to interact with scenes as if they were 3D-printed models sitting on your desk. You could, for example, use tabletop AR to virtually explore a proposed development without needing to create a physical model.
Implement tabletop AR
Tabletop AR often allows users to place scene content on a physical surface of their choice, such as, the top of a desk. Once the content is placed, it stays anchored to the surface as the user moves around it.
-
Create the scene using an
ArcGISand anTiled Elevation Source ArcGIS. Set the scene's surface navigation constraint toScene Layer .stayand its opacity toAbove 0.For demonstration purposes, this code uses the Terrain3D REST service and the buildings layer because the pairing is particularly well-suited for tabletop display. You can construct your own scene using elevation and scene layer data or use any existing scene as long as a clippingDistance is defined for proper tabletop experience.
Use dark colors for code blocks Copy @State private var scene: ArcGIS.Scene = { // Creates a scene layer from buildings REST service. let buildingsURL = URL(string: "https://tiles.arcgis.com/tiles/P3ePLMYs2RVChkJx/arcgis/rest/services/DevA_BuildingShells/SceneServer")! let buildingsLayer = ArcGISSceneLayer(url: buildingsURL) // Creates an elevation source from Terrain3D REST service. let elevationServiceURL = URL(string: "https://elevation3d.arcgis.com/arcgis/rest/services/WorldElevation3D/Terrain3D/ImageServer")! let elevationSource = ArcGISTiledElevationSource(url: elevationServiceURL) let surface = Surface() surface.addElevationSource(elevationSource) let scene = Scene() scene.baseSurface = surface scene.addOperationalLayer(buildingsLayer) scene.baseSurface.navigationConstraint = .stayAbove scene.baseSurface.opacity = 0 return scene }() -
Create an anchor point. This is the location point of the ArcGIS scene that is anchored on the physical surface. This point could be a known value, a user-selected value, or a computed value. For simplicity, this example uses a known value.
Use dark colors for code blocks Copy private let anchorPoint = Point( x: -122.68350326165559, y: 45.53257485106716, spatialReference: .wgs84 ) -
Tableis an ArcGIS Maps SDK for Swift Toolkit component. Create aTop Scene View Tableusing the anchor point, translation factor, clipping distance, and scene view; use the anchor point and scene created previously and calculate values for the remaining parameters.Top Scene View - The translation factor defines how much the scene view translates as the device moves. A useful formula for determining this value is translation factor = virtual content width / desired physical content width. The virtual content width is the real-world size of the scene content and the desired physical content width is the physical table top width. The virtual content width is determined by the clipping distance in meters around the camera.
- The clipping distance is the distance in meters that the ArcGIS Scene data will be clipped to.
- The
Tabletopclosure builds aScene View Sceneto be overlayed on top of the augmented reality video feed. It contains aView Sceneparameter that allows the closure to access operations of theView Proxy Scene. In this example,View Seneis not used and thus, unlabeled asView Proxy _.
Use dark colors for code blocks Copy var body: some View { TableTopSceneView( anchorPoint: anchorPoint, translationFactor: 1_000, clippingDistance: 400 ) { _ in SceneView(scene: scene) } }
Add world-scale AR to your app
A world-scale AR experience is defined by the following characteristics:
- The scene camera is positioned to precisely match the position and orientation of the device’s physical camera
- Scene content is placed in the context of the real world by matching the scene view’s virtual camera position and orientation to that of the physical device camera.
- Context aids, like the basemap, are hidden; the camera feed provides real-world context.
Some example use cases of world-scale AR include:
- Visualizing hidden infrastructure, like sewers, water mains, and telecom conduits.
- Maintaining context while performing rapid data collection for a survey.
- Visualizing a route line while navigating.
Configure content for world-scale AR
The goal of a world-scale AR experience is to create the illusion that your GIS content is physically present in the world around you. There are several requirements for content that will be used for world-scale AR that go beyond what is typically required for 2D mapping.
- Ensure that all data has an accurate elevation (or Z) value. For dynamically generated graphics (for example, route results) use an elevation surface to add elevation.
- Use an elevation source in your scene to ensure all content is placed accurately relative to the user.
- Don't use 3D symbology that closely matches the exact shape of the feature it represents. For example, do not use a generic tree model to represent tree features or a fire hydrant to represent fire hydrant features. Generic symbology won’t capture the unique geometry of actual real-world objects and will highlight minor inaccuracies in position.
- Consider how you present content that would otherwise be obscured in the real world, as the parallax effect can make that content appear to move unnaturally. For example, underground pipes will ‘float’ relative to the surface, even though they are at a fixed point underground. Have a plan to educate users, or consider adding visual guides, like lines drawn to link the hidden feature to the obscuring surface (for example, the ground).
- By default, scene content is rendered over a large distance. This can be problematic when you are trying to view a limited subset of nearby features (just the pipes in your building, not for the entire campus, for example). You can use the clipping distance to limit the area over which scene content renders.
Location tracking options for world-scale AR
With world scale, the location is updated continuously. The origin camera is set every time the location data source provides a new update.
There are three types of tracking enumerations provided by World: geo, prefer, and world. If unspecified, geo is the default tracking configuration used by the view.
Implement world-scale AR
-
Create an
ArcGISand add it to a surface. Configure the surface's properties and it to the scene.Tiled Elevation Source For demonstration purposes, this code uses the Terrain3D REST service.
Use dark colors for code blocks Copy @State private var scene: ArcGIS.Scene = { // Creates an elevation source from Terrain3D REST service. let elevationServiceURL = URL( string: "https://elevation3d.arcgis.com/arcgis/rest/services/WorldElevation3D/Terrain3D/ImageServer" )! let elevationSource = ArcGISTiledElevationSource(url: elevationServiceURL) let surface = Surface() surface.addElevationSource(elevationSource) surface.backgroundGrid.isVisible = false surface.navigationConstraint = .unconstrained let scene = Scene(basemapStyle: .arcGISImagery) scene.baseSurface = surface scene.baseSurface.opacity = 0 return scene }() -
Create a
Systemand aLocation Data Source Graphicswith theOverlay @property wrappers. These objects will be used to access the device location and add graphics to the initial location.State Use dark colors for code blocks Copy /// The location datasource that is used to access the device location. @State private var locationDataSource = SystemLocationDataSource() /// The graphics overlay which shows a graphic around your initial location. @State private var graphicsOverlay = GraphicsOverlay() -
In the body, create a
Worldwith a clipping distance ofScale Scene View 400. In the closure, create aSceneusing the scene and graphics overlay created above.View Use dark colors for code blocks var body: some View { WorldScaleSceneView( clippingDistance: 400 ) { _ in SceneView(scene: scene, graphicsOverlays: [graphicsOverlay]) } } -
Add a task modifier to the
Worldand create aScale Scene View CL. If theLocation Manager authorizationis not determined, prompt the location manager to request in use authorization.Status Use dark colors for code blocks var body: some View { WorldScaleSceneView( clippingDistance: 400 ) { _ in SceneView(scene: scene, graphicsOverlays: [graphicsOverlay]) } .task { let locationManager = CLLocationManager() if locationManager.authorizationStatus == .notDetermined { locationManager.requestWhenInUseAuthorization() } } } -
Start the location data source and get the initial location.
Use dark colors for code blocks .task { let locationManager = CLLocationManager() if locationManager.authorizationStatus == .notDetermined { locationManager.requestWhenInUseAuthorization() } try? await locationDataSource.start() // Retrieves initial location. guard let initialLocation = await locationDataSource.locations.first(where: { _ in true }) else { return } } -
Create a geodetic buffer geometry around the initial location using
Geometry. Create and add a graphic using that geometry.Engine Use dark colors for code blocks .task { let locationManager = CLLocationManager() if locationManager.authorizationStatus == .notDetermined { locationManager.requestWhenInUseAuthorization() } try? await locationDataSource.start() // Retrieves initial location. guard let initialLocation = await locationDataSource.locations.first(where: { _ in true }) else { return } // Puts a circle graphic around the initial location. let circle = GeometryEngine.geodeticBuffer( around: initialLocation.position, distance: 20, distanceUnit: .meters, maxDeviation: 1, curveType: .geodesic ) graphicsOverlay.addGraphic( Graphic( geometry: circle, symbol: SimpleLineSymbol( color: .red, width: 3 ) ) ) } -
Lastly, stop the location data source.
Use dark colors for code blocks .task { let locationManager = CLLocationManager() if locationManager.authorizationStatus == .notDetermined { locationManager.requestWhenInUseAuthorization() } try? await locationDataSource.start() // Retrieves initial location. guard let initialLocation = await locationDataSource.locations.first(where: { _ in true }) else { return } // Puts a circle graphic around the initial location. let circle = GeometryEngine.geodeticBuffer( around: initialLocation.position, distance: 20, distanceUnit: .meters, maxDeviation: 1, curveType: .geodesic ) graphicsOverlay.addGraphic( Graphic( geometry: circle, symbol: SimpleLineSymbol( color: .red, width: 3 ) ) ) // Stops the location data source after the initial location is retrieved. await locationDataSource.stop() }
Enable calibration for world-scale AR
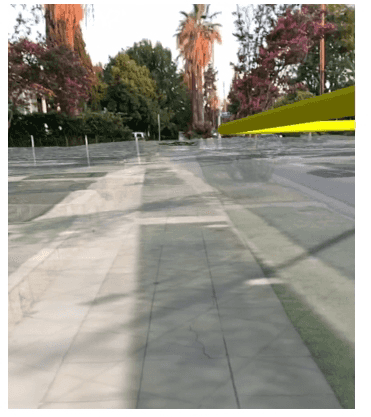
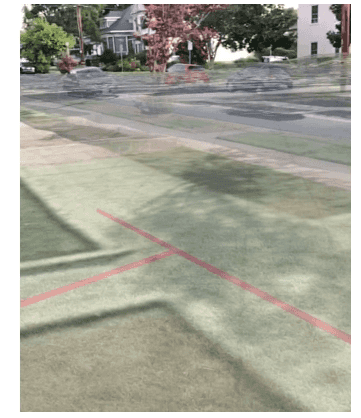
World-scale AR depends on a close match between the positions and orientations of the device’s physical camera and the scene view’s virtual camera. Any error in the device’s position or orientation will degrade the experience. Consider each of the following key properties as common sources of error:
- Heading – Usually determined using a magnetometer (compass) on the device
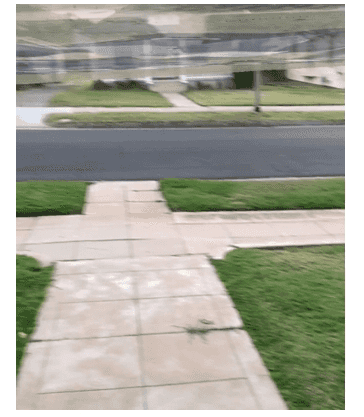
- Elevation/Altitude (Z) – Usually determined using GPS/GNSS or a barometer
- Position (X,Y) – usually determined using GPS/GNSS, cell triangulation, or beacons
The following examples illustrate these errors by showing a semitransparent basemap for comparison with the ground truth provided by the camera:
| Orientation error | Elevation error | Position error |
|---|---|---|
|
|
|
Configure calibration
Calibrating your device while using world scale AR allows virtual elements to be accurately aligned with the real world. Calibration can improve the accuracy and comfort of the user experience. The World provides optional calibration UI that is controlled by the Toolkit. You can configure the UI using the related view modifiers:
.calibrationButton Alignment(alignment : Alignment) .calibrationView Hidden(hidden : Bool) .onCalibrating Changed(perform :)
Explicitly plan for calibration when designing your AR experiences. Consider how and where your users will use your app. Not all calibration workflows are appropriate for all locations or use cases.
Identify real-world and in-scene objects
To determine the real-world position of a tapped plane, the World offers on. The function returns the screen point and scene point of the tap gesture to determine the real-world position.
Manage vertical space in world-scale AR
Accurate positioning is particularly important to world-scale AR; even small errors can break the perception that the virtual content is anchored in the real world. Unlike 2D mapping, Z values are important. And unlike traditional 3D experiences, you need to know the position of the user’s device.
Be aware of the following common Z-value challenges that you’re likely to encounter while building AR experiences:
- Many kinds of Z values – and iOS devices differ in how they represent altitude/elevation/Z values.
- Imprecise altitude – Altitude/Elevation is the least precise measurement offered by GPS/GNSS. In testing, we found devices reported elevations that were anywhere between 10 and 100 above or below the true value, even under ideal conditions.
Many kinds of Z values
Just as there are many ways to represent position using X and Y values, there are many ways to represent Z values. GPS devices tend to use two primary reference systems for altitude/elevation:
- WGS84 – Height Above Ellipsoid (HAE)
- Orthometric – Height Above Mean Sea Level (MSL)
The full depth of the differences between these two references is beyond the scope of this topic, but do keep in mind the following facts:
- Android devices return elevations in HAE, while iOS devices return altitude in MSL.
- It is not trivial to convert between HAE and MSL; MSL is based on a measurement of the Earth’s gravitational field. There are many models, and you may not know which model was used to when generating data.
- Esri’s world elevation service uses orthometric altitudes.
- The difference between MSL and HAE varies by location and can be on the order of tens of meters. For example, at Esri’s HQ in Redlands, California, the MSL altitude is about 30 meters higher than the HAE elevation.
It is important that you understand how your Z values are defined to ensure that data is placed correctly in the scene. For example, the Esri world elevation service uses MSL for its Z values. If you set the origin camera using an HAE Z value, you could be tens of meters off from the desired location.
To gain a deeper understanding of these issues, see ArcUser: Mean Sea Level, GPS, and the Geoid.
