To take full advantage of the 3D environment, features and graphics provide additional API for controlling geoelement display in a scene or scene view. A set of symbols has been designed exclusively for three-dimensional display.
- Layer scene properties: Properties of a layer or graphics overlay that are only evaluated for display in 3D. This includes surface placement, which controls how z-values (elevation or altitude, for example) are evaluated relative to the data in the scene view.
- Renderer scene properties: Renderer properties that are only evaluated for display in 3D. Use these properties to extract two-dimensional geometries vertically (on the z-axis) or to define heading, pitch, and roll for geoelements.
- 3D-specific symbols: Create symbols used exclusively for 3D display, such as 3D shapes (sphere, cylinder, cube, and so on) and 3D model symbols that provide a realistic display of 3D objects.
Layer scene properties
You can set additional properties that apply to feature layers and graphics overlays when they are displayed in a scene. These properties are defined on the LayerSceneProperties class and control how features and graphics are placed in 3D space. These properties are only evaluated for 3D display. When displayed in a map, they are ignored.
Surface placement
You can specify a surface placement mode for feature layers and graphics overlays that defines how the geometry z-value (elevation or altitude) is interpreted when each geoelement is rendered.
The SurfacePlacement enum provides the following values:
- Draped billboarded—Ignore z-values and drape geoelements onto the surface. Symbols render to face the camera.
- Draped flat—Ignore z-values and drape geoelements onto on the surface. Symbols render flat on the surface.
- Absolute—Place geoelements by adding their z-value to the height of the globe skin (sea level).
- Relative—Place geoelements by adding their z-value to the height of the scene's elevation surface.
- Relative to scene—Place geoelements relative to objects in the scene, such as an elevation surface, buildings in a scene layer, integrated mesh layers, and extruded polygons. Some objects do not affect this type of placement, such as extruded points or lines, KML layers, or model symbols. Some combinations may not work for relative to scene placement, such as polygons placed relative to an integrated mesh layer.
- Draped—(obsolete) Use either draped billboarded or draped flat instead.
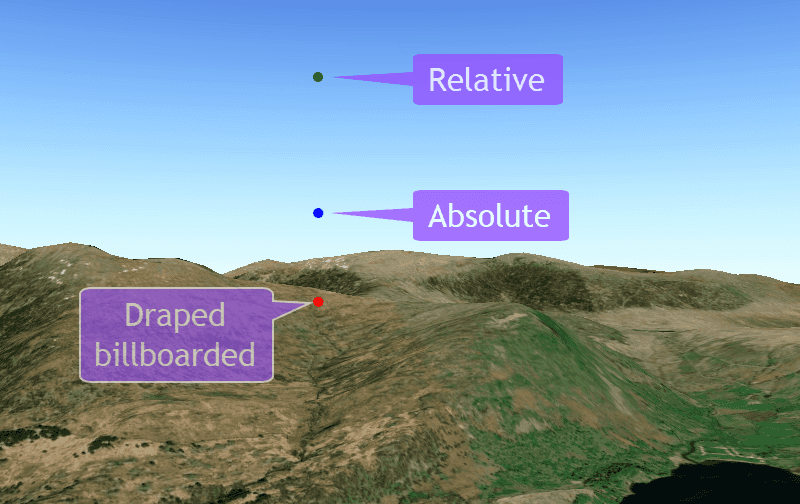
The image below shows graphics with the same z-value rendered with different surface placement modes. The draped graphic is drawn on the elevation surface despite its z-value of 1000 meters. The graphic with absolute placement is drawn 1000 meters above the globe (sea level) and the graphic with relative placement is drawn 1000 meters above the elevation surface. If a graphic were added in the same location with relative to scene placement, it would be drawn 1000 meters above the graphic with the greatest z-value.

// Creates a draped graphics overlay.
let drapedGraphicsOverlay = GraphicsOverlay()
drapedGraphicsOverlay.sceneProperties.surfacePlacement = .drapedBillboarded
// Creates an absolute graphics overlay.
let absoluteGraphicsOverlay = GraphicsOverlay()
absoluteGraphicsOverlay.sceneProperties.surfacePlacement = .absolute
// Creates a relative graphics overlay.
let relativeGraphicsOverlay = GraphicsOverlay()
relativeGraphicsOverlay.sceneProperties.surfacePlacement = .relative
// The array of graphics overlays to be added to the scene view.
let graphicsOverlays = [drapedGraphicsOverlay, absoluteGraphicsOverlay, relativeGraphicsOverlay]
Renderer scene properties
You can set additional properties that apply to renderers when they display a feature layer or graphics overlay in a scene. These properties are defined on the RendererSceneProperties class and control additional rendering behavior for features and graphics. These properties are only evaluated for 3D rendering. When displayed in a map, they are ignored.
Extrusion
Extrusion is the process of extending a flat 2D shape vertically (along the z-axis) to create a 3D representation. This lets you create three-dimensional symbology from two-dimensional features. For example, you can extrude building polygons by their heights to create realistic building shapes. You can also use extrusion to illustrate relative values in your data. For example, you could extrude district polygons by median home value to visualize the most expensive areas of the city. The three basic geometry types (points, lines, and polygons) all support extrusion.
When using renderers in 3D, you can set properties to define extrusion expressions for both features and graphics. An extrusion expression can consist of a combination of attribute names, mathematical operators, and numeric values. An expression to extrude building polygons by the number of floors multiplied by ten might look like this: [floors] * 10, where "floors" is the name of the attribute that stores the number of floors for each building. If you want to extrude by an attribute value alone, the expression is just the attribute (field) name ([height], for example). Likewise, if you want to extrude by a specific value for each geoelement, your expression is the value to extrude by (125, for example).
There are several ways that an extrusion expression can be applied to extrude features. The ExtrusionMode enum provides the following values to define how geoelements are extruded.
- None—Geoelements are not extruded.
- Minimum—Geoelements are extruded to a flat top at a z-value determined by adding the extrusion height to the minimum z-value of the geoelement (the lowest z-value for all vertices contained by the geometry, in other words).
- Maximum—Geoelements are extruded to a flat top at a z-value determined by adding the extrusion height to the maximum z-value of the geoelement (the highest z-value for all vertices contained by the geometry, in other words).
- Absolute height—Geoelements are extruded to the specified z-value as a flat top, regardless of their z-values.
- Base height—A z-value is calculated for each vertex of the geoelement's base, and it is extruded to the various z-values. This is the only extrusion mode that doesn't have a flat top.
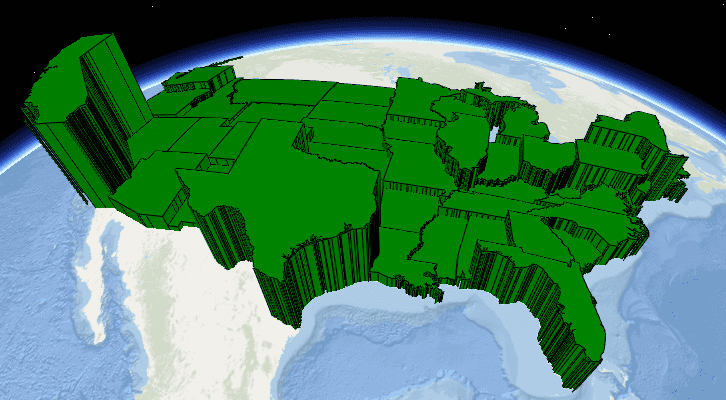
The following image shows a graphics overlay of US states extruded based on a population attribute.

To apply extrusion to a feature layer or graphics overlay:
- Create a new renderer.
- Set the relevant scene properties for the renderer.
- Extrusion mode
- Extrusion expression
- Assign the renderer to the feature layer or graphics overlay.
- Ensure that the rendering mode is set to dynamic.
- Add the feature layer to the scene's operational layers or the graphics overlay to the scene view's graphics overlay collection.
// Defines fill and outline for symbol.
let line = SimpleLineSymbol(style: .solid, color: .black, width: 1)
let fill = SimpleFillSymbol(style: .solid, color: .green, outline: line)
// Creates a simple renderer.
let renderer = SimpleRenderer(symbol: fill)
// Defines the extrusion mode and expression.
renderer.sceneProperties.extrusionMode = .absoluteHeight
renderer.sceneProperties.extrusionExpression = "[pop2010] / 50"
graphicsOverlay.renderer = renderer
Rotation expressions
RendererSceneProperties has properties for defining expressions for heading, pitch, and roll for features or graphics displayed in 3D. Like extrusion expressions, these can include attribute (field) names, numbers, and mathematical operators.
- Heading: An angle of rotation around the Z-axis, measured clockwise from north in an east-north-up (ENU) coordinate system. Values range from 0 to 360 degrees.
- Pitch: An angle of rotation around the Y-axis in an east-north-up (ENU) coordinate system. Values range from 0 to 180 degrees, where 0 is looking straight down (to the center of the earth) and 180 is looking straight up (towards outer space).
- Roll: An angle of rotation around the X-axis in an east-north-up (ENU) coordinate system. Values range from 0 to 360 degrees, where 0 is horizontal.
See the Prepare your graphics section of the Follow a graphic in a scene view topic for an example of setting heading, pitch, and roll expressions for a renderer.
Scene symbols
Graphics in a scene view graphics overlay can use the same (2D) symbols used for a map view. The following 3D-specific symbols are provided for graphics in a scene view:
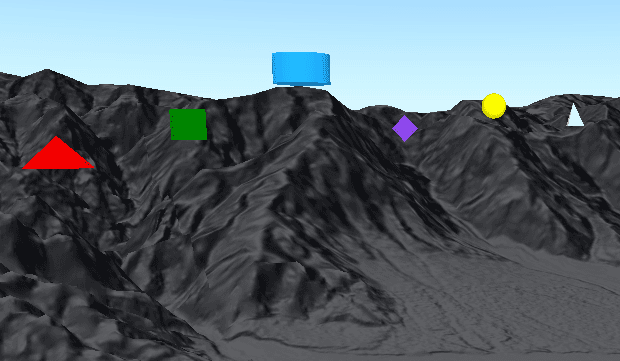
- Simple marker scene symbols—Cone, Cube, Cylinder, Diamond, Sphere, and Tetrahedron
- Stroke symbol layer 3D line styles—Strip, Tube
- Model 3D symbols—Displays a 3D model file

Simple marker scene symbols provide a variety of styles (shapes) that can be applied. You can also set the size, color, and anchor position used for the symbol. To further control 3D display, you can also set heading, pitch, and roll.
Lines can be rendered in a scene view using a stroke symbol layer with either a Strip or Tube 3D line style. A strip displays a line that conforms to the surface of the scene, and a tube draws as a cylinder.
A model symbol provides a realistic three-dimensional visualization to symbolize scene features. These models define the geometry and surface textures of real-world items such as aircraft. Create a Model using a 3D model file, passing the path to the file and a scale factor to the model symbol constructor. Depending on the model file's default orientation, you may have to rotate the symbol to get your model in the desired orientation.
The supported model file types for 3D model symbols are:
- 3D Max (
.3ds) - Collada (
.dae) - Filmbox (
.fbx) - GL Transmission Format (
.gltf,.glb) - Wavefront (
.obj)
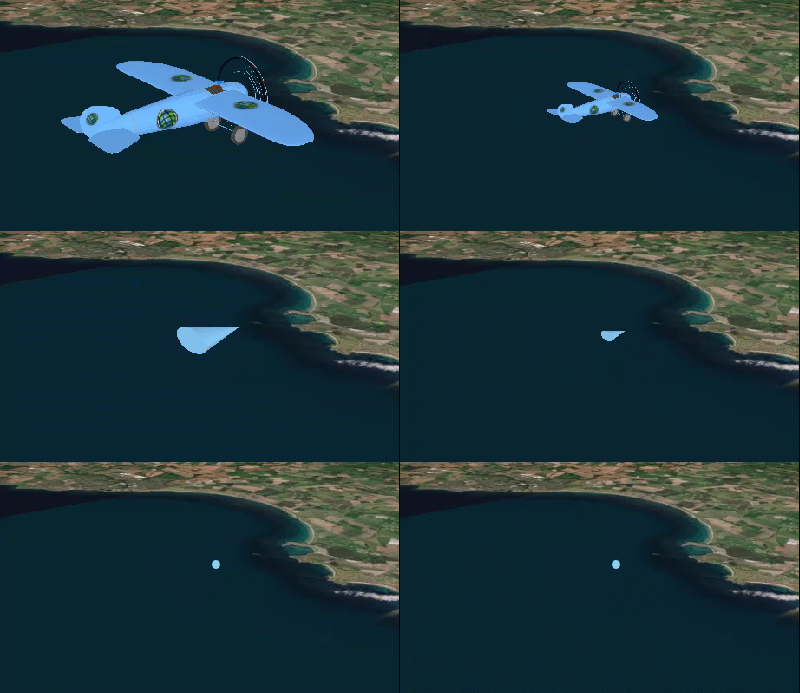
Distance composite symbols
A distance composite symbol is a collection of several symbols. It determines which symbol to display based on the current camera distance to the graphic. While model symbols can accurately represent real-world objects when viewed close up, they may not be visible when viewed at a distance (unless the size of the object is exaggerated). A distance composite symbol allows you to display a different symbol based on the camera distance to the graphic. They are commonly used to show more simple symbols at a great distance and more complex symbols when the camera approaches the graphic.
