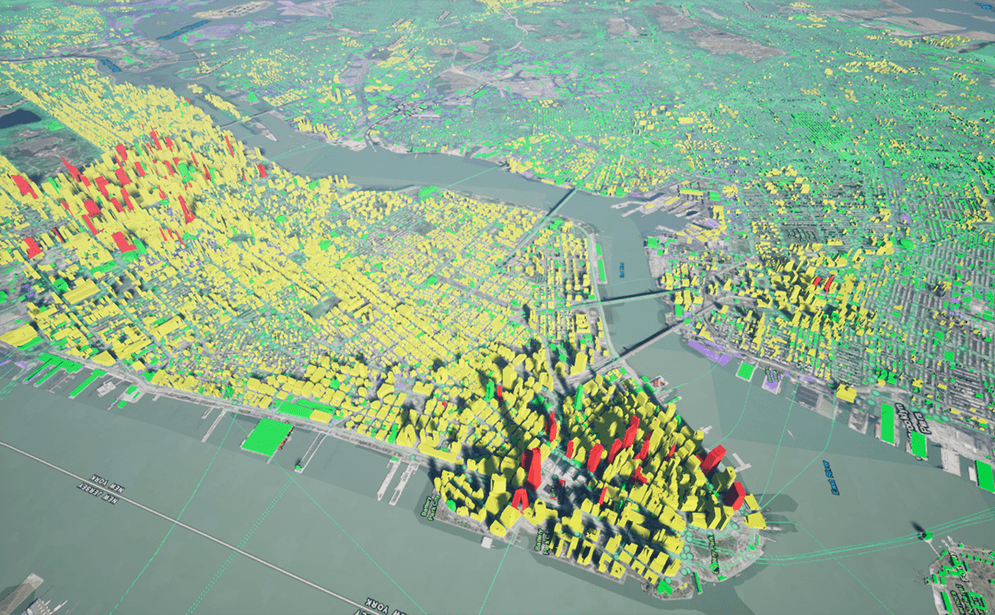
3D object scene layers can also include attributes that help you to visualize objects in the layer in a more meaningful way. 3D Object scene layers include attributes with values for each node. Depending on how the layer was authored, the cached attributes may include a variety of different information.
Select attributes
To see which attributes are included in the 3D object scene layer you are using, you can open the URL in your web browser and reference the field section of the service definition JSON. The New York building data in our sample found here shows all of its attributes which you can see (BIN, SOURCE, NAME, CNSTRCT...).
Before you begin to write code, you need to know the attribute types you plan to use. By default, materials and the shaders that render them only support float and integer types in Unreal Engine. If you want to use an attribute of a different type, such as strings, you will need to convert these attributes into data that can be processed by the shader.
To learn more about Unreal Engine's materials and shaders, visit Unreal Engine's documentation.

The image above is an example of what you can do with the 3D attributes functionality. In this image, you see the buildings differently based on their NUM attribute to show buildings with more than 100 floors in red, buildings with more than 20 floors in yellow and the remaining buildings in green.

The image above is an example of how to use the NAME attribute to visualize the Empire State Building in a unique way. Set up an attribute transform so it can find the feature with the name of "Empire State Building". This gives you the ability to apply a different texture to that specific building. In this example, you can also use more complicated textures than just solid colors to bring more realism to the 3D object scene layers that do not have textures baked in.
Pass the attribute data to the materials
Once you know the type of attributes that you will work with, you need to include necessary namespaces and write scripts to filter attributes by name and pass the data to the materials. Set allows you to specify which attributes will be published in a texture to the Material. By default, no attributes are published to the material, so using the Set allows you to set an array of the attributes you want to publish. This step requires you to have knowledge of the attributes in your layer.
With float, integer, and double-typed attributes
When setting an attribute that is either a float or an integer, you can pass it directly to the shader. Doubles can also be passed directly to the shader however internally they are being converted to a float so expect some loss of precision.
With other typed attributes (strings, dates, etc...)
GPUs generally do not support strings and other non-numeric data types. To use attributes with other types, you need to use the ArcGIS to convert these types into meaningful integer or floating point values that are compatible with the material.
Set the material for filtered nodes
The Material property on the ArcGI allows you to specify a material to render the layer with. You can use this method without using any layer attributes to render the layer with a different material than the one used by default by the layer.
Configure the material to use the attribute data
There are some helper functions provided in the ArcGIS Maps SDK for Unity that allow you to easily access the attribute data according to the data type in the shader. These helper functions, Read, Read and Read output the value of the attribute. Which one you use depends on the type of data being exposed in the shader.
With float, integer, and double-typed attributes
You can use the attribute processor to convert custom data types into a suitable format that can be read by the GPU. If you don't use the attribute processor to convert data, you can use Read, Read or Read depending on the data. See the table below.
| Field type | Helper function (without attribute processor) |
|---|---|
| esriFieldTypeDate | Not supported |
| esriFieldTypeDouble | ReadFeatureFloatAttribute |
| esriFieldTypeGlobalID | Not supported |
| esriFieldTypeGUID | Not supported |
| esriFieldTypeInteger | ReadFeatureUnsignedIntegerAttribute, ReadFeatureIntegerAttribute |
| esriFieldTypeOID | ReadFeatureUnsignedIntegerAttribute, ReadFeatureIntegerAttribute |
| esriFieldTypeSingle | ReadFeatureFloatAttribute |
| esriFieldTypeSmallInteger | ReadFeatureUnsignedIntegerAttribute, ReadFeatureIntegerAttribute |
| esriFieldTypeString | Not supported |
With other typed attributes (strings, dates, etc...)
You can convert the data to Float32 or Int32 with the attribute processor. Depending on the data type, you should use either Read or Read helper function. You can also use the attribute processor with float, integer, and double-type attributes if you want to process the original data.
Work with 3D attributes
You can find the sample script file that filters 3D attributes and apply different materials in the SampleAttributesComponent.cpp file. The file is located in the folder:
Plugins/ArcGISMapsSDK/Source/ArcGISSamples/Private
You can find the shader used in the samples in the following location in the Unreal Editor. You can modify the shader to control how the layer appears.
Plugins > ArcGISMapsSDK for Unreal Engine Content > Samples > 3DAttributeSample