Spatial filtering enables you to remove areas of 3D object scene layers and building scene layers in your ArcGIS Map based on the polygon areas you specify. There are two different modes for removing areas of the scene layer: removing content inside of the specified polygon (referred to as disjoint) or keeping the content inside of the specified polygons (referred to as contains). For one spatial filter, you can specify multiple polygons by adding them to an ArcGIS.
The ArcGIS identifies 3D objects inside or outside of the provided polygons to remove them from the ArcGIS Map. Any 3D objects that are on the polygon geometry outlines will be removed in both filter types.
Once the 3D objects are removed by the spatial filter, any data associated with the removed 3D objects is not accessible from Unreal Engine.
| Illustration | Modification | Description |
|---|---|---|
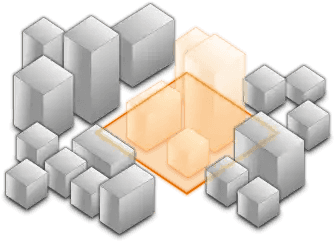
| disjoint - removes the selected area | Remove portions of the scene layer; set a polygon on your scene and do not draw objects inside that polygon. You can use the removed polygon to add another layer that shows new development in that part of the city. |
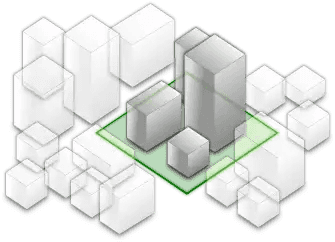
| contains - displays only the selected area | Define an area of interest; set a polygon and draw the scene layer only within that polygon. For example, to show only the portion of a scene layer that is within the boundaries of a city. |
Polygons used to specify the area for spatial filtering; must have a spatial reference that matches the spatial reference of the layer. See the When you need to know about spatial references topics to find the spatial reference of your layers.
Apply spatial filter to layers
You can set one spatial filter type per 3D object scene layer or building scene layer from the Layers content.
Apply spatial filter to a layer
- Click the Layers tab.
- Click the triangle button on the left to expand the 3D object scene layer or the building scene layer registry and see the layer properties.
- On the Spatial Feature Filter raw, click the gear button to display the tool overlay in the Viewport.
- In the tool overlay, click the
 button.
 - Click in the Viewport to draw a polygon.
- Click the
 button.
 - Select the polygon by clicking the polygon lines or anywhere inside the polygon. (The line color will change to blue.)
- Click the Disjoint or Contains button to select the filter you want to apply.
Edit a spatial filter
To edit a spatial filter, open the tool overlay for the layer containing the filter.
- To display polygons for the elevation surface or an integrated mesh scene layer, open the tool overlay.
- To select a polygon, click the polygon lines or click inside of the polygon when the
button is selected in the tool. (The line color will change to blue.)
- To deselect a polygon, click outside of the polygon in the Viewport.
- To move a polygon, use the gizmo while the polygon is selected.
- To move the point position of a polygon, click a point and drag.
- To add points to a polygon, click the middle point of a line.
- To copy a polygon, click the
 button while the polygon is selected.
 - To paste a polygon, click the
 button after opening the tool overlay for the elevation surface or an integrated mesh scene layer.
 - To delete a polygon, click the
 button while the polygon is selected.
 - To change the filter type, click another button while the polygon is selected.
- To turn off the filter for a layer, uncheck the Spatial Feature Filter checkbox.