Learn how to implement user authentication to access a secure ArcGIS service with OAuth credentials.

You can use different types of authentication to access secured ArcGIS services. To implement OAuth credentials for user authentication, you can use your ArcGIS account to register an app with your portal and get a Client ID, and then configure your app to redirect users to login with their credentials when the service or content is accessed. This is known as user authentication. If the app uses premium ArcGIS Online services that consume credits, for example, the app user's account will be charged.
In this tutorial, you will build an app that implements user authentication using OAuth credentials so users can sign in and be authenticated through ArcGIS Online to access the ArcGIS World Traffic service.
Prerequisites
Before starting this tutorial, you need the following:
-
An ArcGIS Location Platform or ArcGIS Online account.
-
A development and deployment environment that meets the system requirements.
-
An IDE for Android development in Kotlin.
Steps
Create OAuth credentials for user authentication
OAuth credentials are required to implement user authentication. These credentials are created as an Application item in your organization's portal.
-
Go to the Create OAuth credentials for user authentication tutorial and create OAuth credentials using your ArcGIS Location Platform or ArcGIS Online account.
-
Copy the
Client IDandRedirect URLas you will use them to implement user authentication in the next step. TheClient IDis found on the Application item's Overview page, while theRedirect URLis found on the Settings page.
The Client ID uniquely identifies your app on the authenticating server. If the server cannot find an app with the provided Client ID, it will not proceed with authentication.
The Redirect URL is used to identify a response from the authenticating server when the system returns control back to your app after an OAuth login. You can configure several redirect URLs in your application definition and can remove or edit them. It's important to make sure the redirect URL used in your app's code matches a redirect URL configured for the application.
- The redirect URL consists of three parts:
- the scheme
- the separator string "://"
- the host
- Scheme: You are probably familiar with standard schemes used in internet URLs:
http,https,ftp, etc. In OAuth 2.0, you can create a private-use URI scheme (also known as custom URL scheme), which will only be used by the authorization server and your app. This is an arbitrary string whose allowed characters are declared in the Uniform Resource Locators (URL) Spec . Though not strictly required, making your scheme unique is a good practice. Some organization use the app ID or the reverse domain of their company (com.mycompany.appname) as the URL scheme. - Host: An arbitrary string occupying the host portion of the URL. It allows you to use the same URL scheme with different URL hosts.
Open an Android Studio project with Gradle
-
To start this tutorial, complete the Display a map tutorial, or download and unzip the Display a map solution in a new folder.
-
Modify the old project for use in this new tutorial.
-
On your file system, delete the .idea folder, if present, at the top level of your project.
-
In the Android view, open app > res > values > strings.xml.
In the
<string name="appelement, change the text content to Access services with OAuth 2.0._name" > strings.xmlUse dark colors for code blocks <resources> <string name="app_name">Access services with OAuth 2.0</string> <string name="oauth_client_id">YOUR_CLIENT_ID</string> <string name="oauth_redirect_uri_scheme">my-app</string> <string name="oauth_redirect_uri_host">auth</string> </resources> -
In the Android view, open Gradle Scripts > settings.gradle.kts.
Change the value of
rootto "Access services with OAuth 2.0".Project.name settings.gradle.ktsUse dark colors for code blocks dependencyResolutionManagement { repositoriesMode.set(RepositoriesMode.FAIL_ON_PROJECT_REPOS) repositories { google() mavenCentral() maven { url = uri("https://esri.jfrog.io/artifactory/arcgis") } } } rootProject.name = "Access services with OAuth 2.0" include(":app") -
The UI theme composable in Display a map tutorial was
Display. Rename the theme composable throughout the tutorial by refactoringA Map Theme Display.A Map Theme In the Android view, open app > kotlin+java > com.exmple.app > ui.theme > Theme.kt.
Right-click the function name
Displayand select Refactor -> Rename. Replace the name withA Map Theme Access.Services With O Auth Theme Theme.ktUse dark colors for code blocks Copy @Composable fun DisplayAMapTheme( darkTheme: Boolean = isSystemInDarkTheme(), // Dynamic color is available on Android 12+ dynamicColor: Boolean = true, content: @Composable () -> Unit ) { val colorScheme = when { dynamicColor && Build.VERSION.SDK_INT >= Build.VERSION_CODES.S -> { val context = LocalContext.current if (darkTheme) dynamicDarkColorScheme(context) else dynamicLightColorScheme(context) } darkTheme -> DarkColorScheme else -> LightColorScheme } -
Click File > Sync Project with Gradle files. Android Studio will recognize your changes and create a new .idea folder.
-
-
Delete the code that sets your API Key. Since your app will be using OAuth, you will not need an API Key.
MainActivity.ktUse dark colors for code blocks 12 13 14 15 16 18 19 20 21 22 23 24 25 26 27 28 34 35Remove line Remove line Remove line Remove line Remove line Remove line class MainActivity : ComponentActivity() { override fun onCreate(savedInstanceState: Bundle?) { super.onCreate(savedInstanceState) setApiKey() enableEdgeToEdge() setContent { DisplayAMapTheme { MainScreen() } } } private fun setApiKey() { ArcGISEnvironment.apiKey = ApiKey.create("YOUR_ACCESS_TOKEN") } }
Prepare files before coding the app
Modify the files from the Display a map tutorial for use in this tutorial: you will replace import statements, define strings for OAuth client ID, redirect URI scheme, redirect URI HTMLOListElement, and add an Android activity for OAuth user sign-in.
-
In the Android view, open Gradle Scripts > build.gradle.kts (Module: app) and add a dependency on the
authenticationcomponent defined in the ArcGIS Maps SDK for Kotlin Toolkit.build.gradle.kts (:app)Use dark colors for code blocks // ArcGIS Maps for Kotlin - SDK dependency implementation(libs.arcgis.maps.kotlin) // Toolkit dependencies implementation(platform(libs.arcgis.maps.kotlin.toolkit.bom)) implementation(libs.arcgis.maps.kotlin.toolkit.geoview.compose) // Additional modules from Toolkit, if needed, such as: implementation(libs.arcgis.maps.kotlin.toolkit.authentication) -
From the Android view, open Gradle Scripts > libs.versions.toml file and add the Authentication dependency. Note that the version is specified by the
arcgis-maps-kotlin-toolkit-bomdependency, which was already set in the Display a map tutorial on which the current tutorial is based.Gradle version catalogs are the standard Android approach to declaring dependency versions.
gradle/libs.versions.tomlUse dark colors for code blocks [libraries] arcgis-maps-kotlin = { group = "com.esri", name = "arcgis-maps-kotlin", version.ref = "arcgisMapsKotlin" } arcgis-maps-kotlin-toolkit-bom = { group = "com.esri", name = "arcgis-maps-kotlin-toolkit-bom", version.ref = "arcgisMapsKotlin" } arcgis-maps-kotlin-toolkit-geoview-compose = { group = "com.esri", name = "arcgis-maps-kotlin-toolkit-geoview-compose" } # Additional modules from Toolkit, if needed, such as: arcgis-maps-kotlin-toolkit-authentication = { group = "com.esri", name = "arcgis-maps-kotlin-toolkit-authentication" } -
Open app > kotlin+java > com.example.app > MainScreen.kt. Replace the import statements with the imports needed for this tutorial.
MainScreen.ktUse dark colors for code blocks @file:OptIn(ExperimentalMaterial3Api::class) package com.example.app.screens import androidx.compose.foundation.layout.fillMaxSize import androidx.compose.foundation.layout.padding import androidx.compose.material3.ExperimentalMaterial3Api import androidx.compose.material3.Scaffold import androidx.compose.material3.Text import androidx.compose.material3.TopAppBar import androidx.compose.runtime.Composable import androidx.compose.runtime.remember import androidx.compose.ui.Modifier import androidx.compose.ui.res.stringResource import com.arcgismaps.httpcore.authentication.OAuthUserConfiguration import com.arcgismaps.mapping.ArcGISMap import com.arcgismaps.mapping.BasemapStyle import com.arcgismaps.mapping.Viewpoint import com.arcgismaps.mapping.layers.ArcGISMapImageLayer import com.arcgismaps.toolkit.authentication.Authenticator import com.arcgismaps.toolkit.authentication.AuthenticatorState import com.arcgismaps.toolkit.geoviewcompose.MapView import com.example.app.R -
Open app > res > values > strings.xml. Enter certain values that you specified while creating your OAuth credentials Create OAuth credentials for user authentication above.
In string.xml define strings for the OAuth
Client IDand theRedirect URL. Values are not quoted.-
oauth_client_id: Replace the placeholder YOUR_CLIENT_ID with the
Client IDdefined for your app. -
oauth_redirect_uri_scheme: The scheme of the
Redirect URLthat you defined for your app. This value ismy-appif you followed the suggestions in Create OAuth credentials for user authentication. -
oauth_redirect_uri_host: The host of the
Redirect URLthat you defined for your app. This value isauthif you followed the suggestions in Create OAuth credentials for user authentication.
strings.xmlUse dark colors for code blocks <resources> <string name="app_name">Access services with OAuth 2.0</string> <string name="oauth_client_id">YOUR_CLIENT_ID</string> <string name="oauth_redirect_uri_scheme">my-app</string> <string name="oauth_redirect_uri_host">auth</string> </resources> -
-
Open app > manifests > AndroidManifest.xml. Add an
<activitytag that declares the OAuth user sign-in activity. Note the> <dataelement that references the Redirect URI scheme and host.> The
OAuthUserSignInActivityclass is an activity that launches a CustomTabs activity and receives the redirect intent that is sent when the user completes the CustomTabs prompt. For more information, see theREADMEfor theauthenticationcomponent in the ArcGIS Maps SDK for Kotlin Toolkit.AndroidManifest.xmlUse dark colors for code blocks <activity android:name="com.arcgismaps.toolkit.authentication.OAuthUserSignInActivity" android:configChanges="keyboard|keyboardHidden|orientation|screenSize" android:exported="true" android:launchMode="singleTop" > <intent-filter> <action android:name="android.intent.action.VIEW" /> <category android:name="android.intent.category.DEFAULT" /> <category android:name="android.intent.category.BROWSABLE" /> <data android:scheme="@string/oauth_redirect_uri_scheme" android:host="@string/oauth_redirect_uri_host" /> </intent-filter> </activity>
Implement user authentication using OAuth 2.0
The composable function Authenticator abstracts some details of OAuth 2.0 authentication in your app.
Calling AuthenticatorState requires that you pass an AuthenticatorState, which has an o property. Use your OAuth Client ID and Redirect URL to instantiate OAuthUserConfiguration.
The Authenticator composable displays an Authentication UI when an authentication challenge is issued. The Authenticator interface handles authentication challenges and exposes the state for the Authenticator to display to the user. Both are defined in the authentication component of the ArcGIS Maps SDK for Kotlin Toolkit.
For more information, go to the ArcGIS Maps SDK for Kotlin Toolkit. Consult the README for the authentication component, and examine the source code for Authenticator and Authenticator.
-
Create
o,Auth Client Id o, andAuth Redirect Uri Scheme ovariables, using string resources defined inAuth Redirect Uri Host strings.xml.MainScreen.ktUse dark colors for code blocks @Composable fun MainScreen() { val oAuthClientId = stringResource(id = R.string.oauth_client_id) val oAuthRedirectUriScheme = stringResource(id = R.string.oauth_redirect_uri_scheme) val oAuthRedirectUriHost = stringResource(id = R.string.oauth_redirect_uri_host) val map = remember { createMap() } Scaffold( topBar = { TopAppBar(title = { Text(text = stringResource(id = R.string.app_name)) }) } ) { MapView( modifier = Modifier.fillMaxSize().padding(it), arcGISMap = map ) } } -
Create a variable named
othat is initialized as the string concatenation of theAuth Redirect Uri Redirect URLscheme, the separator://, and theRedirect URLhost.MainScreen.ktUse dark colors for code blocks @Composable fun MainScreen() { val oAuthClientId = stringResource(id = R.string.oauth_client_id) val oAuthRedirectUriScheme = stringResource(id = R.string.oauth_redirect_uri_scheme) val oAuthRedirectUriHost = stringResource(id = R.string.oauth_redirect_uri_host) val oAuthRedirectUri = oAuthRedirectUriScheme + "://" + oAuthRedirectUriHost val map = remember { createMap() } Scaffold( topBar = { TopAppBar(title = { Text(text = stringResource(id = R.string.app_name)) }) } ) { MapView( modifier = Modifier.fillMaxSize().padding(it), arcGISMap = map ) } } -
Inside a
rememberblock, create an instance ofAuthenticatorState, which is from theauthenticationcomponent of ArcGIS Maps SDK for Kotlin Toolkit. Then set theoproperty by instantiatingAuth User Configuration OAuthUserConfigurationand passingportal,Url client, andId redirect. Last, assign theURL remember { }call to a local variable namedauthenticator.State MainScreen.ktUse dark colors for code blocks @Composable fun MainScreen() { val oAuthClientId = stringResource(id = R.string.oauth_client_id) val oAuthRedirectUriScheme = stringResource(id = R.string.oauth_redirect_uri_scheme) val oAuthRedirectUriHost = stringResource(id = R.string.oauth_redirect_uri_host) val oAuthRedirectUri = oAuthRedirectUriScheme + "://" + oAuthRedirectUriHost val authenticatorState = remember { AuthenticatorState().apply { oAuthUserConfiguration = OAuthUserConfiguration( portalUrl = "https://www.arcgis.com", clientId = oAuthClientId, redirectUrl = oAuthRedirectUri ) } } val map = remember { createMap() } Scaffold( topBar = { TopAppBar(title = { Text(text = stringResource(id = R.string.app_name)) }) } ) { MapView( modifier = Modifier.fillMaxSize().padding(it), arcGISMap = map ) } } -
Call the
Authenticatorcomposable, passingauthenticator. TheState Authenticatorcomposable function should be called from the root level of your UI, typically from youMain, to ensure that authentication prompts always appear on top of any other UI of your application.Screen MainScreen.ktUse dark colors for code blocks @Composable fun MainScreen() { val oAuthClientId = stringResource(id = R.string.oauth_client_id) val oAuthRedirectUriScheme = stringResource(id = R.string.oauth_redirect_uri_scheme) val oAuthRedirectUriHost = stringResource(id = R.string.oauth_redirect_uri_host) val oAuthRedirectUri = oAuthRedirectUriScheme + "://" + oAuthRedirectUriHost val authenticatorState = remember { AuthenticatorState().apply { oAuthUserConfiguration = OAuthUserConfiguration( portalUrl = "https://www.arcgis.com", clientId = oAuthClientId, redirectUrl = oAuthRedirectUri ) } } val map = remember { createMap() } Scaffold( topBar = { TopAppBar(title = { Text(text = stringResource(id = R.string.app_name)) }) } ) { MapView( modifier = Modifier.fillMaxSize().padding(it), arcGISMap = map ) } Authenticator(authenticatorState = authenticatorState) }
Add a traffic layer
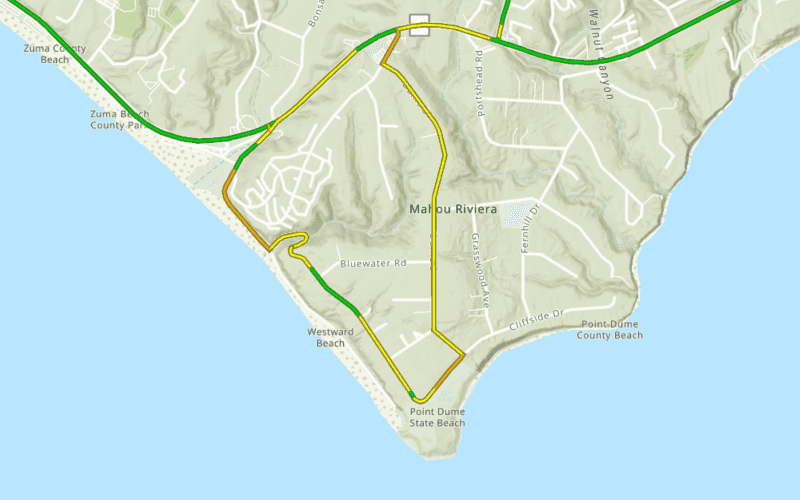
You will add a layer to display the ArcGIS World Traffic service, a dynamic map service that presents historical and near real-time traffic information for different regions in the world. This is a secure service and requires an ArcGIS Online organizational subscription.
ArcGIS World Traffic service data is updated every five minutes to provide traffic speed and traffic incident visualization and identification.
Traffic speeds are displayed as a percentage of free-flow speeds, which is frequently the speed limit or how fast cars tend to travel when unencumbered by other vehicles. The streets are color coded as follows:
- Green (fast): 85 - 100% of free flow speeds
- Yellow (moderate): 65 - 85%
- Orange (slow); 45 - 65%
- Red (stop and go): 0 - 45%
-
Create an
ArcGISMapImageLayerto display the traffic service.MainScreen.ktUse dark colors for code blocks fun createMap(): ArcGISMap { // Create a layer to display the ArcGIS World Traffic service val trafficLayer = ArcGISMapImageLayer("https://traffic.arcgis.com/arcgis/rest/services/World/Traffic/MapServer") return ArcGISMap(BasemapStyle.ArcGISTopographic).apply { initialViewpoint = Viewpoint( latitude = 34.02700, longitude = -118.80543, scale = 72000.0 ) operationalLayers.add(trafficLayer) } } -
Add the layer to the map's collection of data layers (operational layers).
MainScreen.ktUse dark colors for code blocks fun createMap(): ArcGISMap { // Create a layer to display the ArcGIS World Traffic service val trafficLayer = ArcGISMapImageLayer("https://traffic.arcgis.com/arcgis/rest/services/World/Traffic/MapServer") return ArcGISMap(BasemapStyle.ArcGISTopographic).apply { initialViewpoint = Viewpoint( latitude = 34.02700, longitude = -118.80543, scale = 72000.0 ) operationalLayers.add(trafficLayer) } } -
Click Run > Run > app to run the app.
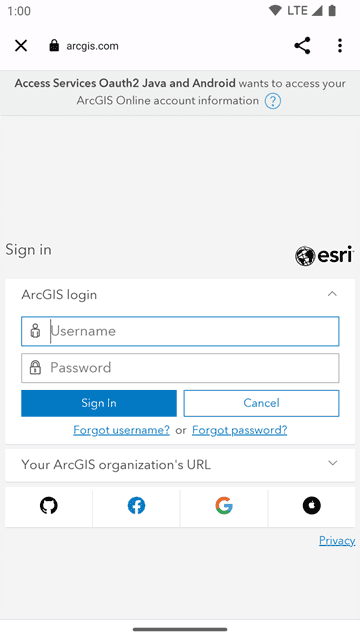
When running your app, you will be prompted for username and password in an Android Custom Tab.
After successfully logging in with your ArcGIS Online credentials, you should see the map with the topographic basemap layer centered on the Santa Monica Mountains in California. You will also see the traffic layer, with its symbology of green, yellow, orange, and red roads to indicate current traffic flow. This is a secured layer, which is visible in your app because the user has entered valid ArcGIS Online username and password.