Create a new layout widget
This topic explains how to create a new header widget to brand the app with the following information:
- Logo
- Main title
- Subtitle
- Links
Create a new layout widget folder structure
- Open the DemoTheme folder from ~/client/stemapp/themes.
- Create a new folder and name it widgets if a widgets folder does not already exist.
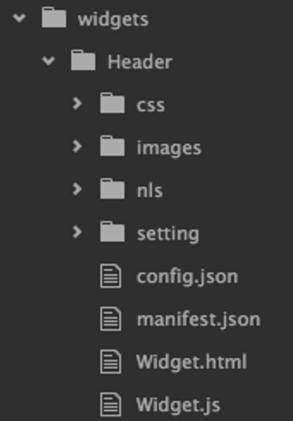
- Copy the Demo folder from ~/client/stemapp/widgets/samplewidgets to the new widgets folder and rename it Header. The widgets folder should similar to the following:

Note:
The Demo folder provides all the required files and folders to create a custom widget.
- Update the general information for the widget, such as its name and label in the manifest.json and nls/string.js files as needed.
- In the manifest.json file, add the following properties to inform Web AppBuilder that this is a layout widget:
"properties": {
    "inPanel": false,

    "isThemeWidget": true
  }
Add Header widget to the default layout
- Open the config.json file from the ~/client/stemapp/themes/DemoTheme/layouts/default folder.
- Add the following configuration to the widgets array in the widgetOnScreen section:
{
  "uri": "themes/DemoTheme/widgets/Header/Widget",
  "position": {
    "left": 0,
    "top": 0,
    "right": 0,
    "height": 50,
    "relativeTo": "browser"
  }
}
The Header is placed at the top of the screen with a height of 50 pixels and a width of 100 percent of the browser window.
- Change the top property of the map to 50 to make space for the Header widget.
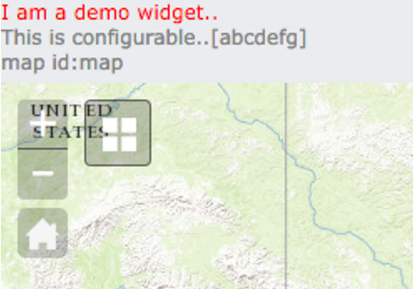
"map": { "position": { "left": 50, "top": 50, "right": 0, "bottom": 0 } }, - Reload the Web AppBuilder app, and choose the Demo theme. The Header widget is added as shown below.

Note:
The Header widget still displays the sample content from the Demo widget, and there are no styles added yet.
Customize the header template
The widget.html file contains the HTML structure of the widget. In this section, you'll remove the sample HTML elements from the Demo widget and add new elements or logos, titles, and links.
- Open the widget.html file in the Header folder and replace the content with the following:
<div>
	<div class="jimu-widget-header-inner">
		<div class="logo" data-dojo-attach-point="logoWrapperNode">
			<img data-dojo-attach-point="logoNode">
		</div>
		<div class="titles jimu-leading-margin1" data-dojo-attach-point="titlesNode">
			<div class="jimu-title" data-dojo-attach-point="titleNode"></div>
			<div class="jimu-subtitle jimu-leading-margin2" data-dojo-attach-point="subtitleNode"></div>
		</div>
		<div class="links" data-dojo-attach-point="linksNode">
		</div>
	</div>
</div>
Note:
Class names such as jimu-title and jimu-leading-margin1 are predefined in the Jimu’s CSS framework.
Customize the header widget
The widget.js file contains the basic widget life cycle methods such as postCreate and startup, and event handlers such as onSignIn and onSignOut.
- Set the widget’s base class name or names.
Find the baseClass property and change its name to jimu-widget-header. This class name will help target the header widget when you define the CSS styles for it. Add another class called jimu-main-background from the Jimu CSS framework to help create multiple styles.
baseClass: 'jimu-widget-header jimu-main-background', - Remove unused event handlers.
Remove the following event handlers since they don't apply to the Header widget:
- onOpen
- onClose
- onMinimize
- onMaximize
- onSignIn
- onSignOut
- Remove unused sample code.
Remove the following code from the startup method:
this.mapIdNode.innerHTML = 'map id:' + this.map.id; - Open Web AppBuilder, create a new app, and choose the Demo theme.
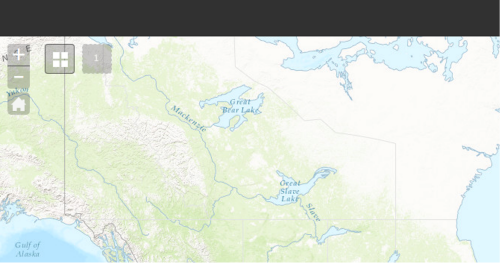
The header displays as a bar at the top of the screen with no content.

- Read the app’s config file, and populate the logo, titles, and links.
- Create a simple method called _initUI to populate the UI for the Header widget by reading properties from the app’s config file.
_initUI: function(appConfig) { // set logo if (appConfig.logo) { this.logoNode.src = appConfig.logo; this.logoNode.alt = appConfig.logo; } else { this.logoNode.style.display = 'none'; } // set title if(appConfig.title) { this.titleNode.innerHTML = appConfig.title; } // set subtitle if(appConfig.subtitle) { this.subtitleNode.innerHTML = appConfig.subtitle; } // add links if(appConfig.links && appConfig.links.length) { for(var i = 0; i < appConfig.links.length; i++) { var linkConfig = appConfig.links[i]; var linkNode = document.createElement('a'); linkNode.innerHTML = linkConfig.label; linkNode.className = 'jimu-link'; linkNode.href = linkConfig.url; this.linksNode.appendChild(linkNode); } } } - In the postCreate method, get the app’s configuration by calling this.appConfig, which is inherited from the jimu/BaseWidget class, and pass it in as a parameter in this._initU.
if(this.appConfig) {
  this._initUI(this.appConfig);
}
- Create a simple method called _initUI to populate the UI for the Header widget by reading properties from the app’s config file.
Add CSS styles
- Open the style.css file from ~/client/stemapp/themes/DemoTheme/widgets/Header/css.
- Add the following styles to align elements in the Header widget property:
.jimu-widget-header-inner { display: table; width: 100%; height: 100%; } .jimu-widget-header-inner > * { display: table-cell; vertical-align: middle; } .jimu-widget-header .logo { width: 50px; padding: 0 10px; } .jimu-widget-header .logo img { max-width: 30px; vertical-align: middle; } .jimu-widget-header .titles { width: 100%; } .jimu-widget-header .jimu-title, .jimu-widget-header .jimu-subtitle { display: inline; } .jimu-widget-header .jimu-link { padding: 10px; } - Open Web AppBuilder, create a new app, choose the Demo theme, and add a few links as shown below.

Add the onAppConfigChanged event handler
The onAppConfigChanged method from the jimu/BaseWidget class handles the event when an app’s configuration has been changed. It enables the app in the preview section to reflect the configuration changes dynamically.
- Add onAppConfigChanged as a new method in the widget.js file.
onAppConfigChanged: function(appConfig, reason, changedData) {
},
The following parameters are passed in the method:
- appConfig—The updated appConfig
- reason—Either attributeChange or widgetChange
- changedData—Details about the updated data
- Check the reason parameter. If it's attributeChange, update the logo and titles, and re-create the links.
onAppConfigChanged: function(appConfig, reason, changedData) { if (reason && reason === 'attributeChange') { // update logo if ('logo' in changedData && changedData.logo !== this.appConfig.logo) { if (changedData.logo) { this.logoNode.src = appConfig.logo; this.logoNode.alt = appConfig.logo; this.logoNode.style.display = ''; } else { this.logoNode.removeAttribute('src'); this.logoNode.removeAttribute('alt'); this.logoNode.style.display = 'none'; } } // update title if ('title' in changedData && changedData.title !== this.appConfig.title) { this.titleNode.innerHTML = changedData.title; } // update subtitle if ('subtitle' in changedData && changedData.subtitle !== this.appConfig.subtitle) { this.subtitleNode.innerHTML = changedData.subtitle; } // recreate links if ('links' in changedData) { this.linksNode.innerHTML = ''; if(changedData.links.length) { for (var i = 0; i < changedData.links.length; i++) { var linkConfig = changedData.links[i]; var linkNode = document.createElement('a'); linkNode.innerHTML = linkConfig.label; linkNode.className = 'jimu-link'; linkNode.href = linkConfig.url; this.linksNode.appendChild(linkNode); } } } } this.appConfig = appConfig; } - Open Web AppBuilder and choose a different logo, update the titles, or add or remove a link.
The preview app reflects the changes dynamically.