Create a custom in-panel widget
This tutorial walks you through the steps to create a basic custom widget. All required folders and files are included in the CustomWidgetTemplate folder so you can focus on writing the code.
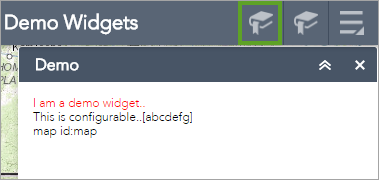
To preview the final result of the custom widget, type http://[your host]/webappviewer/?config=sample-configs/config-demo.json in the browser. When the app starts, click the first icon (shown below highlighted in a green square).

-
Rename the CustomWidgetTemplate folder.
- Go to the \\widgets\samplewidgets folder.
- Make a copy of the CustomWidgetTemplate folder in the same directory.
- Rename the copied folder MyWidget.

- Open Widget.js in the MyWidget folder and set the baseClass name to jimu-widget-mywidget.
- Define the widget's UI.
The widget's UI is defined in an HTML template.
- Open the Widget.html file.
- Copy and paste the following code into the Widget.html file:
<div> <div>This is my widget.</div> </div> - Save the file.
- Add the widget to the app configuration file.
- Open the config-demo.json file in the stemapp/sample-configs folder.
- Find widgetPool > widgets and add a new widget element using the following code:
{ "label": "MyWidget", "uri": "widgets/samplewidgets/MyWidget/Widget" } - Save the file.
- To test the widget, start the app through http://[your host name:3344]/webappviewer/?config=sample-configs/config-demo.json and click the icon.
The widget appears similar to the following:

- Make the widget configurable.
- Open the config.json file in the MyWidget folder.
- Add the following JSON-structured text to pass the
config to the widget:
{ "configText":"abcdefg" } - Open the Widget.html file and replace the contents with the following:
<div> <div>This is my widget.</div> <div>This is configurable.[${config.configText}]</div> </div> - Start the same app again and click the icon.
Now the widget looks like the following. The ${config.configText} marker in the template is automatically substituted with the values in the config.json file.

- Make the widget user-friendly.
On the HTML page, a CSS file is used to lay out the page, making it user-friendly.
- Open the css/style.css file in the MyWidget folder and add the following code:
.jimu-widget-mywidget div:first-child{ color: red; } - Start the same app again and click the icon.
The widget now resembles the following:
http://[your host name:3344]/webappviewer/?config=sample-configs/config-demo.json

- Open the css/style.css file in the MyWidget folder and add the following code:
- Access a map.
- Open the Widget.js file, comment out the startup function, and replace it with the following lines of code:
The widget's map property is a type of esri.map from ArcGIS API for JavaScript, which can be retrieved through this.map in the startup function.
startup: function() { this.inherited(arguments); this.mapIdNode.innerHTML = 'map id is:' + this.map.id; }, - Modify the Widget.html template to display the map ID property.
<div> <div>This is my widget</div> <div>This is configurable.[${config.configText}]</div> <div data-dojo-attach-point="mapIdNode"></div> </div> - Restart the app and click the icon.
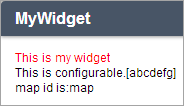
The widget now resembles the following:
http://[your host name:3344]/webappviewer/?config=sample-configs/config-demo.json

If you don't want to localize the widget, proceed to step 10.
- Open the Widget.js file, comment out the startup function, and replace it with the following lines of code:
- Add i18n support.
Currently, the widget contains two English strings: "This is my widget" and "This is configurable". Using the Chinese language as an example to localize the UI, the following steps are needed:
- Open the nls/strings.js file in the MyWidget folder.
Replace the contents with the following lines:
define({ root:{ label1: "This is my widget.", label2: "This is configurable." }, "zh-cn": true }); - Create a subfolder named zh-cn under the nls folder.

- Copy the nls/strings.js file into the zh-cn folder.
- Open the zh-cn/strings.js file and replace the contents with the following lines:
define({ label1 : "我的widget。", label2 : "这里可以配置。" }); - Save the file.
- Open the Widget.html file and replace the hard-coded English strings with markers.
<div> <div>${nls.label1}</div> <div>${nls.label2}[${config.configText}]</div> <div data-dojo-attach-point="mapIdNode"></div> </div> - Save the file.
- Reload the app, and change the browser's locale configuration to view the changes.http://[your host name]:3344/webappviewer/?config=sample-configs/config-demo.json
- Open the nls/strings.js file in the MyWidget folder.
- Deploy the widget.
- Open the manifest.json file in the MyWidget folder and change the properties accordingly, such as widget type, name, locale, and so on. See Widget manifest for more information.
- Copy the MyWidget folder into the \stemapp\widgets folder.
- Restart node.js and go to http://[your host name:3344]/webappbuilder.
You will see MyWidget in the widget pool when you click Click here to add widget in the builder.
Note:
The custom widget should always deploy to the stemapp\widgets folder.
Note:
mywidget is the custom widget name.
define(['dojo/_base/declare', 'jimu/BaseWidget'],
function(declare, BaseWidget) {
  //To create a widget, you need to derive from BaseWidget.
  return declare([BaseWidget], {
    // Custom widget code goes here
    baseClass: 'jimu-widget-mywidget'
  });
});
Caution:
If you add other properties after the line baseClass: 'jimu-widget-mywidget', you must add a comma at the end of this line.