Filter widget
(Added at v2.1)
The Filter widget allows you to limit the visibility of features in a layer. Only the features that meet the expression criteria will be visible in the map. Accordingly, other out-of-the-box widgets, if applicable, will respond to the change it makes in the layer.
Configure the Filter widget
This widget can be set to open automatically when
an app starts. Hover over the widget and click the Do not open this widget when
the app starts button  to change the setting to Open this widget automatically when the app starts. (For widgets that you need to add to the app first, you can turn on this option after configuring the widget.)
- Hover over the widget and click the Configure this widget button
 to open the configuration window.
Note:
If you need to add the widget to the app first, click a widget placeholder on the Widget tab. In the Choose Widget window that opens, select the widget and click OK.
- Optionally click Change widget icon and replace it with an image of your own.
A file explorer window appears, allowing you to select a local image file to use as the widget icon.
- Click + New filter and select a layer from the Layer list.
- On the Info tab, for Label, provide a name for the filter.
- Optionally change the default icon for the filter. Choose from several symbol categories or select Custom image and browse to your local images.
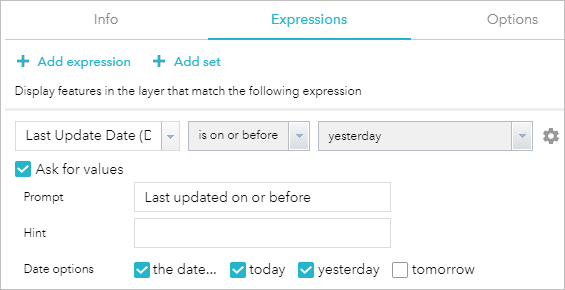
- On the Expressions tab, click + Add expression.
A filter uses logical expressions to find and display features in a layer based on attribute values in its data. Expressions use the general form of <Field name> <condition> <Value or Field>. For example, Shelter capacity is greater than 200.
- From the field name list, choose the field by which to filter the layer.
- Choose an appropriate condition from the next list.
Note:
- The is any of and is none of conditions accept multiple field values as input. Your expression can get data that matches any or none of the selected values, respectively.
- Certain date-related conditions, such as in the last and not in the last, are only available for online-hosted feature services. Date-related conditions can support relative dates, such as in the last five days.
- Complete the expression by specifying a value or field applicable to your filter criteria. Click the Set input type button
 and choose one of the available options listed below.
Tip:
For options that provide a list of all the attribute values, you can type a term in the search box to reduce the list and help you find a value if there are several.
- Value—Filter based on field values by typing or choosing a value relevant to the data. Date-related values can include relative dates, such as today, yesterday, and tomorrow.
- Field—Filter based on comparing the value in one field to the value in another field.
- Unique—Filter based on a field value by choosing from a list of valid attribute values for the selected field.
Caution:
Unique value filters require a 10.1 or later map service layer. The Unique option does not appear if you are creating a filter on a 10.0 or earlier service layer.
- Unique (predefined)—Filter based on a value that users can choose from a static list that you define. By default, Ask for values is checked and the list is set to show values based on the previous expressions.
- Multiple—Filter based on multiple field values by choosing from a list of valid attribute values for the selected field. Check all the values you want to include in the expression. This option is only supported by the is any of and is none of conditions.
- Multiple (predefined)—Filter based on multiple values that users can select in a static list that you define. By default, Ask for values is checked and the list is set to show values based on the previous expressions.
If applicable to the data, when you choose the date for a date field value, you can also select time by checking Show time. You must choose a date before setting the time. You can filter by time accuracy at the hour, minute, or second level. For example, if you preset Hour and Minute values and leave Second blank, users won't be able to filter based on seconds, even if the layer's attributes include second values.
Note:
If you check the Show Time box but leave all three boxes blank for hour, minute, and second, users won't see the option to specify time as an input value for interactive filters.
- If you created an expression using the Value or Unique input types, optionally check the Ask for values box to set up an interactive filter for users to input values for the filter. (This option is set by default for the predefined input types.)
With this option, you can provide a default value for the filter or leave it blank, and users choose from a list of values or type their own.
- For Prompt, clarify the expression, if necessary.
- For Hint, provide a helpful instruction for the user.
- If applicable, for Date options, turn off the date values that don't make sense for your data. For example, it would be illogical to include tomorrow as an option for filtering a layer that shows crime incidents. You can't turn off a value here if it's selected in your expression.

- If applicable, for List values, choose to show all unique values, values based on the previous expressions, or values based on all other expressions regardless of their order.
Caution:
If your filter asks for input values and has one of the following list settings, the service must support the capability of query by statistics to display descriptions for coded values: Values filtered by previous expressions or Values filtered by all other expressions.
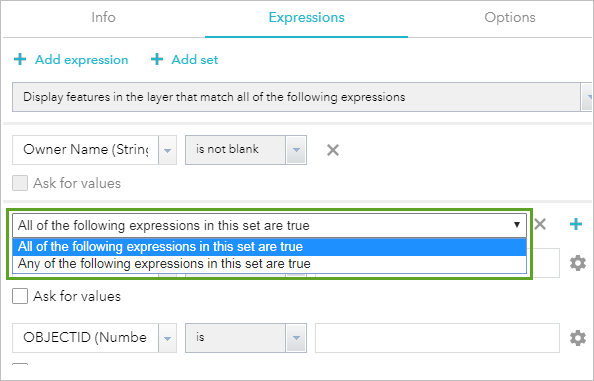
- To create multiple expressions, click + Add expression. Above the expressions, you have the option to display features in the layer that match all or any of the expressions.
- To create one or more sets of expressions, click + Add set. At the top of the new set, choose whether all or any of the expressions in this set should be true when filtering the layer.
A set is a grouping of expressions, for example, Shelter capacity is greater than 200 and Status is open.

- On the Options tab, enable any of the following settings:
- Remove the preset layer filter from the map—Prevents filters defined in the map from being applied in your app.
- Apply this filter when the widget is opened—Immediately applies the filter when users open the widget.
- Collapse the filter expression (if any) when the widget is opened—Requires that users expand interactive expressions for filters that allow input values.
- To add another filter, repeat these steps. If you add multiple filters, you have the option to display features that match any or all of the filters. To move filters up or down, point to a filter in the list and click the arrow buttons.
- Optionally select Group filter by layer to sort the filters by the layer they impact.
- To zoom to the extent of the features displayed in the map after the filters are applied, check Zoom to the remaining features when the layer's filter is applied.
- To zoom to the app's initial map extent when users turn off all the filters, check Zoom to the initial map extent when layer's filters are all off. (You set the app's initial map extent on the Map tab.)
- Include additional buttons in the Filter widget by choosing from the following options:
- Enable custom filter—Users can create an additional filter by building their own expressions.
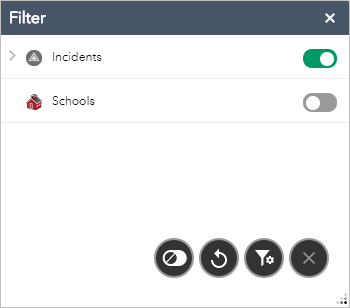
- Enable reset filters (except custom)—Users can reset the Filter widget to the app's default settings.
- Enable turn off filters (except custom)—Users can turn off the app's filters all at once.
- Click OK to save and close the configuration.
Use the Filter widget
You can apply multiple filters simultaneously or apply an individual filter to the map.
- Click the Filter button to open the widget.
- Click a filter to turn it on and limit features that appear on the map. Some filters may be turned on by default.
- If the app was configured to allow modifying the filter, type a value or choose values from a list. (You can click the arrow next to the filter to show or hide the input values.)
Note:
When filtering date field attributes, if the time picker is configured, you can choose preset time values or modify them by typing in the box. - If available in the app, click one of the following buttons. (You may need to click the Filter actions button to see these buttons if the app has more than one.)

- Create a custom filter—Define your own filter to find and display features in the layer based on attribute values in its data. Choose a layer, click Add expression or Add set, and build an expression.
Note:
Custom filters don't support filtering time-specific attributes.
- Reset filters (except custom)—Reset the Filter widget to the app's default settings. If you created a custom filter, it will remain unchanged.
- Turn off filters (except custom)—Turn off the app's filters and zoom to the initial map extent. If you turned on a custom filter, it will remain on. Click the Create a custom filter button and turn off your custom filter separately.
- Create a custom filter—Define your own filter to find and display features in the layer based on attribute values in its data. Choose a layer, click Add expression or Add set, and build an expression.