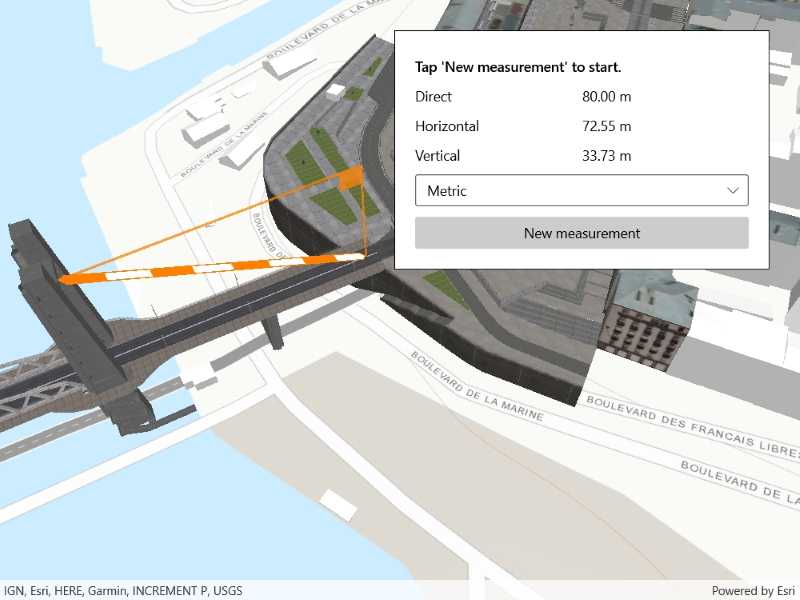
Measure distances between two points in 3D.

Use case
The distance measurement analysis allows you to add to your app the same interactive measuring experience found in ArcGIS Pro, City Engine, and the ArcGIS API for JavaScript. You can set the unit system of measurement (metric or imperial). The units automatically switch to one appropriate for the current scale.
How to use the sample
Choose a unit system for the measurement. Click any location in the scene to start measuring. Move the mouse to an end location, and click to complete the measurement. Click a new location to clear and start a new measurement.
How it works
- Create an
AnalysisOverlayobject and add it to the analysis overlay collection of theSceneViewobject. - Specify the start location and end location to create a
LocationDistanceMeasurementobject. Initially, the start and end locations can be the same point. - Add the location distance measurement analysis to the analysis overlay.
- The
MeasurementChangedevent will be raised if the distances change. You can get the new values for theDirectDistance,HorizontalDistance, andVerticalDistancefrom the event arguments.
Relevant API
- AnalysisOverlay
- LocationDistanceMeasurement
- LocationDistanceMeasurement.MeasurementChanged
Additional information
The LocationDistanceMeasurement analysis only performs planar distance calculations. This may not be appropriate for large distances where the Earth's curvature must be considered.
Tags
3D, analysis, distance, measure
Sample Code
<UserControl
x:Class="ArcGIS.UWP.Samples.DistanceMeasurement.DistanceMeasurement"
xmlns="http://schemas.microsoft.com/winfx/2006/xaml/presentation"
xmlns:x="http://schemas.microsoft.com/winfx/2006/xaml"
xmlns:esriUI="using:Esri.ArcGISRuntime.UI.Controls">
<UserControl.Resources>
<Style TargetType="TextBlock">
<Setter Property="Margin" Value="0,5,0,5" />
<Setter Property="VerticalAlignment" Value="Center" />
</Style>
</UserControl.Resources>
<Grid>
<esriUI:SceneView x:Name="MySceneView" />
<Border Style="{StaticResource BorderStyle}">
<Grid>
<Grid.RowDefinitions>
<RowDefinition Height="Auto" />
<RowDefinition Height="Auto" />
<RowDefinition Height="Auto" />
<RowDefinition Height="Auto" />
<RowDefinition Height="Auto" />
<RowDefinition Height="Auto" />
</Grid.RowDefinitions>
<Grid.ColumnDefinitions>
<ColumnDefinition Width="*" />
<ColumnDefinition Width="*" />
</Grid.ColumnDefinitions>
<!-- Labels -->
<TextBlock x:Name="HelpTextBlock"
TextWrapping="WrapWholeWords"
FontWeight="SemiBold"
Text="Tap 'New measurement' to start."
Grid.Row="0" Grid.Column="0" Grid.ColumnSpan="2" />
<TextBlock Text="Direct"
Grid.Row="1" Grid.Column="0" />
<TextBlock Text="Horizontal"
Grid.Row="2" Grid.Column="0" />
<TextBlock Text="Vertical"
Grid.Row="3" Grid.Column="0" />
<!-- Controls -->
<TextBlock x:Name="DirectMeasureTextBlock"
Grid.Row="1" Grid.Column="1" />
<TextBlock x:Name="HorizontalMeasureTextBlock"
Grid.Row="2" Grid.Column="1" />
<TextBlock x:Name="VerticalMeasureTextBlock"
Grid.Row="3" Grid.Column="1" />
<ComboBox x:Name="UnitSystemCombo"
Grid.Row="4" Grid.Column="0" Grid.ColumnSpan="2"
HorizontalAlignment="Stretch"
Margin="0,5,0,5" />
<Button x:Name="NewMeasureButton"
Content="New measurement"
IsEnabled="False"
Grid.Row="5" Grid.Column="0" Grid.ColumnSpan="2"
HorizontalAlignment="Stretch"
Margin="0,5,0,0"
Click="NewMeasureButton_OnClick" />
</Grid>
</Border>
</Grid>
</UserControl>